This is the full developer documentation for Hono.
# Start of Hono documentation
# Hono
Hono - _**means flame🔥 in Japanese**_ - is a small, simple, and ultrafast web framework built on Web Standards.
It works on any JavaScript runtime: Cloudflare Workers, Fastly Compute, Deno, Bun, Vercel, Netlify, AWS Lambda, Lambda@Edge, and Node.js.
Fast, but not only fast.
```ts twoslash
import { Hono } from 'hono'
const app = new Hono()
app.get('/', (c) => c.text('Hono!'))
export default app
```
## Quick Start
Just run this:
::: code-group
```sh [npm]
npm create hono@latest
```
```sh [yarn]
yarn create hono
```
```sh [pnpm]
pnpm create hono@latest
```
```sh [bun]
bun create hono@latest
```
```sh [deno]
deno init --npm hono@latest
```
:::
## Features
- **Ultrafast** 🚀 - The router `RegExpRouter` is really fast. Not using linear loops. Fast.
- **Lightweight** 🪶 - The `hono/tiny` preset is under 14kB. Hono has zero dependencies and uses only the Web Standards.
- **Multi-runtime** 🌍 - Works on Cloudflare Workers, Fastly Compute, Deno, Bun, AWS Lambda, or Node.js. The same code runs on all platforms.
- **Batteries Included** 🔋 - Hono has built-in middleware, custom middleware, third-party middleware, and helpers. Batteries included.
- **Delightful DX** 😃 - Super clean APIs. First-class TypeScript support. Now, we've got "Types".
## Use-cases
Hono is a simple web application framework similar to Express, without a frontend.
But it runs on CDN Edges and allows you to construct larger applications when combined with middleware.
Here are some examples of use-cases.
- Building Web APIs
- Proxy of backend servers
- Front of CDN
- Edge application
- Base server for a library
- Full-stack application
## Who is using Hono?
| Project | Platform | What for? |
| ---------------------------------------------------------------------------------- | ------------------ | ----------------------------------------------------------------------------------------------------------- |
| [cdnjs](https://cdnjs.com) | Cloudflare Workers | A free and open-source CDN service. _Hono is used for the API server_. |
| [Cloudflare D1](https://www.cloudflare.com/developer-platform/d1/) | Cloudflare Workers | Serverless SQL databases. _Hono is used for the internal API server_. |
| [Cloudflare Workers KV](https://www.cloudflare.com/developer-platform/workers-kv/) | Cloudflare Workers | Serverless key-value database. _Hono is used for the internal API server_. |
| [BaseAI](https://baseai.dev) | Local AI Server | Serverless AI agent pipes with memory. An open-source agentic AI framework for web. _API server with Hono_. |
| [Unkey](https://unkey.dev) | Cloudflare Workers | An open-source API authentication and authorization. _Hono is used for the API server_. |
| [OpenStatus](https://openstatus.dev) | Bun | An open-source website & API monitoring platform. _Hono is used for the API server_. |
| [Deno Benchmarks](https://deno.com/benchmarks) | Deno | A secure TypeScript runtime built on V8. _Hono is used for benchmarking_. |
| [Clerk](https://clerk.com) | Cloudflare Workers | An open-source User Management Platform. _Hono is used for the API server_. |
And the following.
- [Drivly](https://driv.ly/) - Cloudflare Workers
- [repeat.dev](https://repeat.dev/) - Cloudflare Workers
Do you want to see more? See [Who is using Hono in production?](https://github.com/orgs/honojs/discussions/1510).
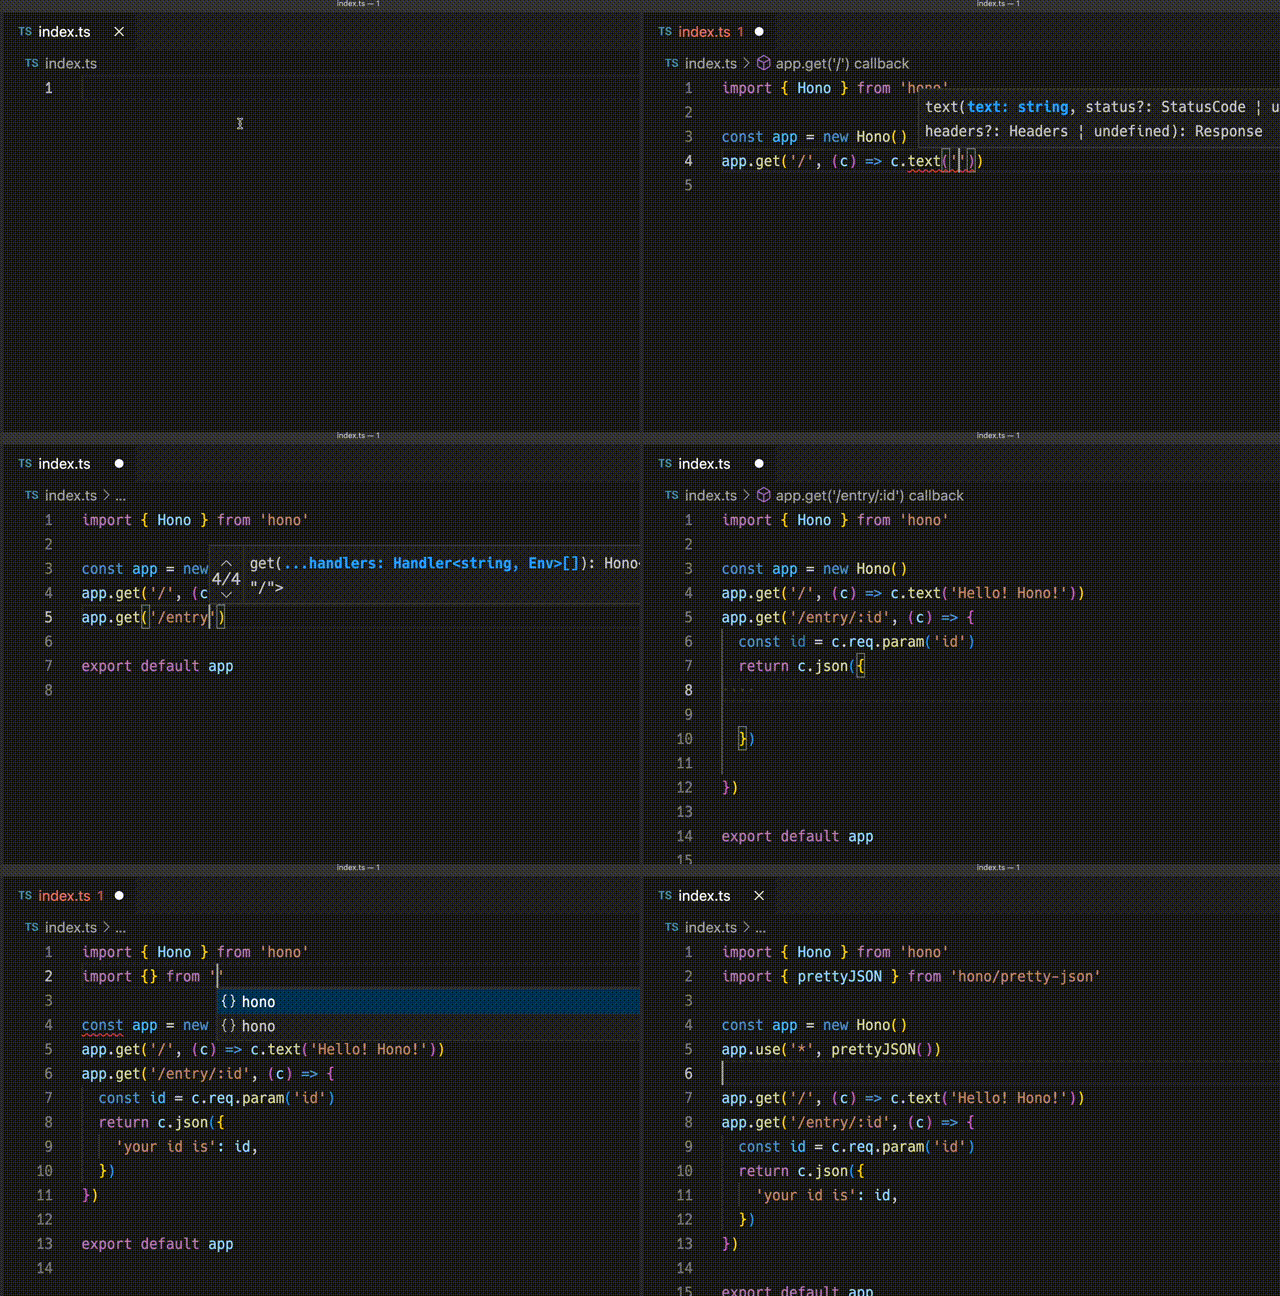
## Hono in 1 minute
A demonstration to create an application for Cloudflare Workers with Hono.
## Ultrafast
**Hono is the fastest**, compared to other routers for Cloudflare Workers.
```
Hono x 402,820 ops/sec ±4.78% (80 runs sampled)
itty-router x 212,598 ops/sec ±3.11% (87 runs sampled)
sunder x 297,036 ops/sec ±4.76% (77 runs sampled)
worktop x 197,345 ops/sec ±2.40% (88 runs sampled)
Fastest is Hono
✨ Done in 28.06s.
```
See [more benchmarks](/docs/concepts/benchmarks).
## Lightweight
**Hono is so small**. With the `hono/tiny` preset, its size is **under 14KB** when minified. There are many middleware and adapters, but they are bundled only when used. For context, the size of Express is 572KB.
```
$ npx wrangler dev --minify ./src/index.ts
⛅️ wrangler 2.20.0
--------------------
⬣ Listening at http://0.0.0.0:8787
- http://127.0.0.1:8787
- http://192.168.128.165:8787
Total Upload: 11.47 KiB / gzip: 4.34 KiB
```
## Multiple routers
**Hono has multiple routers**.
**RegExpRouter** is the fastest router in the JavaScript world. It matches the route using a single large Regex created before dispatch. With **SmartRouter**, it supports all route patterns.
**LinearRouter** registers the routes very quickly, so it's suitable for an environment that initializes applications every time. **PatternRouter** simply adds and matches the pattern, making it small.
See [more information about routes](/docs/concepts/routers).
## Web Standards
Thanks to the use of the **Web Standards**, Hono works on a lot of platforms.
- Cloudflare Workers
- Cloudflare Pages
- Fastly Compute
- Deno
- Bun
- Vercel
- AWS Lambda
- Lambda@Edge
- Others
And by using [a Node.js adapter](https://github.com/honojs/node-server), Hono works on Node.js.
See [more information about Web Standards](/docs/concepts/web-standard).
## Middleware & Helpers
**Hono has many middleware and helpers**. This makes "Write Less, do more" a reality.
Out of the box, Hono provides middleware and helpers for:
- [Basic Authentication](/docs/middleware/builtin/basic-auth)
- [Bearer Authentication](/docs/middleware/builtin/bearer-auth)
- [Body Limit](/docs/middleware/builtin/body-limit)
- [Cache](/docs/middleware/builtin/cache)
- [Compress](/docs/middleware/builtin/compress)
- [Context Storage](/docs/middleware/builtin/context-storage)
- [Cookie](/docs/helpers/cookie)
- [CORS](/docs/middleware/builtin/cors)
- [ETag](/docs/middleware/builtin/etag)
- [html](/docs/helpers/html)
- [JSX](/docs/guides/jsx)
- [JWT Authentication](/docs/middleware/builtin/jwt)
- [Logger](/docs/middleware/builtin/logger)
- [Language](/docs/middleware/builtin/language)
- [Pretty JSON](/docs/middleware/builtin/pretty-json)
- [Secure Headers](/docs/middleware/builtin/secure-headers)
- [SSG](/docs/helpers/ssg)
- [Streaming](/docs/helpers/streaming)
- [GraphQL Server](https://github.com/honojs/middleware/tree/main/packages/graphql-server)
- [Firebase Authentication](https://github.com/honojs/middleware/tree/main/packages/firebase-auth)
- [Sentry](https://github.com/honojs/middleware/tree/main/packages/sentry)
- Others!
For example, adding ETag and request logging only takes a few lines of code with Hono:
```ts
import { Hono } from 'hono'
import { etag } from 'hono/etag'
import { logger } from 'hono/logger'
const app = new Hono()
app.use(etag(), logger())
```
See [more information about Middleware](/docs/concepts/middleware).
## Developer Experience
Hono provides a delightful "**Developer Experience**".
Easy access to Request/Response thanks to the `Context` object.
Moreover, Hono is written in TypeScript. Hono has "**Types**".
For example, the path parameters will be literal types.
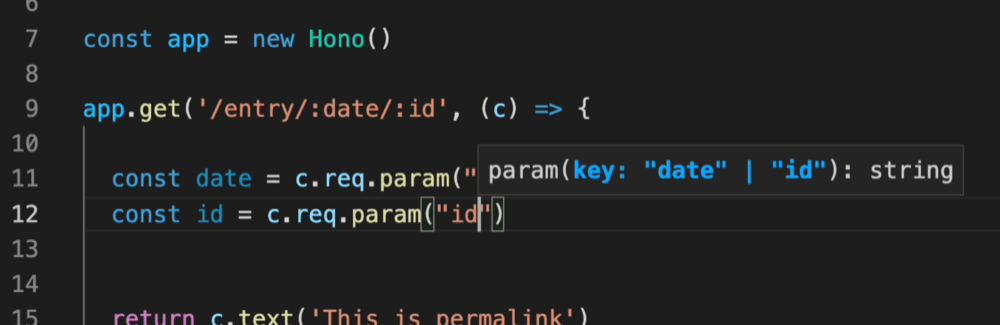
And, the Validator and Hono Client `hc` enable the RPC mode. In RPC mode,
you can use your favorite validator such as Zod and easily share server-side API specs with the client and build type-safe applications.
See [Hono Stacks](/docs/concepts/stacks).
# Cloudflare Workers
[Cloudflare Workers](https://workers.cloudflare.com) is a JavaScript edge runtime on Cloudflare CDN.
You can develop the application locally and publish it with a few commands using [Wrangler](https://developers.cloudflare.com/workers/wrangler/).
Wrangler includes transcompiler, so we can write the code with TypeScript.
Let’s make your first application for Cloudflare Workers with Hono.
## 1. Setup
A starter for Cloudflare Workers is available.
Start your project with "create-hono" command.
Select `cloudflare-workers` template for this example.
::: code-group
```sh [npm]
npm create hono@latest my-app
```
```sh [yarn]
yarn create hono my-app
```
```sh [pnpm]
pnpm create hono my-app
```
```sh [bun]
bun create hono@latest my-app
```
```sh [deno]
deno init --npm hono my-app
```
:::
Move to `my-app` and install the dependencies.
::: code-group
```sh [npm]
cd my-app
npm i
```
```sh [yarn]
cd my-app
yarn
```
```sh [pnpm]
cd my-app
pnpm i
```
```sh [bun]
cd my-app
bun i
```
:::
## 2. Hello World
Edit `src/index.ts` like below.
```ts
import { Hono } from 'hono'
const app = new Hono()
app.get('/', (c) => c.text('Hello Cloudflare Workers!'))
export default app
```
## 3. Run
Run the development server locally. Then, access `http://localhost:8787` in your web browser.
::: code-group
```sh [npm]
npm run dev
```
```sh [yarn]
yarn dev
```
```sh [pnpm]
pnpm dev
```
```sh [bun]
bun run dev
```
:::
### Change port number
If you need to change the port number you can follow the instructions here to update `wrangler.toml` / `wrangler.json` / `wrangler.jsonc` files:
[Wrangler Configuration](https://developers.cloudflare.com/workers/wrangler/configuration/#local-development-settings)
Or, you can follow the instructions here to set CLI options:
[Wrangler CLI](https://developers.cloudflare.com/workers/wrangler/commands/#dev)
## 4. Deploy
If you have a Cloudflare account, you can deploy to Cloudflare. In `package.json`, `$npm_execpath` needs to be changed to your package manager of choice.
::: code-group
```sh [npm]
npm run deploy
```
```sh [yarn]
yarn deploy
```
```sh [pnpm]
pnpm run deploy
```
```sh [bun]
bun run deploy
```
:::
That's all!
## Using Hono with other event handlers
You can integrate Hono with other event handlers (such as `scheduled`) in _Module Worker mode_.
To do this, export `app.fetch` as the module's `fetch` handler, and then implement other handlers as needed:
```ts
const app = new Hono()
export default {
fetch: app.fetch,
scheduled: async (batch, env) => {},
}
```
## Serve static files
If you want to serve static files, you can use [the Static Assets feature](https://developers.cloudflare.com/workers/static-assets/) of Cloudflare Workers. Specify the directory for the files in `wrangler.toml`:
```toml
assets = { directory = "public" }
```
Then create the `public` directory and place the files there. For instance, `./public/static/hello.txt` will be served as `/static/hello.txt`.
```
.
├── package.json
├── public
│ ├── favicon.ico
│ └── static
│ └── hello.txt
├── src
│ └── index.ts
└── wrangler.toml
```
## Types
You have to install `@cloudflare/workers-types` if you want to have workers types.
::: code-group
```sh [npm]
npm i --save-dev @cloudflare/workers-types
```
```sh [yarn]
yarn add -D @cloudflare/workers-types
```
```sh [pnpm]
pnpm add -D @cloudflare/workers-types
```
```sh [bun]
bun add --dev @cloudflare/workers-types
```
:::
## Testing
For testing, we recommend using `@cloudflare/vitest-pool-workers`.
Refer to [examples](https://github.com/honojs/examples) for setting it up.
If there is the application below.
```ts
import { Hono } from 'hono'
const app = new Hono()
app.get('/', (c) => c.text('Please test me!'))
```
We can test if it returns "_200 OK_" Response with this code.
```ts
describe('Test the application', () => {
it('Should return 200 response', async () => {
const res = await app.request('http://localhost/')
expect(res.status).toBe(200)
})
})
```
## Bindings
In the Cloudflare Workers, we can bind the environment values, KV namespace, R2 bucket, or Durable Object. You can access them in `c.env`. It will have the types if you pass the "_type definition_" for the bindings to the `Hono` as generics.
```ts
type Bindings = {
MY_BUCKET: R2Bucket
USERNAME: string
PASSWORD: string
}
const app = new Hono<{ Bindings: Bindings }>()
// Access to environment values
app.put('/upload/:key', async (c, next) => {
const key = c.req.param('key')
await c.env.MY_BUCKET.put(key, c.req.body)
return c.text(`Put ${key} successfully!`)
})
```
## Using Variables in Middleware
This is the only case for Module Worker mode.
If you want to use Variables or Secret Variables in Middleware, for example, "username" or "password" in Basic Authentication Middleware, you need to write like the following.
```ts
import { basicAuth } from 'hono/basic-auth'
type Bindings = {
USERNAME: string
PASSWORD: string
}
const app = new Hono<{ Bindings: Bindings }>()
//...
app.use('/auth/*', async (c, next) => {
const auth = basicAuth({
username: c.env.USERNAME,
password: c.env.PASSWORD,
})
return auth(c, next)
})
```
The same is applied to Bearer Authentication Middleware, JWT Authentication, or others.
## Deploy from GitHub Actions
Before deploying code to Cloudflare via CI, you need a Cloudflare token. You can manage it from [User API Tokens](https://dash.cloudflare.com/profile/api-tokens).
If it's a newly created token, select the **Edit Cloudflare Workers** template. If you already have another token, make sure the token has the corresponding permissions. (Note: token permissions are not shared between Cloudflare Pages and Cloudflare Workers).
then go to your GitHub repository settings dashboard: `Settings->Secrets and variables->Actions->Repository secrets`, and add a new secret with the name `CLOUDFLARE_API_TOKEN`.
then create `.github/workflows/deploy.yml` in your Hono project root folder, paste the following code:
```yml
name: Deploy
on:
push:
branches:
- main
jobs:
deploy:
runs-on: ubuntu-latest
name: Deploy
steps:
- uses: actions/checkout@v4
- name: Deploy
uses: cloudflare/wrangler-action@v3
with:
apiToken: ${{ secrets.CLOUDFLARE_API_TOKEN }}
```
then edit `wrangler.toml`, and add this code after `compatibility_date` line.
```toml
main = "src/index.ts"
minify = true
```
Everything is ready! Now push the code and enjoy it.
## Load env when local development
To configure the environment variables for local development, create a `.dev.vars` file or a `.env` file in the root directory of the project.
These files should be formatted using the [dotenv](https://hexdocs.pm/dotenvy/dotenv-file-format.html) syntax. For example:
```
SECRET_KEY=value
API_TOKEN=eyJhbGciOiJIUzI1NiIsInR5cCI6IkpXVCJ9
```
> For more about this section you can find in the Cloudflare documentation:
> https://developers.cloudflare.com/workers/wrangler/configuration/#secrets
Then we use the `c.env.*` to get the environment variables in our code.
::: info
By default, `process.env` is not available in Cloudflare Workers, so it is recommended to get environment variables from `c.env`. If you want to use it, you need to enable [`nodejs_compat_populate_process_env`](https://developers.cloudflare.com/workers/configuration/compatibility-flags/#enable-auto-populating-processenv) flag. You can also import `env` from `cloudflare:workers`. For details, please see [How to access `env` on Cloudflare docs](https://developers.cloudflare.com/workers/runtime-apis/bindings/#how-to-access-env)
:::
```ts
type Bindings = {
SECRET_KEY: string
}
const app = new Hono<{ Bindings: Bindings }>()
app.get('/env', (c) => {
const SECRET_KEY = c.env.SECRET_KEY
return c.text(SECRET_KEY)
})
```
Before you deploy your project to Cloudflare, remember to set the environment variable/secrets in the Cloudflare Workers project's configuration.
> For more about this section you can find in the Cloudflare documentation:
> https://developers.cloudflare.com/workers/configuration/environment-variables/#add-environment-variables-via-the-dashboard
# Vercel
Vercel is the AI cloud, providing the developer tools and cloud infrastructure to build, scale, and secure a faster, more personalized web.
Hono can be deployed to Vercel with zero-configuration.
## 1. Setup
A starter for Vercel is available.
Start your project with "create-hono" command.
Select `vercel` template for this example.
::: code-group
```sh [npm]
npm create hono@latest my-app
```
```sh [yarn]
yarn create hono my-app
```
```sh [pnpm]
pnpm create hono my-app
```
```sh [bun]
bun create hono@latest my-app
```
```sh [deno]
deno init --npm hono my-app
```
:::
Move into `my-app` and install the dependencies.
::: code-group
```sh [npm]
cd my-app
npm i
```
```sh [yarn]
cd my-app
yarn
```
```sh [pnpm]
cd my-app
pnpm i
```
```sh [bun]
cd my-app
bun i
```
:::
We will use Vercel CLI to work on the app locally in the next step. If you haven't already, install it globally following [the Vercel CLI documentation](https://vercel.com/docs/cli).
## 2. Hello World
In the `index.ts` or `src/index.ts` of your project, export the Hono application as a default export.
```ts
import { Hono } from 'hono'
const app = new Hono()
const welcomeStrings = [
'Hello Hono!',
'To learn more about Hono on Vercel, visit https://vercel.com/docs/frameworks/backend/hono',
]
app.get('/', (c) => {
return c.text(welcomeStrings.join('\n\n'))
})
export default app
```
If you started with the `vercel` template, this is already set up for you.
## 3. Run
To run the development server locally:
```sh
vercel dev
```
Visiting `localhost:3000` will respond with a text response.
## 4. Deploy
Deploy to Vercel using `vc deploy`.
```sh
vercel deploy
```
## Further reading
[Learn more about Hono in the Vercel documentation](https://vercel.com/docs/frameworks/backend/hono).
# Supabase Edge Functions
[Supabase](https://supabase.com/) is an open-source alternative to Firebase, offering a suite of tools similar to Firebase's capabilities, including database, authentication, storage, and now, serverless functions.
Supabase Edge Functions are server-side TypeScript functions that are distributed globally, running closer to your users for improved performance. These functions are developed using [Deno](https://deno.com/), which brings several benefits, including improved security and a modern JavaScript/TypeScript runtime.
Here's how you can get started with Supabase Edge Functions:
## 1. Setup
### Prerequisites
Before you begin, make sure you have the Supabase CLI installed. If you haven't installed it yet, follow the instructions in the [official documentation](https://supabase.com/docs/guides/cli/getting-started).
### Creating a New Project
1. Open your terminal or command prompt.
2. Create a new Supabase project in a directory on your local machine by running:
```bash
supabase init
```
This command initializes a new Supabase project in the current directory.
### Adding an Edge Function
3. Inside your Supabase project, create a new Edge Function named `hello-world`:
```bash
supabase functions new hello-world
```
This command creates a new Edge Function with the specified name in your project.
## 2. Hello World
Edit the `hello-world` function by modifying the file `supabase/functions/hello-world/index.ts`:
```ts
import { Hono } from 'jsr:@hono/hono'
// change this to your function name
const functionName = 'hello-world'
const app = new Hono().basePath(`/${functionName}`)
app.get('/hello', (c) => c.text('Hello from hono-server!'))
Deno.serve(app.fetch)
```
## 3. Run
To run the function locally, use the following command:
1. Use the following command to serve the function:
```bash
supabase start # start the supabase stack
supabase functions serve --no-verify-jwt # start the Functions watcher
```
The `--no-verify-jwt` flag allows you to bypass JWT verification during local development.
2. Make a GET request using cURL or Postman to `http://127.0.0.1:54321/functions/v1/hello-world/hello`:
```bash
curl --location 'http://127.0.0.1:54321/functions/v1/hello-world/hello'
```
This request should return the text "Hello from hono-server!".
## 4. Deploy
You can deploy all of your Edge Functions in Supabase with a single command:
```bash
supabase functions deploy
```
Alternatively, you can deploy individual Edge Functions by specifying the name of the function in the deploy command:
```bash
supabase functions deploy hello-world
```
For more deployment methods, visit the Supabase documentation on [Deploying to Production](https://supabase.com/docs/guides/functions/deploy).
# Bun
[Bun](https://bun.com) is another JavaScript runtime. It's not Node.js or Deno. Bun includes a transcompiler, we can write the code with TypeScript.
Hono also works on Bun.
## 1. Install Bun
To install `bun` command, follow the instruction in [the official web site](https://bun.com).
## 2. Setup
### 2.1. Setup a new project
A starter for Bun is available. Start your project with "bun create" command.
Select `bun` template for this example.
```sh
bun create hono@latest my-app
```
Move into my-app and install the dependencies.
```sh
cd my-app
bun install
```
### 2.2. Setup an existing project
On an existing Bun project, we only need to install `hono` dependencies on the project root directory via
```sh
bun add hono
```
Then add the `dev` command to your existing `package.json`.
```json
{
"scripts": {
"dev": "bun run --hot src/index.ts"
}
}
```
See the [Bun starter template](https://github.com/honojs/starter/tree/main/templates/bun) for a minimal example setup. This is the output of running `bun create hono@latest`.
## 3. Hello World
"Hello World" script is below. Almost the same as writing on other platforms.
```ts
import { Hono } from 'hono'
const app = new Hono()
app.get('/', (c) => c.text('Hello Bun!'))
export default app
```
If you are setting up Hono on an existing project, the `bun run dev` command expects the "Hello World" script to be placed in `src/index.tx`
## 4. Run
Run the command.
```sh
bun run dev
```
Then, access `http://localhost:3000` in your browser.
## Change port number
You can specify the port number with exporting the `port`.
```ts
import { Hono } from 'hono'
const app = new Hono()
app.get('/', (c) => c.text('Hello Bun!'))
export default app // [!code --]
export default { // [!code ++]
port: 3000, // [!code ++]
fetch: app.fetch, // [!code ++]
} // [!code ++]
```
## Serve static files
To serve static files, use `serveStatic` which is imported from `hono/bun`.
```ts
import { serveStatic } from 'hono/bun'
const app = new Hono()
app.use('/static/*', serveStatic({ root: './' }))
app.use('/favicon.ico', serveStatic({ path: './favicon.ico' }))
app.get('/', (c) => c.text('You can access: /static/hello.txt'))
app.get('*', serveStatic({ path: './static/fallback.txt' }))
```
For the above code, it will work well with the following directory structure.
```
./
├── favicon.ico
├── src
└── static
├── demo
│ └── index.html
├── fallback.txt
├── hello.txt
└── images
└── dinotocat.png
```
### `rewriteRequestPath`
If you want to map `http://localhost:3000/static/*` to `./statics`, you can use the `rewriteRequestPath` option:
```ts
app.get(
'/static/*',
serveStatic({
root: './',
rewriteRequestPath: (path) =>
path.replace(/^\/static/, '/statics'),
})
)
```
### `mimes`
You can add MIME types with `mimes`:
```ts
app.get(
'/static/*',
serveStatic({
mimes: {
m3u8: 'application/vnd.apple.mpegurl',
ts: 'video/mp2t',
},
})
)
```
### `onFound`
You can specify handling when the requested file is found with `onFound`:
```ts
app.get(
'/static/*',
serveStatic({
// ...
onFound: (_path, c) => {
c.header('Cache-Control', `public, immutable, max-age=31536000`)
},
})
)
```
### `onNotFound`
You can specify handling when the requested file is not found with `onNotFound`:
```ts
app.get(
'/static/*',
serveStatic({
onNotFound: (path, c) => {
console.log(`${path} is not found, you access ${c.req.path}`)
},
})
)
```
### `precompressed`
The `precompressed` option checks if files with extensions like `.br` or `.gz` are available and serves them based on the `Accept-Encoding` header. It prioritizes Brotli, then Zstd, and Gzip. If none are available, it serves the original file.
```ts
app.get(
'/static/*',
serveStatic({
precompressed: true,
})
)
```
## Testing
You can use `bun:test` for testing on Bun.
```ts
import { describe, expect, it } from 'bun:test'
import app from '.'
describe('My first test', () => {
it('Should return 200 Response', async () => {
const req = new Request('http://localhost/')
const res = await app.fetch(req)
expect(res.status).toBe(200)
})
})
```
Then, run the command.
```sh
bun test index.test.ts
```
# Deno
[Deno](https://deno.com/) is a JavaScript runtime built on V8. It's not Node.js.
Hono also works on Deno.
You can use Hono, write the code with TypeScript, run the application with the `deno` command, and deploy it to "Deno Deploy".
## 1. Install Deno
First, install `deno` command.
Please refer to [the official document](https://docs.deno.com/runtime/getting_started/installation/).
## 2. Setup
A starter for Deno is available.
Start your project with the [`deno init`](https://docs.deno.com/runtime/reference/cli/init/) command.
```sh
deno init --npm hono --template=deno my-app
```
Move into `my-app`. For Deno, you don't have to install Hono explicitly.
```sh
cd my-app
```
## 3. Hello World
Edit `main.ts`:
```ts [main.ts]
import { Hono } from 'hono'
const app = new Hono()
app.get('/', (c) => c.text('Hello Deno!'))
Deno.serve(app.fetch)
```
## 4. Run
Run the development server locally. Then, access `http://localhost:8000` in your Web browser.
```sh
deno task start
```
## Change port number
You can specify the port number by updating the arguments of `Deno.serve` in `main.ts`:
```ts
Deno.serve(app.fetch) // [!code --]
Deno.serve({ port: 8787 }, app.fetch) // [!code ++]
```
## Serve static files
To serve static files, use `serveStatic` imported from `hono/deno`.
```ts
import { Hono } from 'hono'
import { serveStatic } from 'hono/deno'
const app = new Hono()
app.use('/static/*', serveStatic({ root: './' }))
app.use('/favicon.ico', serveStatic({ path: './favicon.ico' }))
app.get('/', (c) => c.text('You can access: /static/hello.txt'))
app.get('*', serveStatic({ path: './static/fallback.txt' }))
Deno.serve(app.fetch)
```
For the above code, it will work well with the following directory structure.
```
./
├── favicon.ico
├── index.ts
└── static
├── demo
│ └── index.html
├── fallback.txt
├── hello.txt
└── images
└── dinotocat.png
```
### `rewriteRequestPath`
If you want to map `http://localhost:8000/static/*` to `./statics`, you can use the `rewriteRequestPath` option:
```ts
app.get(
'/static/*',
serveStatic({
root: './',
rewriteRequestPath: (path) =>
path.replace(/^\/static/, '/statics'),
})
)
```
### `mimes`
You can add MIME types with `mimes`:
```ts
app.get(
'/static/*',
serveStatic({
mimes: {
m3u8: 'application/vnd.apple.mpegurl',
ts: 'video/mp2t',
},
})
)
```
### `onFound`
You can specify handling when the requested file is found with `onFound`:
```ts
app.get(
'/static/*',
serveStatic({
// ...
onFound: (_path, c) => {
c.header('Cache-Control', `public, immutable, max-age=31536000`)
},
})
)
```
### `onNotFound`
You can specify handling when the requested file is not found with `onNotFound`:
```ts
app.get(
'/static/*',
serveStatic({
onNotFound: (path, c) => {
console.log(`${path} is not found, you access ${c.req.path}`)
},
})
)
```
### `precompressed`
The `precompressed` option checks if files with extensions like `.br` or `.gz` are available and serves them based on the `Accept-Encoding` header. It prioritizes Brotli, then Zstd, and Gzip. If none are available, it serves the original file.
```ts
app.get(
'/static/*',
serveStatic({
precompressed: true,
})
)
```
## Deno Deploy
Deno Deploy is a serverless platform for running JavaScript and TypeScript applications in the cloud.
It provides a management plane for deploying and running applications through integrations like GitHub deployment.
Hono also works on Deno Deploy. Please refer to [the official document](https://docs.deno.com/deploy/manual/).
## Testing
Testing the application on Deno is easy.
You can write with `Deno.test` and use `assert` or `assertEquals` from [@std/assert](https://jsr.io/@std/assert).
```sh
deno add jsr:@std/assert
```
```ts [hello.ts]
import { Hono } from 'hono'
import { assertEquals } from '@std/assert'
Deno.test('Hello World', async () => {
const app = new Hono()
app.get('/', (c) => c.text('Please test me'))
const res = await app.request('http://localhost/')
assertEquals(res.status, 200)
})
```
Then run the command:
```sh
deno test hello.ts
```
## npm and JSR
Hono is available on both [npm](https://www.npmjs.com/package/hono) and [JSR](https://jsr.io/@hono/hono) (the JavaScript Registry). You can use either `npm:hono` or `jsr:@hono/hono` in your `deno.json`:
```json
{
"imports": {
"hono": "jsr:@hono/hono" // [!code --]
"hono": "npm:hono" // [!code ++]
}
}
```
To use middleware you need to use the [Deno directory](https://docs.deno.com/runtime/fundamentals/configuration/#custom-path-mappings) syntax in the import.
```json
{
"imports": {
"hono/": "npm:/hono/"
}
}
```
When using third-party middleware, you may need to use Hono from the same registry as the middleware for proper TypeScript type inference. For example, if using the middleware from npm, you should also use Hono from npm:
```json
{
"imports": {
"hono": "npm:hono",
"zod": "npm:zod",
"@hono/zod-validator": "npm:@hono/zod-validator"
}
}
```
We also provide many third-party middleware packages on [JSR](https://jsr.io/@hono). When using the middleware on JSR, use Hono from JSR:
```json
{
"imports": {
"hono": "jsr:@hono/hono",
"zod": "npm:zod",
"@hono/zod-validator": "jsr:@hono/zod-validator"
}
}
```
# Node.js
[Node.js](https://nodejs.org/) is an open-source, cross-platform JavaScript runtime environment.
Hono was not designed for Node.js at first, but with a [Node.js Adapter](https://github.com/honojs/node-server), it can run on Node.js as well.
::: info
It works on Node.js versions greater than 18.x. The specific required Node.js versions are as follows:
- 18.x => 18.14.1+
- 19.x => 19.7.0+
- 20.x => 20.0.0+
Essentially, you can simply use the latest version of each major release.
:::
## 1. Setup
A starter for Node.js is available.
Start your project with "create-hono" command.
Select `nodejs` template for this example.
::: code-group
```sh [npm]
npm create hono@latest my-app
```
```sh [yarn]
yarn create hono my-app
```
```sh [pnpm]
pnpm create hono my-app
```
```sh [bun]
bun create hono@latest my-app
```
```sh [deno]
deno init --npm hono my-app
```
:::
Move to `my-app` and install the dependencies.
::: code-group
```sh [npm]
cd my-app
npm i
```
```sh [yarn]
cd my-app
yarn
```
```sh [pnpm]
cd my-app
pnpm i
```
```sh [bun]
cd my-app
bun i
```
:::
## 2. Hello World
Edit `src/index.ts`:
```ts
import { serve } from '@hono/node-server'
import { Hono } from 'hono'
const app = new Hono()
app.get('/', (c) => c.text('Hello Node.js!'))
serve(app)
```
If you want to gracefully shut down the server, write it like this:
```ts
const server = serve(app)
// graceful shutdown
process.on('SIGINT', () => {
server.close()
process.exit(0)
})
process.on('SIGTERM', () => {
server.close((err) => {
if (err) {
console.error(err)
process.exit(1)
}
process.exit(0)
})
})
```
## 3. Run
Run the development server locally. Then, access `http://localhost:3000` in your Web browser.
::: code-group
```sh [npm]
npm run dev
```
```sh [yarn]
yarn dev
```
```sh [pnpm]
pnpm dev
```
:::
## Change port number
You can specify the port number with the `port` option.
```ts
serve({
fetch: app.fetch,
port: 8787,
})
```
## Access the raw Node.js APIs
You can access the Node.js APIs from `c.env.incoming` and `c.env.outgoing`.
```ts
import { Hono } from 'hono'
import { serve, type HttpBindings } from '@hono/node-server'
// or `Http2Bindings` if you use HTTP2
type Bindings = HttpBindings & {
/* ... */
}
const app = new Hono<{ Bindings: Bindings }>()
app.get('/', (c) => {
return c.json({
remoteAddress: c.env.incoming.socket.remoteAddress,
})
})
serve(app)
```
## Serve static files
You can use `serveStatic` to serve static files from the local file system. For example, suppose the directory structure is as follows:
```sh
./
├── favicon.ico
├── index.ts
└── static
├── hello.txt
└── image.png
```
If a request to the path `/static/*` comes in and you want to return a file under `./static`, you can write the following:
```ts
import { serveStatic } from '@hono/node-server/serve-static'
app.use('/static/*', serveStatic({ root: './' }))
```
::: warning
The `root` option resolves paths relative to the current working directory (`process.cwd()`). This means the behavior depends on **where you run your Node.js process from**, not where your source file is located. If you start your server from a different directory, file resolution may fail.
For reliable path resolution that always points to the same directory as your source file, use `import.meta.url`:
```ts
import { fileURLToPath } from 'node:url'
import { serveStatic } from '@hono/node-server/serve-static'
app.use(
'/static/*',
serveStatic({ root: fileURLToPath(new URL('./', import.meta.url)) })
)
```
:::
Use the `path` option to serve `favicon.ico` in the directory root:
```ts
app.use('/favicon.ico', serveStatic({ path: './favicon.ico' }))
```
If a request to the path `/hello.txt` or `/image.png` comes in and you want to return a file named `./static/hello.txt` or `./static/image.png`, you can use the following:
```ts
app.use('*', serveStatic({ root: './static' }))
```
### `rewriteRequestPath`
If you want to map `http://localhost:3000/static/*` to `./statics`, you can use the `rewriteRequestPath` option:
```ts
app.get(
'/static/*',
serveStatic({
root: './',
rewriteRequestPath: (path) =>
path.replace(/^\/static/, '/statics'),
})
)
```
## http2
You can run hono on a [Node.js http2 Server](https://nodejs.org/api/http2.html).
### unencrypted http2
```ts
import { createServer } from 'node:http2'
const server = serve({
fetch: app.fetch,
createServer,
})
```
### encrypted http2
```ts
import { createSecureServer } from 'node:http2'
import { readFileSync } from 'node:fs'
const server = serve({
fetch: app.fetch,
createServer: createSecureServer,
serverOptions: {
key: readFileSync('localhost-privkey.pem'),
cert: readFileSync('localhost-cert.pem'),
},
})
```
## Building & Deployment
::: code-group
```sh [npm]
npm run build
```
```sh [yarn]
yarn run build
```
```sh [pnpm]
pnpm run build
```
```sh [bun]
bun run build
```
::: info
Apps with a front-end framework may need to use [Hono's Vite plugins](https://github.com/honojs/vite-plugins).
:::
### Dockerfile
Here is an example of a Node.js Dockerfile.
```Dockerfile
FROM node:22-alpine AS base
FROM base AS builder
RUN apk add --no-cache gcompat
WORKDIR /app
COPY package*json tsconfig.json src ./
RUN npm ci && \
npm run build && \
npm prune --production
FROM base AS runner
WORKDIR /app
RUN addgroup --system --gid 1001 nodejs
RUN adduser --system --uid 1001 hono
COPY --from=builder --chown=hono:nodejs /app/node_modules /app/node_modules
COPY --from=builder --chown=hono:nodejs /app/dist /app/dist
COPY --from=builder --chown=hono:nodejs /app/package.json /app/package.json
USER hono
EXPOSE 3000
CMD ["node", "/app/dist/index.js"]
```
# Netlify
Netlify provides static site hosting and serverless backend services. [Edge Functions](https://docs.netlify.com/edge-functions/overview/) enables us to make the web pages dynamic.
Edge Functions support writing in Deno and TypeScript, and deployment is made easy through the [Netlify CLI](https://docs.netlify.com/cli/get-started/). With Hono, you can create the application for Netlify Edge Functions.
## 1. Setup
A starter for Netlify is available.
Start your project with "create-hono" command.
Select `netlify` template for this example.
::: code-group
```sh [npm]
npm create hono@latest my-app
```
```sh [yarn]
yarn create hono my-app
```
```sh [pnpm]
pnpm create hono my-app
```
```sh [bun]
bun create hono@latest my-app
```
```sh [deno]
deno init --npm hono my-app
```
:::
Move into `my-app`.
## 2. Hello World
Edit `netlify/edge-functions/index.ts`:
```ts
import { Hono } from 'jsr:@hono/hono'
import { handle } from 'jsr:@hono/hono/netlify'
const app = new Hono()
app.get('/', (c) => {
return c.text('Hello Hono!')
})
export default handle(app)
```
## 3. Run
Run the development server with Netlify CLI. Then, access `http://localhost:8888` in your Web browser.
```sh
netlify dev
```
## 4. Deploy
You can deploy with a `netlify deploy` command.
```sh
netlify deploy --prod
```
## `Context`
You can access the Netlify's `Context` through `c.env`:
```ts
import { Hono } from 'jsr:@hono/hono'
import { handle } from 'jsr:@hono/hono/netlify'
// Import the type definition
import type { Context } from 'https://edge.netlify.com/'
export type Env = {
Bindings: {
context: Context
}
}
const app = new Hono()
app.get('/country', (c) =>
c.json({
'You are in': c.env.context.geo.country?.name,
})
)
export default handle(app)
```
# Alibaba Cloud Function Compute
[Alibaba Cloud Function Compute](https://www.alibabacloud.com/en/product/function-compute) is a fully managed, event-driven compute service. Function Compute allows you to focus on writing and uploading code without having to manage infrastructure such as servers.
This guide uses a third-party adapter [rwv/hono-alibaba-cloud-fc3-adapter](https://github.com/rwv/hono-alibaba-cloud-fc3-adapter) to run Hono on Alibaba Cloud Function Compute.
## 1. Setup
::: code-group
```sh [npm]
mkdir my-app
cd my-app
npm i hono hono-alibaba-cloud-fc3-adapter
npm i -D @serverless-devs/s esbuild
mkdir src
touch src/index.ts
```
```sh [yarn]
mkdir my-app
cd my-app
yarn add hono hono-alibaba-cloud-fc3-adapter
yarn add -D @serverless-devs/s esbuild
mkdir src
touch src/index.ts
```
```sh [pnpm]
mkdir my-app
cd my-app
pnpm add hono hono-alibaba-cloud-fc3-adapter
pnpm add -D @serverless-devs/s esbuild
mkdir src
touch src/index.ts
```
```sh [bun]
mkdir my-app
cd my-app
bun add hono hono-alibaba-cloud-fc3-adapter
bun add -D esbuild @serverless-devs/s
mkdir src
touch src/index.ts
```
:::
## 2. Hello World
Edit `src/index.ts`.
```ts
import { Hono } from 'hono'
import { handle } from 'hono-alibaba-cloud-fc3-adapter'
const app = new Hono()
app.get('/', (c) => c.text('Hello Hono!'))
export const handler = handle(app)
```
## 3. Setup serverless-devs
> [serverless-devs](https://github.com/Serverless-Devs/Serverless-Devs) is an open source and open serverless developer platform dedicated to providing developers with a powerful tool chain system. Through this platform, developers can not only experience multi cloud serverless products with one click and rapidly deploy serverless projects, but also manage projects in the whole life cycle of serverless applications, and combine serverless devs with other tools / platforms very simply and quickly to further improve the efficiency of R & D, operation and maintenance.
Add the Alibaba Cloud AccessKeyID & AccessKeySecret
```sh
npx s config add
# Please select a provider: Alibaba Cloud (alibaba)
# Input your AccessKeyID & AccessKeySecret
```
Edit `s.yaml`
```yaml
edition: 3.0.0
name: my-app
access: 'default'
vars:
region: 'us-west-1'
resources:
my-app:
component: fc3
props:
region: ${vars.region}
functionName: 'my-app'
description: 'Hello World by Hono'
runtime: 'nodejs20'
code: ./dist
handler: index.handler
memorySize: 1024
timeout: 300
```
Edit `scripts` section in `package.json`:
```json
{
"scripts": {
"build": "esbuild --bundle --outfile=./dist/index.js --platform=node --target=node20 ./src/index.ts",
"deploy": "s deploy -y"
}
}
```
## 4. Deploy
Finally, run the command to deploy:
```sh
npm run build # Compile the TypeScript code to JavaScript
npm run deploy # Deploy the function to Alibaba Cloud Function Compute
```
# AWS Lambda
AWS Lambda is a serverless platform by Amazon Web Services.
You can run your code in response to events and automatically manages the underlying compute resources for you.
Hono works on AWS Lambda with the Node.js 18+ environment.
## 1. Setup
When creating the application on AWS Lambda,
[CDK](https://docs.aws.amazon.com/cdk/v2/guide/home.html)
is useful to set up the functions such as IAM Role, API Gateway, and others.
Initialize your project with the `cdk` CLI.
::: code-group
```sh [npm]
mkdir my-app
cd my-app
cdk init app -l typescript
npm i hono
npm i -D esbuild
mkdir lambda
touch lambda/index.ts
```
```sh [yarn]
mkdir my-app
cd my-app
cdk init app -l typescript
yarn add hono
yarn add -D esbuild
mkdir lambda
touch lambda/index.ts
```
```sh [pnpm]
mkdir my-app
cd my-app
cdk init app -l typescript
pnpm add hono
pnpm add -D esbuild
mkdir lambda
touch lambda/index.ts
```
```sh [bun]
mkdir my-app
cd my-app
cdk init app -l typescript
bun add hono
bun add -D esbuild
mkdir lambda
touch lambda/index.ts
```
:::
## 2. Hello World
Edit `lambda/index.ts`.
```ts
import { Hono } from 'hono'
import { handle } from 'hono/aws-lambda'
const app = new Hono()
app.get('/', (c) => c.text('Hello Hono!'))
export const handler = handle(app)
```
## 3. Deploy
Edit `lib/my-app-stack.ts`.
```ts
import * as cdk from 'aws-cdk-lib'
import { Construct } from 'constructs'
import * as lambda from 'aws-cdk-lib/aws-lambda'
import { NodejsFunction } from 'aws-cdk-lib/aws-lambda-nodejs'
export class MyAppStack extends cdk.Stack {
constructor(scope: Construct, id: string, props?: cdk.StackProps) {
super(scope, id, props)
const fn = new NodejsFunction(this, 'lambda', {
entry: 'lambda/index.ts',
handler: 'handler',
runtime: lambda.Runtime.NODEJS_22_X,
})
const fnUrl = fn.addFunctionUrl({
authType: lambda.FunctionUrlAuthType.NONE,
})
new cdk.CfnOutput(this, 'lambdaUrl', {
value: fnUrl.url!,
})
}
}
```
Finally, run the command to deploy:
```sh
cdk deploy
```
## Serve Binary data
Hono supports binary data as a response.
In Lambda, base64 encoding is required to return binary data.
Once binary type is set to `Content-Type` header, Hono automatically encodes data to base64.
```ts
app.get('/binary', async (c) => {
// ...
c.status(200)
c.header('Content-Type', 'image/png') // means binary data
return c.body(buffer) // supports `ArrayBufferLike` type, encoded to base64.
})
```
## Access AWS Lambda Object
In Hono, you can access the AWS Lambda Events and Context by binding the `LambdaEvent`, `LambdaContext` type and using `c.env`
```ts
import { Hono } from 'hono'
import type { LambdaEvent, LambdaContext } from 'hono/aws-lambda'
import { handle } from 'hono/aws-lambda'
type Bindings = {
event: LambdaEvent
lambdaContext: LambdaContext
}
const app = new Hono<{ Bindings: Bindings }>()
app.get('/aws-lambda-info/', (c) => {
return c.json({
isBase64Encoded: c.env.event.isBase64Encoded,
awsRequestId: c.env.lambdaContext.awsRequestId,
})
})
export const handler = handle(app)
```
## Access RequestContext
In Hono, you can access the AWS Lambda request context by binding the `LambdaEvent` type and using `c.env.event.requestContext`.
```ts
import { Hono } from 'hono'
import type { LambdaEvent } from 'hono/aws-lambda'
import { handle } from 'hono/aws-lambda'
type Bindings = {
event: LambdaEvent
}
const app = new Hono<{ Bindings: Bindings }>()
app.get('/custom-context/', (c) => {
const lambdaContext = c.env.event.requestContext
return c.json(lambdaContext)
})
export const handler = handle(app)
```
### Before v3.10.0 (deprecated)
you can access the AWS Lambda request context by binding the `ApiGatewayRequestContext` type and using `c.env.`
```ts
import { Hono } from 'hono'
import type { ApiGatewayRequestContext } from 'hono/aws-lambda'
import { handle } from 'hono/aws-lambda'
type Bindings = {
requestContext: ApiGatewayRequestContext
}
const app = new Hono<{ Bindings: Bindings }>()
app.get('/custom-context/', (c) => {
const lambdaContext = c.env.requestContext
return c.json(lambdaContext)
})
export const handler = handle(app)
```
## Lambda response streaming
By changing the invocation mode of AWS Lambda, you can achieve [Streaming Response](https://aws.amazon.com/blogs/compute/introducing-aws-lambda-response-streaming/).
```diff
fn.addFunctionUrl({
authType: lambda.FunctionUrlAuthType.NONE,
+ invokeMode: lambda.InvokeMode.RESPONSE_STREAM,
})
```
Typically, the implementation requires writing chunks to NodeJS.WritableStream using awslambda.streamifyResponse, but with the AWS Lambda Adaptor, you can achieve the traditional streaming response of Hono by using streamHandle instead of handle.
```ts
import { Hono } from 'hono'
import { streamHandle } from 'hono/aws-lambda'
import { streamText } from 'hono/streaming'
const app = new Hono()
app.get('/stream', async (c) => {
return streamText(c, async (stream) => {
for (let i = 0; i < 3; i++) {
await stream.writeln(`${i}`)
await stream.sleep(1)
}
})
})
export const handler = streamHandle(app)
```
# Getting Started
Using Hono is super easy. We can set up the project, write code, develop with a local server, and deploy quickly. The same code will work on any runtime, just with different entry points. Let's look at the basic usage of Hono.
## Starter
Starter templates are available for each platform. Use the following "create-hono" command.
::: code-group
```sh [npm]
npm create hono@latest my-app
```
```sh [yarn]
yarn create hono my-app
```
```sh [pnpm]
pnpm create hono@latest my-app
```
```sh [bun]
bun create hono@latest my-app
```
```sh [deno]
deno init --npm hono@latest my-app
```
:::
Then you will be asked which template you would like to use.
Let's select Cloudflare Workers for this example.
```
? Which template do you want to use?
aws-lambda
bun
cloudflare-pages
❯ cloudflare-workers
deno
fastly
nextjs
nodejs
vercel
```
The template will be pulled into `my-app`, so go to it and install the dependencies.
::: code-group
```sh [npm]
cd my-app
npm i
```
```sh [yarn]
cd my-app
yarn
```
```sh [pnpm]
cd my-app
pnpm i
```
```sh [bun]
cd my-app
bun i
```
:::
Once the package installation is complete, run the following command to start up a local server.
::: code-group
```sh [npm]
npm run dev
```
```sh [yarn]
yarn dev
```
```sh [pnpm]
pnpm dev
```
```sh [bun]
bun run dev
```
:::
## Hello World
You can write code in TypeScript with the Cloudflare Workers development tool "Wrangler", Deno, Bun, or others without being aware of transpiling.
Write your first application with Hono in `src/index.ts`. The example below is a starter Hono application.
The `import` and the final `export default` parts may vary from runtime to runtime,
but all of the application code will run the same code everywhere.
```ts
import { Hono } from 'hono'
const app = new Hono()
app.get('/', (c) => {
return c.text('Hello Hono!')
})
export default app
```
Start the development server and access `http://localhost:8787` with your browser.
::: code-group
```sh [npm]
npm run dev
```
```sh [yarn]
yarn dev
```
```sh [pnpm]
pnpm dev
```
```sh [bun]
bun run dev
```
:::
## Return JSON
Returning JSON is also easy. The following is an example of handling a GET Request to `/api/hello` and returning an `application/json` Response.
```ts
app.get('/api/hello', (c) => {
return c.json({
ok: true,
message: 'Hello Hono!',
})
})
```
## Request and Response
Getting a path parameter, URL query value, and appending a Response header is written as follows.
```ts
app.get('/posts/:id', (c) => {
const page = c.req.query('page')
const id = c.req.param('id')
c.header('X-Message', 'Hi!')
return c.text(`You want to see ${page} of ${id}`)
})
```
We can easily handle POST, PUT, and DELETE not only GET.
```ts
app.post('/posts', (c) => c.text('Created!', 201))
app.delete('/posts/:id', (c) =>
c.text(`${c.req.param('id')} is deleted!`)
)
```
## Return HTML
You can write HTML with [the html Helper](/docs/helpers/html) or using [JSX](/docs/guides/jsx) syntax. If you want to use JSX, rename the file to `src/index.tsx` and configure it (check with each runtime as it is different). Below is an example using JSX.
```tsx
const View = () => {
return (
Hello Hono!
)
}
app.get('/page', (c) => {
return c.html()
})
```
## Return raw Response
You can also return the raw [Response](https://developer.mozilla.org/en-US/docs/Web/API/Response).
```ts
app.get('/', () => {
return new Response('Good morning!')
})
```
## Using Middleware
Middleware can do the hard work for you.
For example, add in Basic Authentication.
```ts
import { basicAuth } from 'hono/basic-auth'
// ...
app.use(
'/admin/*',
basicAuth({
username: 'admin',
password: 'secret',
})
)
app.get('/admin', (c) => {
return c.text('You are authorized!')
})
```
There are useful built-in middleware including Bearer and authentication using JWT, CORS and ETag.
Hono also provides third-party middleware using external libraries such as GraphQL Server and Firebase Auth.
And, you can make your own middleware.
## Adapter
There are Adapters for platform-dependent functions, e.g., handling static files or WebSocket.
For example, to handle WebSocket in Cloudflare Workers, import `hono/cloudflare-workers`.
```ts
import { upgradeWebSocket } from 'hono/cloudflare-workers'
app.get(
'/ws',
upgradeWebSocket((c) => {
// ...
})
)
```
## Next step
Most code will work on any platform, but there are guides for each.
For instance, how to set up projects or how to deploy.
Please see the page for the exact platform you want to use to create your application!
# Service Worker
[Service Worker](https://developer.mozilla.org/en-US/docs/Web/API/Service_Worker_API) is a script that runs in the background of the browser to handle tasks like caching and push notifications. Using a Service Worker adapter, you can run applications made with Hono as [FetchEvent](https://developer.mozilla.org/en-US/docs/Web/API/FetchEvent) handler within the browser.
This page shows an example of creating a project using [Vite](https://vitejs.dev/).
## 1. Setup
First, create and move to your project directory:
```sh
mkdir my-app
cd my-app
```
Create the necessary files for the project. Make a `package.json` file with the following:
```json
{
"name": "my-app",
"private": true,
"scripts": {
"dev": "vite dev"
},
"type": "module"
}
```
Similarly, create a `tsconfig.json` file with the following:
```json
{
"compilerOptions": {
"target": "ES2020",
"module": "ESNext",
"lib": ["ES2020", "DOM", "WebWorker"],
"moduleResolution": "bundler"
},
"include": ["./"],
"exclude": ["node_modules"]
}
```
Next, install the necessary modules.
::: code-group
```sh [npm]
npm i hono
npm i -D vite
```
```sh [yarn]
yarn add hono
yarn add -D vite
```
```sh [pnpm]
pnpm add hono
pnpm add -D vite
```
```sh [bun]
bun add hono
bun add -D vite
```
:::
## 2. Hello World
Edit `index.html`:
```html
Hello World by Service Worker
```
`main.ts` is a script to register the Service Worker:
```ts
function register() {
navigator.serviceWorker
.register('/sw.ts', { scope: '/sw', type: 'module' })
.then(
function (_registration) {
console.log('Register Service Worker: Success')
},
function (_error) {
console.log('Register Service Worker: Error')
}
)
}
function start() {
navigator.serviceWorker
.getRegistrations()
.then(function (registrations) {
for (const registration of registrations) {
console.log('Unregister Service Worker')
registration.unregister()
}
register()
})
}
start()
```
In `sw.ts`, create an application using Hono and register it to the `fetch` event with the Service Worker adapter’s `handle` function. This allows the Hono application to intercept access to `/sw`.
```ts
// To support types
// https://github.com/microsoft/TypeScript/issues/14877
declare const self: ServiceWorkerGlobalScope
import { Hono } from 'hono'
import { handle } from 'hono/service-worker'
const app = new Hono().basePath('/sw')
app.get('/', (c) => c.text('Hello World'))
self.addEventListener('fetch', handle(app))
```
### Using `fire()`
The `fire()` function automatically calls `addEventListener('fetch', handle(app))` for you, making the code more concise.
```ts
import { Hono } from 'hono'
import { fire } from 'hono/service-worker'
const app = new Hono().basePath('/sw')
app.get('/', (c) => c.text('Hello World'))
fire(app)
```
## 3. Run
Start the development server.
::: code-group
```sh [npm]
npm run dev
```
```sh [yarn]
yarn dev
```
```sh [pnpm]
pnpm run dev
```
```sh [bun]
bun run dev
```
:::
By default, the development server will run on port `5173`. Access `http://localhost:5173/` in your browser to complete the Service Worker registration. Then, access `/sw` to see the response from the Hono application.
# Azure Functions
[Azure Functions](https://azure.microsoft.com/en-us/products/functions) is a serverless platform from Microsoft Azure. You can run your code in response to events, and it automatically manages the underlying compute resources for you.
Hono was not designed for Azure Functions at first, but with [Azure Functions Adapter](https://github.com/Marplex/hono-azurefunc-adapter), it can run on it as well.
It works with Azure Functions **V4** running on Node.js 18 or above.
## 1. Install CLI
To create an Azure Function, you must first install [Azure Functions Core Tools](https://learn.microsoft.com/en-us/azure/azure-functions/create-first-function-cli-typescript?pivots=nodejs-model-v4#install-the-azure-functions-core-tools).
On macOS
```sh
brew tap azure/functions
brew install azure-functions-core-tools@4
```
Follow this link for other OS:
- [Install the Azure Functions Core Tools | Microsoft Learn](https://learn.microsoft.com/en-us/azure/azure-functions/create-first-function-cli-typescript?pivots=nodejs-model-v4#install-the-azure-functions-core-tools)
## 2. Setup
Create a TypeScript Node.js V4 project in the current folder.
```sh
func init --typescript
```
Change the default route prefix of the host. Add this property to the root json object of `host.json`:
```json
"extensions": {
"http": {
"routePrefix": ""
}
}
```
::: info
The default Azure Functions route prefix is `/api`. If you don't change it as shown above, be sure to start all your Hono routes with `/api`
:::
Now you are ready to install Hono and the Azure Functions Adapter with:
::: code-group
```sh [npm]
npm i @marplex/hono-azurefunc-adapter hono
```
```sh [yarn]
yarn add @marplex/hono-azurefunc-adapter hono
```
```sh [pnpm]
pnpm add @marplex/hono-azurefunc-adapter hono
```
```sh [bun]
bun add @marplex/hono-azurefunc-adapter hono
```
:::
## 3. Hello World
Create `src/app.ts`:
```ts
// src/app.ts
import { Hono } from 'hono'
const app = new Hono()
app.get('/', (c) => c.text('Hello Azure Functions!'))
export default app
```
Create `src/functions/httpTrigger.ts`:
```ts
// src/functions/httpTrigger.ts
import { app } from '@azure/functions'
import { azureHonoHandler } from '@marplex/hono-azurefunc-adapter'
import honoApp from '../app'
app.http('httpTrigger', {
methods: [
//Add all your supported HTTP methods here
'GET',
'POST',
'DELETE',
'PUT',
],
authLevel: 'anonymous',
route: '{*proxy}',
handler: azureHonoHandler(honoApp.fetch),
})
```
## 4. Run
Run the development server locally. Then, access `http://localhost:7071` in your Web browser.
::: code-group
```sh [npm]
npm run start
```
```sh [yarn]
yarn start
```
```sh [pnpm]
pnpm start
```
```sh [bun]
bun run start
```
:::
## 5. Deploy
::: info
Before you can deploy to Azure, you need to create some resources in your cloud infrastructure. Please visit the Microsoft documentation on [Create supporting Azure resources for your function](https://learn.microsoft.com/en-us/azure/azure-functions/create-first-function-cli-typescript?pivots=nodejs-model-v4&tabs=windows%2Cazure-cli%2Cbrowser#create-supporting-azure-resources-for-your-function)
:::
Build the project for deployment:
::: code-group
```sh [npm]
npm run build
```
```sh [yarn]
yarn build
```
```sh [pnpm]
pnpm build
```
```sh [bun]
bun run build
```
:::
Deploy your project to the function app in Azure Cloud. Replace `` with the name of your app.
```sh
func azure functionapp publish
```
# Lambda@Edge
[Lambda@Edge](https://aws.amazon.com/lambda/edge/) is a serverless platform by Amazon Web Services. It allows you to run Lambda functions at Amazon CloudFront's edge locations, enabling you to customize behaviors for HTTP requests/responses.
Hono supports Lambda@Edge with the Node.js 18+ environment.
## 1. Setup
When creating the application on Lambda@Edge,
[CDK](https://docs.aws.amazon.com/serverless-application-model/latest/developerguide/serverless-cdk.html)
is useful to set up the functions such as CloudFront, IAM Role, API Gateway, and others.
Initialize your project with the `cdk` CLI.
::: code-group
```sh [npm]
mkdir my-app
cd my-app
cdk init app -l typescript
npm i hono
mkdir lambda
```
```sh [yarn]
mkdir my-app
cd my-app
cdk init app -l typescript
yarn add hono
mkdir lambda
```
```sh [pnpm]
mkdir my-app
cd my-app
cdk init app -l typescript
pnpm add hono
mkdir lambda
```
```sh [bun]
mkdir my-app
cd my-app
cdk init app -l typescript
bun add hono
mkdir lambda
```
:::
## 2. Hello World
Edit `lambda/index_edge.ts`.
```ts
import { Hono } from 'hono'
import { handle } from 'hono/lambda-edge'
const app = new Hono()
app.get('/', (c) => c.text('Hello Hono on Lambda@Edge!'))
export const handler = handle(app)
```
## 3. Deploy
Edit `bin/my-app.ts`.
```ts
#!/usr/bin/env node
import 'source-map-support/register'
import * as cdk from 'aws-cdk-lib'
import { MyAppStack } from '../lib/my-app-stack'
const app = new cdk.App()
new MyAppStack(app, 'MyAppStack', {
env: {
account: process.env.CDK_DEFAULT_ACCOUNT,
region: 'us-east-1',
},
})
```
Edit `lambda/cdk-stack.ts`.
```ts
import { Construct } from 'constructs'
import * as cdk from 'aws-cdk-lib'
import * as cloudfront from 'aws-cdk-lib/aws-cloudfront'
import * as origins from 'aws-cdk-lib/aws-cloudfront-origins'
import * as lambda from 'aws-cdk-lib/aws-lambda'
import { NodejsFunction } from 'aws-cdk-lib/aws-lambda-nodejs'
import * as s3 from 'aws-cdk-lib/aws-s3'
export class MyAppStack extends cdk.Stack {
public readonly edgeFn: lambda.Function
constructor(scope: Construct, id: string, props?: cdk.StackProps) {
super(scope, id, props)
const edgeFn = new NodejsFunction(this, 'edgeViewer', {
entry: 'lambda/index_edge.ts',
handler: 'handler',
runtime: lambda.Runtime.NODEJS_20_X,
})
// Upload any html
const originBucket = new s3.Bucket(this, 'originBucket')
new cloudfront.Distribution(this, 'Cdn', {
defaultBehavior: {
origin: new origins.S3Origin(originBucket),
edgeLambdas: [
{
functionVersion: edgeFn.currentVersion,
eventType: cloudfront.LambdaEdgeEventType.VIEWER_REQUEST,
},
],
},
})
}
}
```
Finally, run the command to deploy:
```sh
cdk deploy
```
## Callback
If you want to add Basic Auth and continue with request processing after verification, you can use `c.env.callback()`
```ts
import { Hono } from 'hono'
import { basicAuth } from 'hono/basic-auth'
import type { Callback, CloudFrontRequest } from 'hono/lambda-edge'
import { handle } from 'hono/lambda-edge'
type Bindings = {
callback: Callback
request: CloudFrontRequest
}
const app = new Hono<{ Bindings: Bindings }>()
app.get(
'*',
basicAuth({
username: 'hono',
password: 'acoolproject',
})
)
app.get('/', async (c, next) => {
await next()
c.env.callback(null, c.env.request)
})
export const handler = handle(app)
```
# Next.js
Next.js is a flexible React framework that gives you building blocks to create fast web applications.
You can run Hono on Next.js when using the Node.js runtime.\
On Vercel, deploying Hono with Next.js is easy by using Vercel Functions.
## 1. Setup
A starter for Next.js is available.
Start your project with "create-hono" command.
Select `nextjs` template for this example.
::: code-group
```sh [npm]
npm create hono@latest my-app
```
```sh [yarn]
yarn create hono my-app
```
```sh [pnpm]
pnpm create hono my-app
```
```sh [bun]
bun create hono@latest my-app
```
```sh [deno]
deno init --npm hono my-app
```
:::
Move into `my-app` and install the dependencies.
::: code-group
```sh [npm]
cd my-app
npm i
```
```sh [yarn]
cd my-app
yarn
```
```sh [pnpm]
cd my-app
pnpm i
```
```sh [bun]
cd my-app
bun i
```
:::
## 2. Hello World
If you use the App Router, Edit `app/api/[[...route]]/route.ts`. Refer to the [Supported HTTP Methods](https://nextjs.org/docs/app/building-your-application/routing/route-handlers#supported-http-methods) section for more options.
```ts
import { Hono } from 'hono'
import { handle } from 'hono/vercel'
const app = new Hono().basePath('/api')
app.get('/hello', (c) => {
return c.json({
message: 'Hello Next.js!',
})
})
export const GET = handle(app)
export const POST = handle(app)
```
## 3. Run
Run the development server locally. Then, access `http://localhost:3000` in your Web browser.
::: code-group
```sh [npm]
npm run dev
```
```sh [yarn]
yarn dev
```
```sh [pnpm]
pnpm dev
```
```sh [bun]
bun run dev
```
:::
Now, `/api/hello` just returns JSON, but if you build React UIs, you can create a full-stack application with Hono.
## 4. Deploy
If you have a Vercel account, you can deploy by linking the Git repository.
## Pages Router
If you use the Pages Router, you'll need to install the Node.js adapter first.
::: code-group
```sh [npm]
npm i @hono/node-server
```
```sh [yarn]
yarn add @hono/node-server
```
```sh [pnpm]
pnpm add @hono/node-server
```
```sh [bun]
bun add @hono/node-server
```
:::
Then, you can utilize the `handle` function imported from `@hono/node-server/vercel` in `pages/api/[[...route]].ts`.
```ts
import { Hono } from 'hono'
import { handle } from '@hono/node-server/vercel'
import type { PageConfig } from 'next'
export const config: PageConfig = {
api: {
bodyParser: false,
},
}
const app = new Hono().basePath('/api')
app.get('/hello', (c) => {
return c.json({
message: 'Hello Next.js!',
})
})
export default handle(app)
```
In order for this to work with the Pages Router, it's important to disable Vercel Node.js helpers by setting up an environment variable in your project dashboard or in your `.env` file.
```text
NODEJS_HELPERS=0
```
# Fastly Compute
[Fastly Compute](https://www.fastly.com/products/edge-compute) is an advanced edge computing system that runs your code, in your favorite language, on Fastly's global edge network. Hono also works on Fastly Compute.
You can develop the application locally and publish it with a few commands using [Fastly CLI](https://www.fastly.com/documentation/reference/tools/cli/), which is installed locally automatically as part of the template.
## 1. Setup
A starter for Fastly Compute is available.
Start your project with "create-hono" command.
Select `fastly` template for this example.
::: code-group
```sh [npm]
npm create hono@latest my-app
```
```sh [yarn]
yarn create hono my-app
```
```sh [pnpm]
pnpm create hono my-app
```
```sh [bun]
bun create hono@latest my-app
```
```sh [deno]
deno init --npm hono my-app
```
:::
Move to `my-app` and install the dependencies.
::: code-group
```sh [npm]
cd my-app
npm i
```
```sh [yarn]
cd my-app
yarn
```
```sh [pnpm]
cd my-app
pnpm i
```
```sh [bun]
cd my-app
bun i
```
:::
## 2. Hello World
Edit `src/index.ts`:
```ts
// src/index.ts
import { Hono } from 'hono'
import { fire } from '@fastly/hono-fastly-compute'
const app = new Hono()
app.get('/', (c) => c.text('Hello Fastly!'))
fire(app)
```
> [!NOTE]
> When using `fire` (or `buildFire()`) from `@fastly/hono-fastly-compute'` at the top level of your application, it is suitable to use `Hono` from `'hono'` rather than `'hono/quick'`, because `fire` causes its router to build its internal data during the application initialization phase.
## 3. Run
Run the development server locally. Then, access `http://localhost:7676` in your Web browser.
::: code-group
```sh [npm]
npm run start
```
```sh [yarn]
yarn start
```
```sh [pnpm]
pnpm run start
```
```sh [bun]
bun run start
```
:::
## 4. Deploy
To build and deploy your application to your Fastly account, type the following command. The first time you deploy the application, you will be prompted to create a new service in your account.
If you don't have an account yet, you must [create your Fastly account](https://www.fastly.com/signup/).
::: code-group
```sh [npm]
npm run deploy
```
```sh [yarn]
yarn deploy
```
```sh [pnpm]
pnpm run deploy
```
```sh [bun]
bun run deploy
```
:::
## Bindings
In Fastly Compute, you can bind Fastly platform resources, such as KV Stores, Config Stores, Secret Stores, Backends, Access Control Lists, Named Log Streams, and Environment Variables. You can access them through `c.env`, and will have their individual SDK types.
To use these bindings, import `buildFire` instead of `fire` from `@fastly/hono-fastly-compute`. Define your [bindings](https://github.com/fastly/compute-js-context?tab=readme-ov-file#typed-bindings-with-buildcontextproxy) and pass them to [`buildFire()`](https://github.com/fastly/hono-fastly-compute?tab=readme-ov-file#basic-example) to obtain `fire`. Then use `fire.Bindings` to define your `Env` type as you construct `Hono`.
```ts
// src/index.ts
import { buildFire } from '@fastly/hono-fastly-compute'
const fire = buildFire({
siteData: 'KVStore:site-data', // I have a KV Store named "site-data"
})
const app = new Hono<{ Bindings: typeof fire.Bindings }>()
app.put('/upload/:key', async (c, next) => {
// e.g., Access the KV Store
const key = c.req.param('key')
await c.env.siteData.put(key, c.req.body)
return c.text(`Put ${key} successfully!`)
})
fire(app)
```
# Google Cloud Run
[Google Cloud Run](https://cloud.google.com/run) is a serverless platform built by Google Cloud. You can run your code in response to events and Google automatically manages the underlying compute resources for you.
Google Cloud Run uses containers to run your service. This means you can use any runtime you like (E.g., Deno or Bun) by providing a Dockerfile. If no Dockerfile is provided Google Cloud Run will use the default Node.js buildpack.
This guide assumes you already have a Google Cloud account and a billing account.
## 1. Install the CLI
When working with Google Cloud Platform, it is easiest to work with the [gcloud CLI](https://cloud.google.com/sdk/docs/install).
For example, on MacOS using Homebrew:
```sh
brew install --cask gcloud-cli
```
Authenticate with the CLI.
```sh
gcloud auth login
```
## 2. Project setup
Create a project. Accept the auto-generated project ID at the prompt.
```sh
gcloud projects create --set-as-default --name="my app"
```
Create environment variables for your project ID and project number for easy reuse. It may take ~30 seconds before the project successfully returns with the `gcloud projects list` command.
```sh
PROJECT_ID=$(gcloud projects list \
--format='value(projectId)' \
--filter='name="my app"')
PROJECT_NUMBER=$(gcloud projects list \
--format='value(projectNumber)' \
--filter='name="my app"')
echo $PROJECT_ID $PROJECT_NUMBER
```
Find your billing account ID.
```sh
gcloud billing accounts list
```
Add your billing account from the prior command to the project.
```sh
gcloud billing projects link $PROJECT_ID \
--billing-account=[billing_account_id]
```
Enable the required APIs.
```sh
gcloud services enable run.googleapis.com \
cloudbuild.googleapis.com
```
Update the service account permissions to have access to Cloud Build.
```sh
gcloud projects add-iam-policy-binding $PROJECT_ID \
--member=serviceAccount:$PROJECT_NUMBER-compute@developer.gserviceaccount.com \
--role=roles/run.builder
```
## 3. Hello World
Start your project with "create-hono" command. Select `nodejs`.
```sh
npm create hono@latest my-app
```
Move to `my-app` and install the dependencies.
```sh
cd my-app
npm i
```
Update the port in `src/index.ts` to be `8080`.
```ts
import { serve } from '@hono/node-server'
import { Hono } from 'hono'
const app = new Hono()
app.get('/', (c) => {
return c.text('Hello Hono!')
})
serve({
fetch: app.fetch,
port: 3000 // [!code --]
port: 8080 // [!code ++]
}, (info) => {
console.log(`Server is running on http://localhost:${info.port}`)
})
```
Run the development server locally. Then, access http://localhost:8080 in your Web browser.
```sh
npm run dev
```
## 4. Deploy
Start the deployment and follow the interactive prompts (E.g., select a region).
```sh
gcloud run deploy my-app --source . --allow-unauthenticated
```
## Changing runtimes
If you want to deploy using Deno or Bun runtimes (or a customised Nodejs container), add a `Dockerfile` (and optionally `.dockerignore`) with your desired environment.
For information on containerizing, please refer to:
- [Node.js](/docs/getting-started/nodejs#building-deployment)
- [Bun](https://bun.com/guides/ecosystem/docker)
- [Deno](https://docs.deno.com/examples/google_cloud_run_tutorial)
# WebAssembly (w/ WASI)
[WebAssembly][wasm-core] is a secure, sandboxed, portable runtime that runs inside and outside web browsers.
In practice:
- Languages (like JavaScript) _compile to_ WebAssembly (`.wasm` files)
- WebAssembly runtimes (like [`wasmtime`][wasmtime] or [`jco`][jco]) enable _running_ WebAssembly binaries
While core WebAssembly has _no_ access to things like the local filesystem or sockets, the [WebAssembly System Interface][wasi]
steps in to enable defining a platform under WebAssebly workloads.
This means that _with_ WASI, WebAssembly can operate on files, sockets, and much more.
::: info
Want to peek at the WASI interface yourself? check out [`wasi:http`][wasi-http]
:::
Support for WebAssembly w/ WASI in JS is powered by [StarlingMonkey][sm], and thanks to the focus on Web standards in
both StarlingMonkey and Hono, **Hono works \*out of the box with WASI-enabled WebAssembly ecosystems.**
[sm]: https://github.com/bytecodealliance/StarlingMonkey
[wasm-core]: https://webassembly.org/
[wasi]: https://wasi.dev/
[bca]: https://bytecodealliance.org/
[wasi-http]: https://github.com/WebAssembly/wasi-http
## 1. Setup
The WebAssembly JS ecosystem provides tooling to make it easy to get started building WASI-enabled WebAssembly components:
- [StarlingMonkey][sm] is a fork of [SpiderMonkey][spidermonkey] that compiles to WebAssembly and enables components
- [`componentize-js`][componentize-js] turns JavaScript ES modules into WebAssembly components
- [`jco`][jco] is a multi-tool that builds components, generates types, and runs components in environments like Node.js or the browser
::: info
WebAssembly has an open ecosystem and is open source, with core projects stewarded primarily by the [Bytecode Alliance][bca] and its members.
New features, issues, pull requests and other types of contributions are always welcome.
:::
While a starter for Hono on WebAssembly is not yet available, you can start a WebAssembly Hono project just like any other:
::: code-group
```sh [npm]
mkdir my-app
cd my-app
npm init
npm i hono
npm i -D @bytecodealliance/jco @bytecodealliance/componentize-js @bytecodealliance/jco-std
npm i -D rolldown
```
````sh [yarn]
mkdir my-app
cd my-app
npm init
yarn add hono
yarn add -D @bytecodealliance/jco @bytecodealliance/componentize-js @bytecodealliance/jco-std
yarn add -D rolldown
G```
```sh [pnpm]
mkdir my-app
cd my-app
pnpm init --init-type module
pnpm add hono
pnpm add -D @bytecodealliance/jco @bytecodealliance/componentize-js @bytecodealliance/jco-std
pnpm add -D rolldown
````
```sh [bun]
mkdir my-app
cd my-app
npm init
bun add hono
bun add -D @bytecodealliance/jco @bytecodealliance/componentize-js @bytecodealliance/jco-std
```
:::
::: info
To ensure your project uses ES modules, ensure `type` is set to `"module"` in `package.json`
:::
After entering the `my-app` folder, install dependencies, and initialize TypeScript:
::: code-group
```sh [npm]
npm i
npx tsc --init
```
```sh [yarn]
yarn
yarn tsc --init
```
```sh [pnpm]
pnpm i
pnpm exec --init
```
```sh [bun]
bun i
```
:::
Once you have a basic TypeScript configuration file (`tsconfig.json`), please ensure it has the following configuration:
- `compilerOptions.module` set to `"nodenext"`
Since `componentize-js` (and `jco` which re-uses it) supports only single JS files,
bundling is necessary, so [`rolldown`][rolldown] can be used to create a single file bundle.
A Rolldown configuration (`rolldown.config.mjs`) like the following can be used:
```js
import { defineConfig } from 'rolldown'
export default defineConfig({
input: 'src/component.ts',
external: /wasi:.*/,
output: {
file: 'dist/component.js',
format: 'esm',
},
})
```
::: info
Feel free to use any other bundlers that you're more comfortable with (`rolldown`, `esbuild`, `rollup`, etc)
:::
[jco]: https://github.com/bytecodealliance/jco
[componentize-js]: https://github.com/bytecodealliance/componentize-js
[rolldown]: https://rolldown.rs
[spidermonkey]: https://spidermonkey.dev/
## 2. Set up WIT interface & dependencies
[WebAssembly Inteface Types (WIT)][wit] is an Interface Definition Language ("IDL") that governs what functionality a WebAssembly component uses ("imports"), and what it provides ("exports").
Amongst the standardized WIT interfaces, [`wasi:http`][wasi-http] is for dealing with HTTP requests (whether it's receiving them or sending them out), and since we intend to make a web server, our component must declare the use of `wasi:http/incoming-handler` in it's [WIT world][wit-world]:
First, let's set up the component's WIT world in a file called `wit/component.wit`:
```txt
package example:hono;
world component {
export wasi:http/incoming-handler@0.2.6;
}
```
Put simply, the WIT file above means that our component "providers" the functionality of "receiving"/"handling incoming" HTTP requests.
The `wasi:http/incoming-handler` interface relies on upstream standardized WIT interfaces (specifications on how requests are structured, etc).
To pull those third party (Bytecode Alliance maintained) WIT interaces, one tool we can use is [`wkg`][wkg]:
```sh
wkg wit fetch
```
Once `wkg` has finished running, you should find your `wit` folder populated with a new `deps` folder alongside `component.wit`:
```
wit
├── component.wit
└── deps
├── wasi-cli-0.2.6
│ └── package.wit
├── wasi-clocks-0.2.6
│ └── package.wit
├── wasi-http-0.2.6
│ └── package.wit
├── wasi-io-0.2.6
│ └── package.wit
└── wasi-random-0.2.6
└── package.wit
```
[wkg]: https://github.com/bytecodealliance/wasm-pkg-tools
[wit-world]: https://github.com/WebAssembly/component-model/blob/main/design/mvp/WIT.md#wit-worlds
[wit]: https://github.com/WebAssembly/component-model/blob/main/design/mvp/WIT.md
## 3. Hello Wasm
To build a HTTP server in WebAssembly, we can make use of the [`jco-std`][jco-std] project, which contains helpers that make the experience very similar to the standard Hono experience.
Let's fulfill our `component` world with a basic Hono application as a WebAssembly component in a file called `src/component.ts`:
```ts
import { Hono } from 'hono'
import { fire } from '@bytecodealliance/jco-std/wasi/0.2.6/http/adapters/hono/server'
const app = new Hono()
app.get('/hello', (c) => {
return c.json({ message: 'Hello from WebAssembly!' })
})
fire(app)
// Although we've called `fire()` with wasi HTTP configured for use above,
// we still need to actually export the `wasi:http/incoming-handler` interface object,
// as jco and componentize-js will be looking for the ES module export that matches the WASI interface.
export { incomingHandler } from '@bytecodealliance/jco-std/wasi/0.2.6/http/adapters/hono/server'
```
## 4. Build
Since we're using Rolldown (and it's configured to handle TypeScript compilation), we can use it to build and bundle:
::: code-group
```sh [npm]
npx rolldown -c
```
```sh [yarn]
yarn rolldown -c
```
```sh [pnpm]
pnpm exec rolldown -c
```
```sh [bun]
bun build --target=bun --outfile=dist/component.js ./src/component.ts
```
:::
::: info
The bundling step is necessary because WebAssembly JS ecosystem tooling only currently supports a single JS file, and we'd like to include Hono along with related libraries.
For components with simpler requirements, bundlers are not necessary.
:::
To build your WebAssembly component, use `jco` (and indirectly `componentize-js`):
::: code-group
```sh [npm]
npx jco componentize -w wit -o dist/component.wasm dist/component.js
```
```sh [yarn]
yarn jco componentize -w wit -o dist/component.wasm dist/component.js
```
```sh [pnpm]
pnpm exec jco componentize -w wit -o dist/component.wasm dist/component.js
```
```sh [bun]
bun run jco componentize -w wit -o dist/component.wasm dist/component.js
```
:::
## 5. Run
To run your Hono WebAssembly HTTP server, you can use any WASI-enabled WebAssembly runtime:
- [`wasmtime`][wasmtime]
- `jco` (runs in Node.js)
In this guide, we'll use `jco serve` since it's already installed.
::: warning
`jco serve` is meant for development, and is not recommended for production use.
:::
[wasmtime]: https://wasmtime.dev
::: code-group
```sh [npm]
npx jco serve dist/component.wasm
```
```sh [yarn]
yarn jco serve dist/component.wasm
```
```sh [pnpm]
pnpm exec jco serve dist/component.wasm
```
```sh [bun]
bun run jco serve dist/component.wasm
```
:::
You should see output like the following:
```
$ npx jco serve dist/component.wasm
Server listening @ localhost:8000...
```
Sending a request to `localhost:8000/hello` will produce the JSON output you've specified in your Hono application.
You should see output like the following:
```json
{ "message": "Hello from WebAssembly!" }
```
::: info
`jco serve` works by converting the WebAssembly component into a basic WebAssembly coremodule, so that it can be run in runtimes like Node.js and the browser.
This process is normally run via `jco transpile`, and is the way we can use JS engines like Node.js and the browser (which may use V8 or other Javascript engines) as WebAssembly Component runtimes.
How `jco transpile` is outside the scope of this guide, you can read more about it in [the Jco book][jco-book]
:::
## More information
To learn more about WASI, WebAssembly components and more, see the following resources:
- [BytecodeAlliance Component Model book][cm-book]
- [`jco` codebase][jco]
- [`jco` example components][jco-example-components] (in particular the [Hono example][jco-example-component-hono])
- [Jco book][jco-book]
- [`componentize-js` codebase][componentize-js]
- [StarlingMonkey codebase][sm]
To reach out to the WebAssembly community with questions, comments, contributions or to file issues:
- [Bytecode Alliance Zulip](https://bytecodealliance.zulipchat.com) (consider posting in the [#jco channel](https://bytecodealliance.zulipchat.com/#narrow/channel/409526-jco))
- [Jco repository](https://github.com/bytecodealliance/jco)
- [componentize-js repository](https://github.com/bytecodealliance/componentize-js)
[cm-book]: https://component-model.bytecodealliance.org/
[jco-book]: https://bytecodealliance.github.io/jco/
[jco-example-components]: https://github.com/bytecodealliance/jco/tree/main/examples/components
[jco-example-component-hono]: https://github.com/bytecodealliance/jco/tree/main/examples/components/http-server-hono
# Cloudflare Pages
[Cloudflare Pages](https://pages.cloudflare.com) is an edge platform for full-stack web applications.
It serves static files and dynamic content provided by Cloudflare Workers.
Hono fully supports Cloudflare Pages.
It introduces a delightful developer experience. Vite's dev server is fast, and deploying with Wrangler is super quick.
## 1. Setup
A starter for Cloudflare Pages is available.
Start your project with "create-hono" command.
Select `cloudflare-pages` template for this example.
::: code-group
```sh [npm]
npm create hono@latest my-app
```
```sh [yarn]
yarn create hono my-app
```
```sh [pnpm]
pnpm create hono my-app
```
```sh [bun]
bun create hono@latest my-app
```
```sh [deno]
deno init --npm hono my-app
```
:::
Move into `my-app` and install the dependencies.
::: code-group
```sh [npm]
cd my-app
npm i
```
```sh [yarn]
cd my-app
yarn
```
```sh [pnpm]
cd my-app
pnpm i
```
```sh [bun]
cd my-app
bun i
```
:::
Below is a basic directory structure.
```text
./
├── package.json
├── public
│ └── static // Put your static files.
│ └── style.css // You can refer to it as `/static/style.css`.
├── src
│ ├── index.tsx // The entry point for server-side.
│ └── renderer.tsx
├── tsconfig.json
└── vite.config.ts
```
## 2. Hello World
Edit `src/index.tsx` like the following:
```tsx
import { Hono } from 'hono'
import { renderer } from './renderer'
const app = new Hono()
app.get('*', renderer)
app.get('/', (c) => {
return c.render(
Hello, Cloudflare Pages!
)
})
export default app
```
## 3. Run
Run the development server locally. Then, access `http://localhost:5173` in your Web browser.
::: code-group
```sh [npm]
npm run dev
```
```sh [yarn]
yarn dev
```
```sh [pnpm]
pnpm dev
```
```sh [bun]
bun run dev
```
:::
## 4. Deploy
If you have a Cloudflare account, you can deploy to Cloudflare. In `package.json`, `$npm_execpath` needs to be changed to your package manager of choice.
::: code-group
```sh [npm]
npm run deploy
```
```sh [yarn]
yarn deploy
```
```sh [pnpm]
pnpm run deploy
```
```sh [bun]
bun run deploy
```
:::
### Deploy via the Cloudflare dashboard with GitHub
1. Log in to the [Cloudflare dashboard](https://dash.cloudflare.com) and select your account.
2. In Account Home, select Workers & Pages > Create application > Pages > Connect to Git.
3. Authorize your GitHub account, and select the repository. In Set up builds and deployments, provide the following information:
| Configuration option | Value |
| -------------------- | --------------- |
| Production branch | `main` |
| Build command | `npm run build` |
| Build directory | `dist` |
## Bindings
You can use Cloudflare Bindings like Variables, KV, D1, and others.
In this section, let's use Variables and KV.
### Create `wrangler.toml`
First, create `wrangler.toml` for local Bindings:
```sh
touch wrangler.toml
```
Edit `wrangler.toml`. Specify Variable with the name `MY_NAME`.
```toml
[vars]
MY_NAME = "Hono"
```
### Create KV
Next, make the KV. Run the following `wrangler` command:
```sh
wrangler kv namespace create MY_KV --preview
```
Note down the `preview_id` as the following output:
```
{ binding = "MY_KV", preview_id = "abcdef" }
```
Specify `preview_id` with the name of Bindings, `MY_KV`:
```toml
[[kv_namespaces]]
binding = "MY_KV"
id = "abcdef"
```
### Edit `vite.config.ts`
Edit the `vite.config.ts`:
```ts
import devServer from '@hono/vite-dev-server'
import adapter from '@hono/vite-dev-server/cloudflare'
import build from '@hono/vite-cloudflare-pages'
import { defineConfig } from 'vite'
export default defineConfig({
plugins: [
devServer({
entry: 'src/index.tsx',
adapter, // Cloudflare Adapter
}),
build(),
],
})
```
### Use Bindings in your application
Use Variable and KV in your application. Set the types.
```ts
type Bindings = {
MY_NAME: string
MY_KV: KVNamespace
}
const app = new Hono<{ Bindings: Bindings }>()
```
Use them:
```tsx
app.get('/', async (c) => {
await c.env.MY_KV.put('name', c.env.MY_NAME)
const name = await c.env.MY_KV.get('name')
return c.render(
Hello! {name}
)
})
```
### In production
For Cloudflare Pages, you will use `wrangler.toml` for local development, but for production, you will set up Bindings in the dashboard.
## Client-side
You can write client-side scripts and import them into your application using Vite's features.
If `/src/client.ts` is the entry point for the client, simply write it in the script tag.
Additionally, `import.meta.env.PROD` is useful for detecting whether it's running on a dev server or in the build phase.
```tsx
app.get('/', (c) => {
return c.html(
{import.meta.env.PROD ? (
) : (
)}
Hello
)
})
```
In order to build the script properly, you can use the example config file `vite.config.ts` as shown below.
```ts
import pages from '@hono/vite-cloudflare-pages'
import devServer from '@hono/vite-dev-server'
import { defineConfig } from 'vite'
export default defineConfig(({ mode }) => {
if (mode === 'client') {
return {
build: {
rollupOptions: {
input: './src/client.ts',
output: {
entryFileNames: 'static/client.js',
},
},
},
}
} else {
return {
plugins: [
pages(),
devServer({
entry: 'src/index.tsx',
}),
],
}
}
})
```
You can run the following command to build the server and client script.
```sh
vite build --mode client && vite build
```
## Cloudflare Pages Middleware
Cloudflare Pages uses its own [middleware](https://developers.cloudflare.com/pages/functions/middleware/) system that is different from Hono's middleware. You can enable it by exporting `onRequest` in a file named `_middleware.ts` like this:
```ts
// functions/_middleware.ts
export async function onRequest(pagesContext) {
console.log(`You are accessing ${pagesContext.request.url}`)
return await pagesContext.next()
}
```
Using `handleMiddleware`, you can use Hono's middleware as Cloudflare Pages middleware.
```ts
// functions/_middleware.ts
import { handleMiddleware } from 'hono/cloudflare-pages'
export const onRequest = handleMiddleware(async (c, next) => {
console.log(`You are accessing ${c.req.url}`)
await next()
})
```
You can also use built-in and 3rd party middleware for Hono. For example, to add Basic Authentication, you can use [Hono's Basic Authentication Middleware](/docs/middleware/builtin/basic-auth).
```ts
// functions/_middleware.ts
import { handleMiddleware } from 'hono/cloudflare-pages'
import { basicAuth } from 'hono/basic-auth'
export const onRequest = handleMiddleware(
basicAuth({
username: 'hono',
password: 'acoolproject',
})
)
```
If you want to apply multiple middleware, you can write it like this:
```ts
import { handleMiddleware } from 'hono/cloudflare-pages'
// ...
export const onRequest = [
handleMiddleware(middleware1),
handleMiddleware(middleware2),
handleMiddleware(middleware3),
]
```
### Accessing `EventContext`
You can access [`EventContext`](https://developers.cloudflare.com/pages/functions/api-reference/#eventcontext) object via `c.env` in `handleMiddleware`.
```ts
// functions/_middleware.ts
import { handleMiddleware } from 'hono/cloudflare-pages'
export const onRequest = [
handleMiddleware(async (c, next) => {
c.env.eventContext.data.user = 'Joe'
await next()
}),
]
```
Then, you can access the data value in via `c.env.eventContext` in the handler:
```ts
// functions/api/[[route]].ts
import type { EventContext } from 'hono/cloudflare-pages'
import { handle } from 'hono/cloudflare-pages'
// ...
type Env = {
Bindings: {
eventContext: EventContext
}
}
const app = new Hono().basePath('/api')
app.get('/hello', (c) => {
return c.json({
message: `Hello, ${c.env.eventContext.data.user}!`, // 'Joe'
})
})
export const onRequest = handle(app)
```
# Dev Helper
Dev Helper provides useful methods you can use in development.
```ts
import { Hono } from 'hono'
import { getRouterName, showRoutes } from 'hono/dev'
```
## `getRouterName()`
You can get the name of the currently used router with `getRouterName()`.
```ts
const app = new Hono()
// ...
console.log(getRouterName(app))
```
## `showRoutes()`
`showRoutes()` function displays the registered routes in your console.
Consider an application like the following:
```ts
const app = new Hono().basePath('/v1')
app.get('/posts', (c) => {
// ...
})
app.get('/posts/:id', (c) => {
// ...
})
app.post('/posts', (c) => {
// ...
})
showRoutes(app, {
verbose: true,
})
```
When this application starts running, the routes will be shown in your console as follows:
```txt
GET /v1/posts
GET /v1/posts/:id
POST /v1/posts
```
## Options
### verbose: `boolean`
When set to `true`, it displays verbose information.
### colorize: `boolean`
When set to `false`, the output will not be colored.
# Route Helper
The Route Helper provides enhanced routing information for debugging and middleware development. It allows you to access detailed information about matched routes and the current route being processed.
## Import
```ts
import { Hono } from 'hono'
import {
matchedRoutes,
routePath,
baseRoutePath,
basePath,
} from 'hono/route'
```
## Usage
### Basic route information
```ts
const app = new Hono()
app.get('/posts/:id', (c) => {
const currentPath = routePath(c) // '/posts/:id'
const routes = matchedRoutes(c) // Array of matched routes
return c.json({
path: currentPath,
totalRoutes: routes.length,
})
})
```
### Working with sub-applications
```ts
const app = new Hono()
const apiApp = new Hono()
apiApp.get('/posts/:id', (c) => {
return c.json({
routePath: routePath(c), // '/posts/:id'
baseRoutePath: baseRoutePath(c), // '/api'
basePath: basePath(c), // '/api' (with actual params)
})
})
app.route('/api', apiApp)
```
## `matchedRoutes()`
Returns an array of all routes that matched the current request, including middleware.
```ts
app.all('/api/*', (c, next) => {
console.log('API middleware')
return next()
})
app.get('/api/users/:id', (c) => {
const routes = matchedRoutes(c)
// Returns: [
// { method: 'ALL', path: '/api/*', handler: [Function] },
// { method: 'GET', path: '/api/users/:id', handler: [Function] }
// ]
return c.json({ routes: routes.length })
})
```
## `routePath()`
Returns the route path pattern registered for the current handler.
```ts
app.get('/posts/:id', (c) => {
console.log(routePath(c)) // '/posts/:id'
return c.text('Post details')
})
```
### Using with index parameter
You can optionally pass an index parameter to get the route path at a specific position, similar to `Array.prototype.at()`.
```ts
app.all('/api/*', (c, next) => {
return next()
})
app.get('/api/users/:id', (c) => {
console.log(routePath(c, 0)) // '/api/*' (first matched route)
console.log(routePath(c, -1)) // '/api/users/:id' (last matched route)
return c.text('User details')
})
```
## `baseRoutePath()`
Returns the base path pattern of the current route as specified in routing.
```ts
const subApp = new Hono()
subApp.get('/posts/:id', (c) => {
return c.text(baseRoutePath(c)) // '/:sub'
})
app.route('/:sub', subApp)
```
### Using with index parameter
You can optionally pass an index parameter to get the base route path at a specific
position, similar to `Array.prototype.at()`.
```ts
app.all('/api/*', (c, next) => {
return next()
})
const subApp = new Hono()
subApp.get('/users/:id', (c) => {
console.log(baseRoutePath(c, 0)) // '/' (first matched route)
console.log(baseRoutePath(c, -1)) // '/api' (last matched route)
return c.text('User details')
})
app.route('/api', subApp)
```
## `basePath()`
Returns the base path with embedded parameters from the actual request.
```ts
const subApp = new Hono()
subApp.get('/posts/:id', (c) => {
return c.text(basePath(c)) // '/api' (for request to '/api/posts/123')
})
app.route('/:sub', subApp)
```
# Proxy Helper
Proxy Helper provides useful functions when using Hono application as a (reverse) proxy.
## Import
```ts
import { Hono } from 'hono'
import { proxy } from 'hono/proxy'
```
## `proxy()`
`proxy()` is a `fetch()` API wrapper for proxy. The parameters and return value are the same as for `fetch()` (except for the proxy-specific options).
The `Accept-Encoding` header is replaced with an encoding that the current runtime can handle. Unnecessary response headers are removed, and a `Response` object is returned that can be sent from the handler.
### Examples
Simple usage:
```ts
app.get('/proxy/:path', (c) => {
return proxy(`http://${originServer}/${c.req.param('path')}`)
})
```
Complicated usage:
```ts
app.get('/proxy/:path', async (c) => {
const res = await proxy(
`http://${originServer}/${c.req.param('path')}`,
{
headers: {
...c.req.header(), // optional, specify only when forwarding all the request data (including credentials) is necessary.
'X-Forwarded-For': '127.0.0.1',
'X-Forwarded-Host': c.req.header('host'),
Authorization: undefined, // do not propagate request headers contained in c.req.header('Authorization')
},
}
)
res.headers.delete('Set-Cookie')
return res
})
```
Or you can pass the `c.req` as a parameter.
```ts
app.all('/proxy/:path', (c) => {
return proxy(`http://${originServer}/${c.req.param('path')}`, {
...c.req, // optional, specify only when forwarding all the request data (including credentials) is necessary.
headers: {
...c.req.header(),
'X-Forwarded-For': '127.0.0.1',
'X-Forwarded-Host': c.req.header('host'),
Authorization: undefined, // do not propagate request headers contained in c.req.header('Authorization')
},
})
})
```
You can override the default global `fetch` function with the `customFetch` option:
```ts
app.get('/proxy', (c) => {
return proxy('https://example.com/', {
customFetch,
})
})
```
### Connection Header Processing
By default, `proxy()` ignores the `Connection` header to prevent Hop-by-Hop Header Injection attacks. You can enable strict RFC 9110 compliance with the `strictConnectionProcessing` option:
```ts
// Default behavior (recommended for untrusted clients)
app.get('/proxy/:path', (c) => {
return proxy(`http://${originServer}/${c.req.param('path')}`, c.req)
})
// Strict RFC 9110 compliance (use only in trusted environments)
app.get('/internal-proxy/:path', (c) => {
return proxy(`http://${internalServer}/${c.req.param('path')}`, {
...c.req,
strictConnectionProcessing: true,
})
})
```
### `ProxyFetch`
The type of `proxy()` is defined as `ProxyFetch` and is as follows
```ts
interface ProxyRequestInit extends Omit {
raw?: Request
customFetch?: (request: Request) => Promise
strictConnectionProcessing?: boolean
headers?:
| HeadersInit
| [string, string][]
| Record
| Record
}
interface ProxyFetch {
(
input: string | URL | Request,
init?: ProxyRequestInit
): Promise
}
```
# Accepts Helper
Accepts Helper helps to handle Accept headers in the Requests.
## Import
```ts
import { Hono } from 'hono'
import { accepts } from 'hono/accepts'
```
## `accepts()`
The `accepts()` function looks at the Accept header, such as Accept-Encoding and Accept-Language, and returns the proper value.
```ts
import { accepts } from 'hono/accepts'
app.get('/', (c) => {
const accept = accepts(c, {
header: 'Accept-Language',
supports: ['en', 'ja', 'zh'],
default: 'en',
})
return c.json({ lang: accept })
})
```
### `AcceptHeader` type
The definition of the `AcceptHeader` type is as follows.
```ts
export type AcceptHeader =
| 'Accept'
| 'Accept-Charset'
| 'Accept-Encoding'
| 'Accept-Language'
| 'Accept-Patch'
| 'Accept-Post'
| 'Accept-Ranges'
```
## Options
### header: `AcceptHeader`
The target accept header.
### supports: `string[]`
The header values which your application supports.
### default: `string`
The default values.
### match: `(accepts: Accept[], config: acceptsConfig) => string`
The custom match function.
# Adapter Helper
The Adapter Helper provides a seamless way to interact with various platforms through a unified interface.
## Import
```ts
import { Hono } from 'hono'
import { env, getRuntimeKey } from 'hono/adapter'
```
## `env()`
The `env()` function facilitates retrieving environment variables across different runtimes, extending beyond just Cloudflare Workers' Bindings. The value that can be retrieved with `env(c)` may be different for each runtimes.
```ts
import { env } from 'hono/adapter'
app.get('/env', (c) => {
// NAME is process.env.NAME on Node.js or Bun
// NAME is the value written in `wrangler.toml` on Cloudflare
const { NAME } = env<{ NAME: string }>(c)
return c.text(NAME)
})
```
Supported Runtimes, Serverless Platforms and Cloud Services:
- Cloudflare Workers
- `wrangler.toml`
- `wrangler.jsonc`
- Deno
- [`Deno.env`](https://docs.deno.com/runtime/manual/basics/env_variables)
- `.env` file
- Bun
- [`Bun.env`](https://bun.com/guides/runtime/set-env)
- `process.env`
- Node.js
- `process.env`
- Vercel
- [Environment Variables on Vercel](https://vercel.com/docs/projects/environment-variables)
- AWS Lambda
- [Environment Variables on AWS Lambda](https://docs.aws.amazon.com/lambda/latest/dg/samples-blank.html#samples-blank-architecture)
- Lambda@Edge\
Environment Variables on Lambda are [not supported](https://docs.aws.amazon.com/AmazonCloudFront/latest/DeveloperGuide/add-origin-custom-headers.html) by Lambda@Edge, you need to use [Lamdba@Edge event](https://docs.aws.amazon.com/AmazonCloudFront/latest/DeveloperGuide/lambda-event-structure.html) as an alternative.
- Fastly Compute\
On Fastly Compute, you can use the ConfigStore to manage user-defined data.
- Netlify\
On Netlify, you can use the [Netlify Contexts](https://docs.netlify.com/site-deploys/overview/#deploy-contexts) to manage user-defined data.
### Specify the runtime
You can specify the runtime to get environment variables by passing the runtime key as the second argument.
```ts
app.get('/env', (c) => {
const { NAME } = env<{ NAME: string }>(c, 'workerd')
return c.text(NAME)
})
```
## `getRuntimeKey()`
The `getRuntimeKey()` function returns the identifier of the current runtime.
```ts
app.get('/', (c) => {
if (getRuntimeKey() === 'workerd') {
return c.text('You are on Cloudflare')
} else if (getRuntimeKey() === 'bun') {
return c.text('You are on Bun')
}
...
})
```
### Available Runtimes Keys
Here are the available runtimes keys, unavailable runtime key runtimes may be supported and labeled as `other`, with some being inspired by [WinterCG's Runtime Keys](https://runtime-keys.proposal.wintercg.org/):
- `workerd` - Cloudflare Workers
- `deno`
- `bun`
- `node`
- `edge-light` - Vercel Edge Functions
- `fastly` - Fastly Compute
- `other` - Other unknown runtimes keys
# JWT Authentication Helper
This helper provides functions for encoding, decoding, signing, and verifying JSON Web Tokens (JWTs). JWTs are commonly used for authentication and authorization purposes in web applications. This helper offers robust JWT functionality with support for various cryptographic algorithms.
## Import
To use this helper, you can import it as follows:
```ts
import { decode, sign, verify } from 'hono/jwt'
```
::: info
[JWT Middleware](/docs/middleware/builtin/jwt) also import the `jwt` function from the `hono/jwt`.
:::
## `sign()`
This function generates a JWT token by encoding a payload and signing it using the specified algorithm and secret.
```ts
sign(
payload: unknown,
secret: string,
alg?: 'HS256';
): Promise;
```
### Example
```ts
import { sign } from 'hono/jwt'
const payload = {
sub: 'user123',
role: 'admin',
exp: Math.floor(Date.now() / 1000) + 60 * 5, // Token expires in 5 minutes
}
const secret = 'mySecretKey'
const token = await sign(payload, secret)
```
### Options
#### payload: `unknown`
The JWT payload to be signed. You can include other claims like in [Payload Validation](#payload-validation).
#### secret: `string`
The secret key used for JWT verification or signing.
#### alg: [AlgorithmTypes](#supported-algorithmtypes)
The algorithm used for JWT signing or verification. The default is HS256.
## `verify()`
This function checks if a JWT token is genuine and still valid. It ensures the token hasn't been altered and checks validity only if you added [Payload Validation](#payload-validation).
```ts
verify(
token: string,
secret: string,
alg: 'HS256';
issuer?: string | RegExp;
): Promise;
```
### Example
```ts
import { verify } from 'hono/jwt'
const tokenToVerify = 'token'
const secretKey = 'mySecretKey'
const decodedPayload = await verify(tokenToVerify, secretKey, 'HS256')
console.log(decodedPayload)
```
### Options
#### token: `string`
The JWT token to be verified.
#### secret: `string`
The secret key used for JWT verification or signing.
#### alg: [AlgorithmTypes](#supported-algorithmtypes)
The algorithm used for JWT signing or verification.
#### issuer: `string | RegExp`
The expected issuer used for JWT verification.
## `decode()`
This function decodes a JWT token without performing signature verification. It extracts and returns the header and payload from the token.
```ts
decode(token: string): { header: any; payload: any };
```
### Example
```ts
import { decode } from 'hono/jwt'
// Decode the JWT token
const tokenToDecode =
'eyJhbGciOiAiSFMyNTYiLCAidHlwIjogIkpXVCJ9.eyJzdWIiOiAidXNlcjEyMyIsICJyb2xlIjogImFkbWluIn0.JxUwx6Ua1B0D1B0FtCrj72ok5cm1Pkmr_hL82sd7ELA'
const { header, payload } = decode(tokenToDecode)
console.log('Decoded Header:', header)
console.log('Decoded Payload:', payload)
```
### Options
#### token: `string`
The JWT token to be decoded.
> The `decode` function allows you to inspect the header and payload of a JWT token _**without**_ performing verification. This can be useful for debugging or extracting information from JWT tokens.
## Payload Validation
When verifying a JWT token, the following payload validations are performed:
- `exp`: The token is checked to ensure it has not expired.
- `nbf`: The token is checked to ensure it is not being used before a specified time.
- `iat`: The token is checked to ensure it is not issued in the future.
- `iss`: The token is checked to ensure it has been issued by a trusted issuer.
Please ensure that your JWT payload includes these fields, as an object, if you intend to perform these checks during verification.
## Custom Error Types
The module also defines custom error types to handle JWT-related errors.
- `JwtAlgorithmNotImplemented`: Indicates that the requested JWT algorithm is not implemented.
- `JwtTokenInvalid`: Indicates that the JWT token is invalid.
- `JwtTokenNotBefore`: Indicates that the token is being used before its valid date.
- `JwtTokenExpired`: Indicates that the token has expired.
- `JwtTokenIssuedAt`: Indicates that the "iat" claim in the token is incorrect.
- `JwtTokenIssuer`: Indicates that the "iss" claim in the token is incorrect.
- `JwtTokenSignatureMismatched`: Indicates a signature mismatch in the token.
## Supported AlgorithmTypes
The module supports the following JWT cryptographic algorithms:
- `HS256`: HMAC using SHA-256
- `HS384`: HMAC using SHA-384
- `HS512`: HMAC using SHA-512
- `RS256`: RSASSA-PKCS1-v1_5 using SHA-256
- `RS384`: RSASSA-PKCS1-v1_5 using SHA-384
- `RS512`: RSASSA-PKCS1-v1_5 using SHA-512
- `PS256`: RSASSA-PSS using SHA-256 and MGF1 with SHA-256
- `PS384`: RSASSA-PSS using SHA-386 and MGF1 with SHA-386
- `PS512`: RSASSA-PSS using SHA-512 and MGF1 with SHA-512
- `ES256`: ECDSA using P-256 and SHA-256
- `ES384`: ECDSA using P-384 and SHA-384
- `ES512`: ECDSA using P-521 and SHA-512
- `EdDSA`: EdDSA using Ed25519
# Cookie Helper
The Cookie Helper provides an easy interface to manage cookies, enabling developers to set, parse, and delete cookies seamlessly.
## Import
```ts
import { Hono } from 'hono'
import {
deleteCookie,
getCookie,
getSignedCookie,
setCookie,
setSignedCookie,
generateCookie,
generateSignedCookie,
} from 'hono/cookie'
```
## Usage
### Regular cookies
```ts
app.get('/cookie', (c) => {
setCookie(c, 'cookie_name', 'cookie_value')
const yummyCookie = getCookie(c, 'cookie_name')
deleteCookie(c, 'cookie_name')
const allCookies = getCookie(c)
// ...
})
```
### Signed cookies
**NOTE**: Setting and retrieving signed cookies returns a Promise due to the async nature of the WebCrypto API, which is used to create HMAC SHA-256 signatures.
```ts
app.get('/signed-cookie', (c) => {
const secret = 'secret' // make sure it's a large enough string to be secure
await setSignedCookie(c, 'cookie_name0', 'cookie_value', secret)
const fortuneCookie = await getSignedCookie(
c,
secret,
'cookie_name0'
)
deleteCookie(c, 'cookie_name0')
// `getSignedCookie` will return `false` for a specified cookie if the signature was tampered with or is invalid
const allSignedCookies = await getSignedCookie(c, secret)
// ...
})
```
### Cookie Generation
`generateCookie` and `generateSignedCookie` functions allow you to create cookie strings directly without setting them in the response headers.
#### `generateCookie`
```ts
// Basic cookie generation
const cookie = generateCookie('delicious_cookie', 'macha')
// Returns: 'delicious_cookie=macha; Path=/'
// Cookie with options
const cookie = generateCookie('delicious_cookie', 'macha', {
path: '/',
secure: true,
httpOnly: true,
domain: 'example.com',
})
```
#### `generateSignedCookie`
```ts
// Basic signed cookie generation
const signedCookie = await generateSignedCookie(
'delicious_cookie',
'macha',
'secret chocolate chips'
)
// Signed cookie with options
const signedCookie = await generateSignedCookie(
'delicious_cookie',
'macha',
'secret chocolate chips',
{
path: '/',
secure: true,
httpOnly: true,
}
)
```
**Note**: Unlike `setCookie` and `setSignedCookie`, these functions only generate the cookie strings. You need to manually set them in headers if needed.
## Options
### `setCookie` & `setSignedCookie`
- domain: `string`
- expires: `Date`
- httpOnly: `boolean`
- maxAge: `number`
- path: `string`
- secure: `boolean`
- sameSite: `'Strict'` | `'Lax'` | `'None'`
- priority: `'Low' | 'Medium' | 'High'`
- prefix: `secure` | `'host'`
- partitioned: `boolean`
Example:
```ts
// Regular cookies
setCookie(c, 'great_cookie', 'banana', {
path: '/',
secure: true,
domain: 'example.com',
httpOnly: true,
maxAge: 1000,
expires: new Date(Date.UTC(2000, 11, 24, 10, 30, 59, 900)),
sameSite: 'Strict',
})
// Signed cookies
await setSignedCookie(
c,
'fortune_cookie',
'lots-of-money',
'secret ingredient',
{
path: '/',
secure: true,
domain: 'example.com',
httpOnly: true,
maxAge: 1000,
expires: new Date(Date.UTC(2000, 11, 24, 10, 30, 59, 900)),
sameSite: 'Strict',
}
)
```
### `deleteCookie`
- path: `string`
- secure: `boolean`
- domain: `string`
Example:
```ts
deleteCookie(c, 'banana', {
path: '/',
secure: true,
domain: 'example.com',
})
```
`deleteCookie` returns the deleted value:
```ts
const deletedCookie = deleteCookie(c, 'delicious_cookie')
```
## `__Secure-` and `__Host-` prefix
The Cookie helper supports `__Secure-` and `__Host-` prefix for cookies names.
If you want to verify if the cookie name has a prefix, specify the prefix option.
```ts
const securePrefixCookie = getCookie(c, 'yummy_cookie', 'secure')
const hostPrefixCookie = getCookie(c, 'yummy_cookie', 'host')
const securePrefixSignedCookie = await getSignedCookie(
c,
secret,
'fortune_cookie',
'secure'
)
const hostPrefixSignedCookie = await getSignedCookie(
c,
secret,
'fortune_cookie',
'host'
)
```
Also, if you wish to specify a prefix when setting the cookie, specify a value for the prefix option.
```ts
setCookie(c, 'delicious_cookie', 'macha', {
prefix: 'secure', // or `host`
})
await setSignedCookie(
c,
'delicious_cookie',
'macha',
'secret choco chips',
{
prefix: 'secure', // or `host`
}
)
```
## Following the best practices
A New Cookie RFC (a.k.a cookie-bis) and CHIPS include some best practices for Cookie settings that developers should follow.
- [RFC6265bis-13](https://datatracker.ietf.org/doc/html/draft-ietf-httpbis-rfc6265bis-13)
- `Max-Age`/`Expires` limitation
- `__Host-`/`__Secure-` prefix limitation
- [CHIPS-01](https://www.ietf.org/archive/id/draft-cutler-httpbis-partitioned-cookies-01.html)
- `Partitioned` limitation
Hono is following the best practices.
The cookie helper will throw an `Error` when parsing cookies under the following conditions:
- The cookie name starts with `__Secure-`, but `secure` option is not set.
- The cookie name starts with `__Host-`, but `secure` option is not set.
- The cookie name starts with `__Host-`, but `path` is not `/`.
- The cookie name starts with `__Host-`, but `domain` is set.
- The `maxAge` option value is greater than 400 days.
- The `expires` option value is 400 days later than the current time.
# css Helper
The CSS helper - `hono/css` - is Hono's built-in CSS in JS(X).
You can write CSS in JSX in a JavaScript template literal named `css`. The return value of `css` will be the class name, which is set to the value of the class attribute. The `` component will then contain the value of the CSS.
## Import
```ts
import { Hono } from 'hono'
import { css, cx, keyframes, Style, createCssContext } from 'hono/css'
```
## `css`
You can write CSS in the `css` template literal. In this case, it uses `headerClass` as a value of the `class` attribute. Don't forget to add `` as it contains the CSS content.
```ts{10,13}
app.get('/', (c) => {
const headerClass = css`
background-color: orange;
color: white;
padding: 1rem;
`
return c.html(
Hello!
)
})
```
You can style pseudo-classes like `:hover` by using the [nesting selector](https://developer.mozilla.org/en-US/docs/Web/CSS/Nesting_selector), `&`:
```ts
const buttonClass = css`
background-color: #fff;
&:hover {
background-color: red;
}
`
```
### Extending
You can extend the CSS definition by embedding the class name.
```tsx
const baseClass = css`
color: white;
background-color: blue;
`
const header1Class = css`
${baseClass}
font-size: 3rem;
`
const header2Class = css`
${baseClass}
font-size: 2rem;
`
```
In addition, the syntax of `${baseClass} {}` enables nesting classes.
```tsx
const headerClass = css`
color: white;
background-color: blue;
`
const containerClass = css`
${headerClass} {
h1 {
font-size: 3rem;
}
}
`
return c.render(
Hello!
)
```
### Global styles
A pseudo-selector called `:-hono-global` allows you to define global styles.
```tsx
const globalClass = css`
:-hono-global {
html {
font-family: Arial, Helvetica, sans-serif;
}
}
`
return c.render(
Hello!
Today is a good day.
)
```
Or you can write CSS in the `` component with the `css` literal.
```tsx
export const renderer = jsxRenderer(({ children, title }) => {
return (
{title}
{children}
)
})
```
## `keyframes`
You can use `keyframes` to write the contents of `@keyframes`. In this case, `fadeInAnimation` will be the name of the animation.
```tsx
const fadeInAnimation = keyframes`
from {
opacity: 0;
}
to {
opacity: 1;
}
`
const headerClass = css`
animation-name: ${fadeInAnimation};
animation-duration: 2s;
`
const Header = () => Hello!
```
## `cx`
The `cx` composites the two class names.
```tsx
const buttonClass = css`
border-radius: 10px;
`
const primaryClass = css`
background: orange;
`
const Button = () => (
Click!
)
```
It can also compose simple strings.
```tsx
const Header = () => Hi
```
## Usage in combination with [Secure Headers](/docs/middleware/builtin/secure-headers) middleware
If you want to use the CSS helpers in combination with the [Secure Headers](/docs/middleware/builtin/secure-headers) middleware, you can add the [`nonce` attribute](https://developer.mozilla.org/en-US/docs/Web/HTML/Global_attributes/nonce) to the `` to avoid Content-Security-Policy caused by the CSS helpers.
```tsx{8,23}
import { secureHeaders, NONCE } from 'hono/secure-headers'
app.get(
'*',
secureHeaders({
contentSecurityPolicy: {
// Set the pre-defined nonce value to `styleSrc`:
styleSrc: [NONCE],
},
})
)
app.get('/', (c) => {
const headerClass = css`
background-color: orange;
color: white;
padding: 1rem;
`
return c.html(
{/* Set the `nonce` attribute on the CSS helpers `style` and `script` elements */}
Hello!
)
})
```
## `createCssContext`
`createCssContext` creates CSS helper functions (`css`, `cx`, `keyframes`, `viewTransition`, `Style`) with a custom context. You can use it to customize the style element ID and the generated class names.
```ts
import { createCssContext } from 'hono/css'
const { css, cx, keyframes, Style } = createCssContext({
id: 'my-app',
})
```
### `classNameSlug`
By default, CSS class names are generated in the format `css-1234567890`. You can customize this by passing a `classNameSlug` function.
The function receives three arguments:
- `hash` - the default generated class name (e.g. `css-1234567890`)
- `label` - extracted from a `/* comment */` at the start of the CSS template (empty string if none)
- `css` - the minified CSS string
```ts
const { css, Style } = createCssContext({
id: 'my-styles',
classNameSlug: (hash, label) => (label ? `h-${label}` : hash),
})
const heroClass = css`
/* hero-section */
background: blue;
`
// Generated class name: "h-hero-section"
```
### `onInvalidSlug`
If the `classNameSlug` function returns an invalid CSS class name, a warning is logged by default. You can customize this behavior with `onInvalidSlug`.
```ts
const { css, Style } = createCssContext({
id: 'my-styles',
classNameSlug: (hash, label) => label || hash,
onInvalidSlug: (slug) => {
throw new Error(`Invalid CSS class name: ${slug}`)
},
})
```
## Tips
If you use VS Code, you can use [vscode-styled-components](https://marketplace.visualstudio.com/items?itemName=styled-components.vscode-styled-components) for Syntax highlighting and IntelliSense for CSS tagged literals.
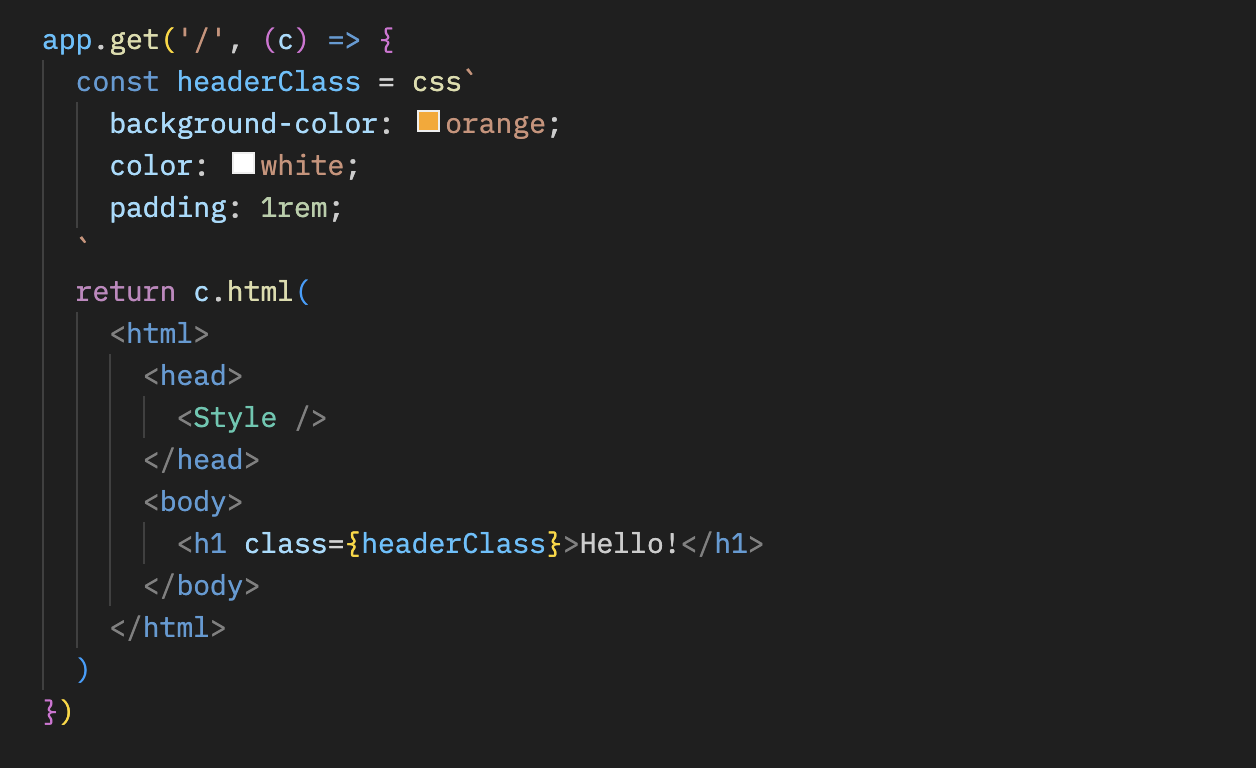
# WebSocket Helper
WebSocket Helper is a helper for server-side WebSockets in Hono applications.
Currently Cloudflare Workers / Pages, Deno, and Bun adapters are available.
## Import
::: code-group
```ts [Cloudflare Workers]
import { Hono } from 'hono'
import { upgradeWebSocket } from 'hono/cloudflare-workers'
```
```ts [Deno]
import { Hono } from 'hono'
import { upgradeWebSocket } from 'hono/deno'
```
```ts [Bun]
import { Hono } from 'hono'
import { upgradeWebSocket, websocket } from 'hono/bun'
// ...
export default {
fetch: app.fetch,
websocket,
}
```
:::
If you use Node.js, you can use [@hono/node-ws](https://github.com/honojs/middleware/tree/main/packages/node-ws).
## `upgradeWebSocket()`
`upgradeWebSocket()` returns a handler for handling WebSocket.
```ts
const app = new Hono()
app.get(
'/ws',
upgradeWebSocket((c) => {
return {
onMessage(event, ws) {
console.log(`Message from client: ${event.data}`)
ws.send('Hello from server!')
},
onClose: () => {
console.log('Connection closed')
},
}
})
)
```
Available events:
- `onOpen` - Currently, Cloudflare Workers does not support it.
- `onMessage`
- `onClose`
- `onError`
::: warning
If you use middleware that modifies headers (e.g., applying CORS) on a route that uses WebSocket Helper, you may encounter an error saying you can't modify immutable headers. This is because `upgradeWebSocket()` also changes headers internally.
Therefore, please be cautious if you are using WebSocket Helper and middleware at the same time.
:::
## RPC-mode
Handlers defined with WebSocket Helper support RPC mode.
```ts
// server.ts
const wsApp = app.get(
'/ws',
upgradeWebSocket((c) => {
//...
})
)
export type WebSocketApp = typeof wsApp
// client.ts
const client = hc('http://localhost:8787')
const socket = client.ws.$ws() // A WebSocket object for a client
```
## Examples
See the examples using WebSocket Helper.
### Server and Client
```ts
// server.ts
import { Hono } from 'hono'
import { upgradeWebSocket } from 'hono/cloudflare-workers'
const app = new Hono().get(
'/ws',
upgradeWebSocket(() => {
return {
onMessage: (event) => {
console.log(event.data)
},
}
})
)
export default app
```
```ts
// client.ts
import { hc } from 'hono/client'
import type app from './server'
const client = hc('http://localhost:8787')
const ws = client.ws.$ws(0)
ws.addEventListener('open', () => {
setInterval(() => {
ws.send(new Date().toString())
}, 1000)
})
```
### Bun with JSX
```tsx
import { Hono } from 'hono'
import { upgradeWebSocket, websocket } from 'hono/bun'
import { html } from 'hono/html'
const app = new Hono()
app.get('/', (c) => {
return c.html(
{html`
`}
)
})
const ws = app.get(
'/ws',
upgradeWebSocket((c) => {
let intervalId
return {
onOpen(_event, ws) {
intervalId = setInterval(() => {
ws.send(new Date().toString())
}, 200)
},
onClose() {
clearInterval(intervalId)
},
}
})
)
export default {
fetch: app.fetch,
websocket,
}
```
# Streaming Helper
The Streaming Helper provides methods for streaming responses.
## Import
```ts
import { Hono } from 'hono'
import { stream, streamText, streamSSE } from 'hono/streaming'
```
## `stream()`
It returns a simple streaming response as `Response` object.
```ts
app.get('/stream', (c) => {
return stream(c, async (stream) => {
// Write a process to be executed when aborted.
stream.onAbort(() => {
console.log('Aborted!')
})
// Write a Uint8Array.
await stream.write(new Uint8Array([0x48, 0x65, 0x6c, 0x6c, 0x6f]))
// Pipe a readable stream.
await stream.pipe(anotherReadableStream)
})
})
```
## `streamText()`
It returns a streaming response with `Content-Type:text/plain`, `Transfer-Encoding:chunked`, and `X-Content-Type-Options:nosniff` headers.
```ts
app.get('/streamText', (c) => {
return streamText(c, async (stream) => {
// Write a text with a new line ('\n').
await stream.writeln('Hello')
// Wait 1 second.
await stream.sleep(1000)
// Write a text without a new line.
await stream.write(`Hono!`)
})
})
```
::: warning
If you are developing an application for Cloudflare Workers, a streaming may not work well on Wrangler. If so, add `Identity` for `Content-Encoding` header.
```ts
app.get('/streamText', (c) => {
c.header('Content-Encoding', 'Identity')
return streamText(c, async (stream) => {
// ...
})
})
```
:::
## `streamSSE()`
It allows you to stream Server-Sent Events (SSE) seamlessly.
```ts
const app = new Hono()
let id = 0
app.get('/sse', async (c) => {
return streamSSE(c, async (stream) => {
while (true) {
const message = `It is ${new Date().toISOString()}`
await stream.writeSSE({
data: message,
event: 'time-update',
id: String(id++),
})
await stream.sleep(1000)
}
})
})
```
## Error Handling
The third argument of the streaming helper is an error handler.
This argument is optional, if you don't specify it, the error will be output as a console error.
```ts
app.get('/stream', (c) => {
return stream(
c,
async (stream) => {
// Write a process to be executed when aborted.
stream.onAbort(() => {
console.log('Aborted!')
})
// Write a Uint8Array.
await stream.write(
new Uint8Array([0x48, 0x65, 0x6c, 0x6c, 0x6f])
)
// Pipe a readable stream.
await stream.pipe(anotherReadableStream)
},
(err, stream) => {
stream.writeln('An error occurred!')
console.error(err)
}
)
})
```
The stream will be automatically closed after the callbacks are executed.
::: warning
If the callback function of the streaming helper throws an error, the `onError` event of Hono will not be triggered.
`onError` is a hook to handle errors before the response is sent and overwrite the response. However, when the callback function is executed, the stream has already started, so it cannot be overwritten.
:::
# html Helper
The html Helper lets you write HTML in JavaScript template literal with a tag named `html`. Using `raw()`, the content will be rendered as is. You have to escape these strings by yourself.
## Import
```ts
import { Hono } from 'hono'
import { html, raw } from 'hono/html'
```
## `html`
```ts
const app = new Hono()
app.get('/:username', (c) => {
const { username } = c.req.param()
return c.html(
html`
Hello! ${username}!
`
)
})
```
### Insert snippets into JSX
Insert the inline script into JSX:
```tsx
app.get('/', (c) => {
return c.html(
Test Site
{html`
`}
Hello!
)
})
```
### Act as functional component
Since `html` returns an HtmlEscapedString, it can act as a fully functional component without using JSX.
#### Use `html` to speed up the process instead of `memo`
```typescript
const Footer = () => html`
`
```
### Receives props and embeds values
```typescript
interface SiteData {
title: string
description: string
image: string
children?: any
}
const Layout = (props: SiteData) => html`
${props.title}
${props.children}
`
const Content = (props: { siteData: SiteData; name: string }) => (
`)
})
```
## Tips
Thanks to these libraries, Visual Studio Code and vim also interprets template literals as HTML, allowing syntax highlighting and formatting to be applied.
-
-
# SSG Helper
SSG Helper generates a static site from your Hono application. It will retrieve the contents of registered routes and save them as static files.
## Usage
### Manual
If you have a simple Hono application like the following:
```tsx
// index.tsx
const app = new Hono()
app.get('/', (c) => c.html('Hello, World!'))
app.use('/about', async (c, next) => {
c.setRenderer((content) => {
return c.html(
{content}
)
})
await next()
})
app.get('/about', (c) => {
return c.render(
<>
Hono SSG PageHello!
)
})
export default app
```
For Node.js, create a build script like this:
```ts
// build.ts
import app from './index'
import { toSSG } from 'hono/ssg'
import fs from 'fs/promises'
toSSG(app, fs)
```
By executing the script, the files will be output as follows:
```bash
ls ./static
about.html index.html
```
### Vite Plugin
Using the `@hono/vite-ssg` Vite Plugin, you can easily handle the process.
For more details, see here:
https://github.com/honojs/vite-plugins/tree/main/packages/ssg
## toSSG
`toSSG` is the main function for generating static sites, taking an application and a filesystem module as arguments. It is based on the following:
### Input
The arguments for toSSG are specified in ToSSGInterface.
```ts
export interface ToSSGInterface {
(
app: Hono,
fsModule: FileSystemModule,
options?: ToSSGOptions
): Promise
}
```
- `app` specifies `new Hono()` with registered routes.
- `fs` specifies the following object, assuming `node:fs/promise`.
```ts
export interface FileSystemModule {
writeFile(path: string, data: string | Uint8Array): Promise
mkdir(
path: string,
options: { recursive: boolean }
): Promise
}
```
### Using adapters for Deno and Bun
If you want to use SSG on Deno or Bun, a `toSSG` function is provided for each file system.
For Deno:
```ts
import { toSSG } from 'hono/deno'
toSSG(app) // The second argument is an option typed `ToSSGOptions`.
```
For Bun:
```ts
import { toSSG } from 'hono/bun'
toSSG(app) // The second argument is an option typed `ToSSGOptions`.
```
### Options
Options are specified in the ToSSGOptions interface.
```ts
export interface ToSSGOptions {
dir?: string
concurrency?: number
extensionMap?: Record
plugins?: SSGPlugin[]
}
```
- `dir` is the output destination for Static files. The default value is `./static`.
- `concurrency` is the concurrent number of files to be generated at the same time. The default value is `2`.
- `extensionMap` is a map containing the `Content-Type` as a key and the string of the extension as a value. This is used to determine the file extension of the output file.
- `plugins` is an array of SSG plugins that extend the functionality of the static site generation process.
### Output
`toSSG` returns the result in the following Result type.
```ts
export interface ToSSGResult {
success: boolean
files: string[]
error?: Error
}
```
## Generate File
### Route and Filename
The following rules apply to the registered route information and the generated file name. The default `./static` behaves as follows:
- `/` -> `./static/index.html`
- `/path` -> `./static/path.html`
- `/path/` -> `./static/path/index.html`
### File Extension
The file extension depends on the `Content-Type` returned by each route. For example, responses from `c.html` are saved as `.html`.
If you want to customize the file extensions, set the `extensionMap` option.
```ts
import { toSSG, defaultExtensionMap } from 'hono/ssg'
// Save `application/x-html` content with `.html`
toSSG(app, fs, {
extensionMap: {
'application/x-html': 'html',
...defaultExtensionMap,
},
})
```
Note that paths ending with a slash are saved as index.ext regardless of the extension.
```ts
// save to ./static/html/index.html
app.get('/html/', (c) => c.html('html'))
// save to ./static/text/index.txt
app.get('/text/', (c) => c.text('text'))
```
## Middleware
Introducing built-in middleware that supports SSG.
### ssgParams
You can use an API like `generateStaticParams` of Next.js.
Example:
```ts
app.get(
'/shops/:id',
ssgParams(async () => {
const shops = await getShops()
return shops.map((shop) => ({ id: shop.id }))
}),
async (c) => {
const shop = await getShop(c.req.param('id'))
if (!shop) {
return c.notFound()
}
return c.render(
{shop.name}
)
}
)
```
### isSSGContext
`isSSGContext` is a helper function that returns `true` if the current application is running within the SSG context triggered by `toSSG`.
```ts
app.get('/page', (c) => {
if (isSSGContext(c)) {
return c.text('This is generated by SSG')
}
return c.text('This is served dynamically')
})
```
### disableSSG
Routes with the `disableSSG` middleware set are excluded from static file generation by `toSSG`.
```ts
app.get('/api', disableSSG(), (c) => c.text('an-api'))
```
### onlySSG
Routes with the `onlySSG` middleware set will be overridden by `c.notFound()` after `toSSG` execution.
```ts
app.get('/static-page', onlySSG(), (c) => c.html(
Welcome to my site
))
```
## Plugins
Plugins allow you to extend the functionality of the static site generation process. They use hooks to customize the generation process at different stages.
### Default Plugin
By default, `toSSG` uses `defaultPlugin` which skips non-200 status responses (like redirects, errors, or 404s). This prevents generating files for unsuccessful responses.
```ts
import { toSSG, defaultPlugin } from 'hono/ssg'
// defaultPlugin is automatically applied when no plugins specified
toSSG(app, fs)
// Equivalent to:
toSSG(app, fs, { plugins: [defaultPlugin] })
```
If you specify custom plugins, `defaultPlugin` is **not** automatically included. To keep the default behavior while adding custom plugins, explicitly include it:
```ts
toSSG(app, fs, {
plugins: [defaultPlugin, myCustomPlugin],
})
```
### Redirect Plugin
The `redirectPlugin` generates HTML redirect pages for routes that return HTTP redirect responses (301, 302, 303, 307, 308). The generated HTML includes a `` tag and a canonical link.
```ts
import { toSSG, redirectPlugin, defaultPlugin } from 'hono/ssg'
toSSG(app, fs, {
plugins: [redirectPlugin(), defaultPlugin()],
})
```
For example, if your app has:
```ts
app.get('/old', (c) => c.redirect('/new'))
```
The `redirectPlugin` will generate an HTML file at `/old.html` with a meta refresh redirect to `/new`.
> [!NOTE]
> When used with `defaultPlugin`, place `redirectPlugin` **before** `defaultPlugin`. Since `defaultPlugin` skips non-200 responses, placing it first would prevent `redirectPlugin` from processing redirect responses.
### Hook Types
Plugins can use the following hooks to customize the `toSSG` process:
```ts
export type BeforeRequestHook = (req: Request) => Request | false
export type AfterResponseHook = (res: Response) => Response | false
export type AfterGenerateHook = (
result: ToSSGResult
) => void | Promise
```
- **BeforeRequestHook**: Called before processing each request. Return `false` to skip the route.
- **AfterResponseHook**: Called after receiving each response. Return `false` to skip file generation.
- **AfterGenerateHook**: Called after the entire generation process completes.
### Plugin Interface
```ts
export interface SSGPlugin {
beforeRequestHook?: BeforeRequestHook | BeforeRequestHook[]
afterResponseHook?: AfterResponseHook | AfterResponseHook[]
afterGenerateHook?: AfterGenerateHook | AfterGenerateHook[]
}
```
### Basic Plugin Examples
Filter only GET requests:
```ts
const getOnlyPlugin: SSGPlugin = {
beforeRequestHook: (req) => {
if (req.method === 'GET') {
return req
}
return false
},
}
```
Filter by status code:
```ts
const statusFilterPlugin: SSGPlugin = {
afterResponseHook: (res) => {
if (res.status === 200 || res.status === 500) {
return res
}
return false
},
}
```
Log generated files:
```ts
const logFilesPlugin: SSGPlugin = {
afterGenerateHook: (result) => {
if (result.files) {
result.files.forEach((file) => console.log(file))
}
},
}
```
### Advanced Plugin Example
Here's an example of creating a sitemap plugin that generates a `sitemap.xml` file:
```ts
// plugins.ts
import fs from 'node:fs/promises'
import path from 'node:path'
import type { SSGPlugin } from 'hono/ssg'
import { DEFAULT_OUTPUT_DIR } from 'hono/ssg'
export const sitemapPlugin = (baseURL: string): SSGPlugin => {
return {
afterGenerateHook: (result, fsModule, options) => {
const outputDir = options?.dir ?? DEFAULT_OUTPUT_DIR
const filePath = path.join(outputDir, 'sitemap.xml')
const urls = result.files.map((file) =>
new URL(file, baseURL).toString()
)
const siteMapText = `
${urls.map((url) => `${url}`).join('\n')}
`
fsModule.writeFile(filePath, siteMapText)
},
}
}
```
Applying plugins:
```ts
import app from './index'
import { toSSG } from 'hono/ssg'
import { sitemapPlugin } from './plugins'
toSSG(app, fs, {
plugins: [
getOnlyPlugin,
statusFilterPlugin,
logFilesPlugin,
sitemapPlugin('https://example.com'),
],
})
```
# Factory Helper
The Factory Helper provides useful functions for creating Hono's components such as Middleware. Sometimes it's difficult to set the proper TypeScript types, but this helper facilitates that.
## Import
```ts
import { Hono } from 'hono'
import { createFactory, createMiddleware } from 'hono/factory'
```
## `createFactory()`
`createFactory()` will create an instance of the Factory class.
```ts
import { createFactory } from 'hono/factory'
const factory = createFactory()
```
You can pass your Env types as Generics:
```ts
type Env = {
Variables: {
foo: string
}
}
const factory = createFactory()
```
### Options
### defaultAppOptions: `HonoOptions`
The default options to pass to the Hono application created by `createApp()`.
```ts
const factory = createFactory({
defaultAppOptions: { strict: false },
})
const app = factory.createApp() // `strict: false` is applied
```
## `createMiddleware()`
`createMiddleware()` is shortcut of `factory.createMiddleware()`.
This function will create your custom middleware.
```ts
const messageMiddleware = createMiddleware(async (c, next) => {
await next()
c.res.headers.set('X-Message', 'Good morning!')
})
```
Tip: If you want to get an argument like `message`, you can create it as a function like the following.
```ts
const messageMiddleware = (message: string) => {
return createMiddleware(async (c, next) => {
await next()
c.res.headers.set('X-Message', message)
})
}
app.use(messageMiddleware('Good evening!'))
```
## `factory.createHandlers()`
`createHandlers()` helps to define handlers in a different place than `app.get('/')`.
```ts
import { createFactory } from 'hono/factory'
import { logger } from 'hono/logger'
// ...
const factory = createFactory()
const middleware = factory.createMiddleware(async (c, next) => {
c.set('foo', 'bar')
await next()
})
const handlers = factory.createHandlers(logger(), middleware, (c) => {
return c.json(c.var.foo)
})
app.get('/api', ...handlers)
```
## `factory.createApp()`
`createApp()` helps to create an instance of Hono with the proper types. If you use this method with `createFactory()`, you can avoid redundancy in the definition of the `Env` type.
If your application is like this, you have to set the `Env` in two places:
```ts
import { createMiddleware } from 'hono/factory'
type Env = {
Variables: {
myVar: string
}
}
// 1. Set the `Env` to `new Hono()`
const app = new Hono()
// 2. Set the `Env` to `createMiddleware()`
const mw = createMiddleware(async (c, next) => {
await next()
})
app.use(mw)
```
By using `createFactory()` and `createApp()`, you can set the `Env` only in one place.
```ts
import { createFactory } from 'hono/factory'
// ...
// Set the `Env` to `createFactory()`
const factory = createFactory()
const app = factory.createApp()
// factory also has `createMiddleware()`
const mw = factory.createMiddleware(async (c, next) => {
await next()
})
```
`createFactory()` can receive the `initApp` option to initialize an `app` created by `createApp()`. The following is an example that uses the option.
```ts
// factory-with-db.ts
type Env = {
Bindings: {
MY_DB: D1Database
}
Variables: {
db: DrizzleD1Database
}
}
export default createFactory({
initApp: (app) => {
app.use(async (c, next) => {
const db = drizzle(c.env.MY_DB)
c.set('db', db)
await next()
})
},
})
```
```ts
// crud.ts
import factoryWithDB from './factory-with-db'
const app = factoryWithDB.createApp()
app.post('/posts', (c) => {
c.var.db.insert()
// ...
})
```
# ConnInfo Helper
The ConnInfo Helper helps you to get the connection information. For example, you can get the client's remote address easily.
## Import
::: code-group
```ts [Cloudflare Workers]
import { Hono } from 'hono'
import { getConnInfo } from 'hono/cloudflare-workers'
```
```ts [Deno]
import { Hono } from 'hono'
import { getConnInfo } from 'hono/deno'
```
```ts [Bun]
import { Hono } from 'hono'
import { getConnInfo } from 'hono/bun'
```
```ts [Vercel]
import { Hono } from 'hono'
import { getConnInfo } from 'hono/vercel'
```
```ts [AWS Lambda]
import { Hono } from 'hono'
import { getConnInfo } from 'hono/aws-lambda'
```
```ts [Cloudflare Pages]
import { Hono } from 'hono'
import { getConnInfo } from 'hono/cloudflare-pages'
```
```ts [Netlify]
import { Hono } from 'hono'
import { getConnInfo } from 'hono/netlify'
```
```ts [Lambda@Edge]
import { Hono } from 'hono'
import { getConnInfo } from 'hono/lambda-edge'
```
```ts [Node.js]
import { Hono } from 'hono'
import { getConnInfo } from '@hono/node-server/conninfo'
```
:::
## Usage
```ts
const app = new Hono()
app.get('/', (c) => {
const info = getConnInfo(c) // info is `ConnInfo`
return c.text(`Your remote address is ${info.remote.address}`)
})
```
## Type Definitions
The type definitions of the values that you can get from `getConnInfo()` are the following:
```ts
type AddressType = 'IPv6' | 'IPv4' | undefined
type NetAddrInfo = {
/**
* Transport protocol type
*/
transport?: 'tcp' | 'udp'
/**
* Transport port number
*/
port?: number
address?: string
addressType?: AddressType
} & (
| {
/**
* Host name such as IP Addr
*/
address: string
/**
* Host name type
*/
addressType: AddressType
}
| {}
)
/**
* HTTP Connection information
*/
interface ConnInfo {
/**
* Remote information
*/
remote: NetAddrInfo
}
```
# Testing Helper
The Testing Helper provides functions to make testing of Hono applications easier.
## Import
```ts
import { Hono } from 'hono'
import { testClient } from 'hono/testing'
```
## `testClient()`
The `testClient()` function takes an instance of Hono as its first argument and returns an object typed according to your Hono application's routes, similar to the [Hono Client](/docs/guides/rpc#client). This allows you to call your defined routes in a type-safe manner with editor autocompletion within your tests.
**Important Note on Type Inference:**
For the `testClient` to correctly infer the types of your routes and provide autocompletion, **you must define your routes using chained methods directly on the `Hono` instance**.
The type inference relies on the type flowing through the chained `.get()`, `.post()`, etc., calls. If you define routes separately after creating the Hono instance (like the common pattern shown in the "Hello World" example: `const app = new Hono(); app.get(...)`), the `testClient` will not have the necessary type information for specific routes, and you won't get the type-safe client features.
**Example:**
This example works because the `.get()` method is chained directly onto the `new Hono()` call:
```ts
// index.ts
const app = new Hono().get('/search', (c) => {
const query = c.req.query('q')
return c.json({ query: query, results: ['result1', 'result2'] })
})
export default app
```
```ts
// index.test.ts
import { Hono } from 'hono'
import { testClient } from 'hono/testing'
import { describe, it, expect } from 'vitest' // Or your preferred test runner
import app from './app'
describe('Search Endpoint', () => {
// Create the test client from the app instance
const client = testClient(app)
it('should return search results', async () => {
// Call the endpoint using the typed client
// Notice the type safety for query parameters (if defined in the route)
// and the direct access via .$get()
const res = await client.search.$get({
query: { q: 'hono' },
})
// Assertions
expect(res.status).toBe(200)
expect(await res.json()).toEqual({
query: 'hono',
results: ['result1', 'result2'],
})
})
})
```
To include headers in your test, pass them as the second parameter in the call. The second parameter can also take an `init` property as a `RequestInit` object, allowing you to set headers, method, body, etc. Learn more about the `init` property [here](/docs/guides/rpc#init-option).
```ts
// index.test.ts
import { Hono } from 'hono'
import { testClient } from 'hono/testing'
import { describe, it, expect } from 'vitest' // Or your preferred test runner
import app from './app'
describe('Search Endpoint', () => {
// Create the test client from the app instance
const client = testClient(app)
it('should return search results', async () => {
// Include the token in the headers and set the content type
const token = 'this-is-a-very-clean-token'
const res = await client.search.$get(
{
query: { q: 'hono' },
},
{
headers: {
Authorization: `Bearer ${token}`,
'Content-Type': `application/json`,
},
}
)
// Assertions
expect(res.status).toBe(200)
expect(await res.json()).toEqual({
query: 'hono',
results: ['result1', 'result2'],
})
})
})
```
# Developer Experience
To create a great application, we need great development experience.
Fortunately, we can write applications for Cloudflare Workers, Deno, and Bun in TypeScript without having the need to transpile it to JavaScript.
Hono is written in TypeScript and can make applications type-safe.
# Web Standards
Hono uses only **Web Standards** like Fetch.
They were originally used in the `fetch` function and consist of basic objects that handle HTTP requests and responses.
In addition to `Requests` and `Responses`, there are `URL`, `URLSearchParam`, `Headers` and others.
Cloudflare Workers, Deno, and Bun also are built upon Web Standards.
For example, a server that returns "Hello World" could be written as below. This could run on Cloudflare Workers and Bun.
```ts twoslash
export default {
async fetch() {
return new Response('Hello World')
},
}
```
Hono uses only Web Standards, which means that Hono can run on any runtime that supports them.
In addition, we have a Node.js adapter. Hono runs on these runtimes:
- Cloudflare Workers (`workerd`)
- Deno
- Bun
- Fastly Compute
- AWS Lambda
- Node.js
- Vercel (edge-light)
- WebAssembly (w/ [WebAssembly System Interface (WASI)][wasi] via [`wasi:http`][wasi-http])
It also works on Netlify and other platforms.
The same code runs on all platforms.
Cloudflare Workers, Deno, Shopify, and others launched [WinterCG](https://wintercg.org) to discuss the possibility of using the Web Standards to enable "web-interoperability".
Hono will follow their steps and go for **the Standard of the Web Standards**.
[wasi]: https://github.com/WebAssembly/wasi
[wasi-http]: https://github.com/WebAssembly/wasi-http
# Middleware
We call the primitive that returns `Response` as "Handler".
"Middleware" is executed before and after the Handler and handles the `Request` and `Response`.
It's like an onion structure.

For example, we can write the middleware to add the "X-Response-Time" header as follows.
```ts twoslash
import { Hono } from 'hono'
const app = new Hono()
// ---cut---
app.use(async (c, next) => {
const start = performance.now()
await next()
const end = performance.now()
c.res.headers.set('X-Response-Time', `${end - start}`)
})
```
With this simple method, we can write our own custom middleware and we can use the built-in or third party middleware.
# Routers
The routers are the most important features for Hono.
Hono has five routers.
## RegExpRouter
**RegExpRouter** is the fastest router in the JavaScript world.
Although this is called "RegExp", it is not an Express-like implementation using [path-to-regexp](https://github.com/pillarjs/path-to-regexp).
They are using linear loops.
Therefore, regular expression matching will be performed for all routes and the performance will be degraded as you have more routes.

Hono's RegExpRouter turns the route pattern into "one large regular expression".
Then it can get the result with one-time matching.
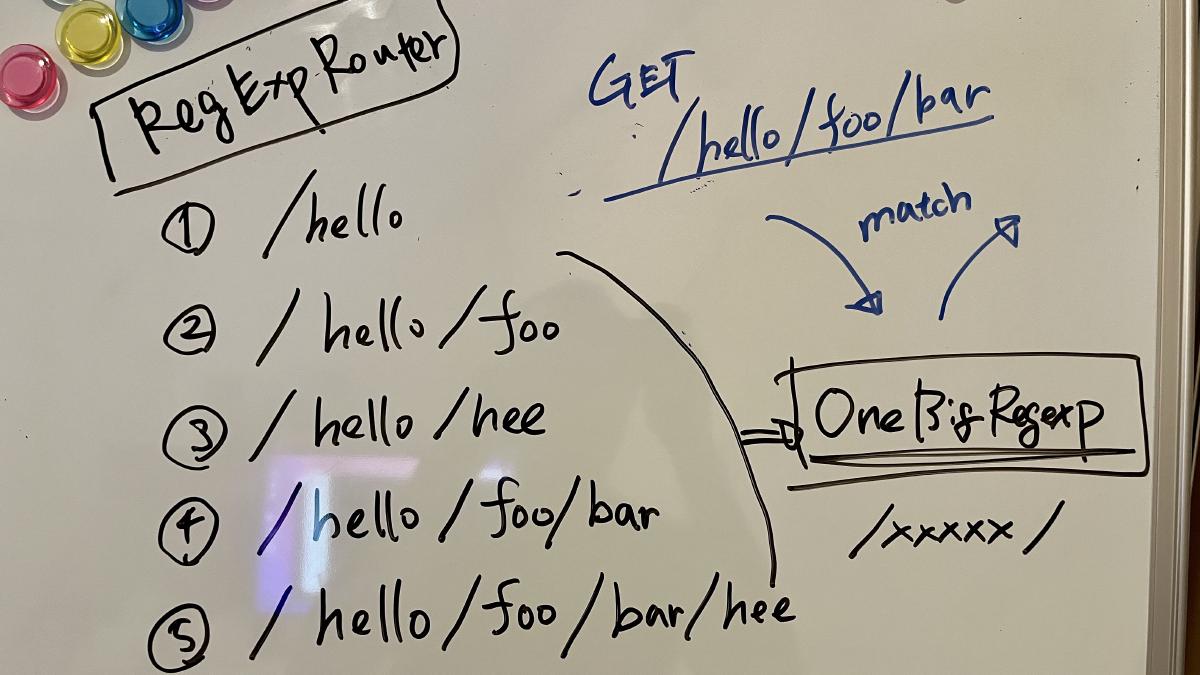
This works faster than methods that use tree-based algorithms such as radix-tree in most cases.
However, RegExpRouter doesn't support all routing patterns, so it's usually used in combination with one of the other routers below that support all routing patterns.
## TrieRouter
**TrieRouter** is the router using the Trie-tree algorithm.
Like RegExpRouter, it does not use linear loops.
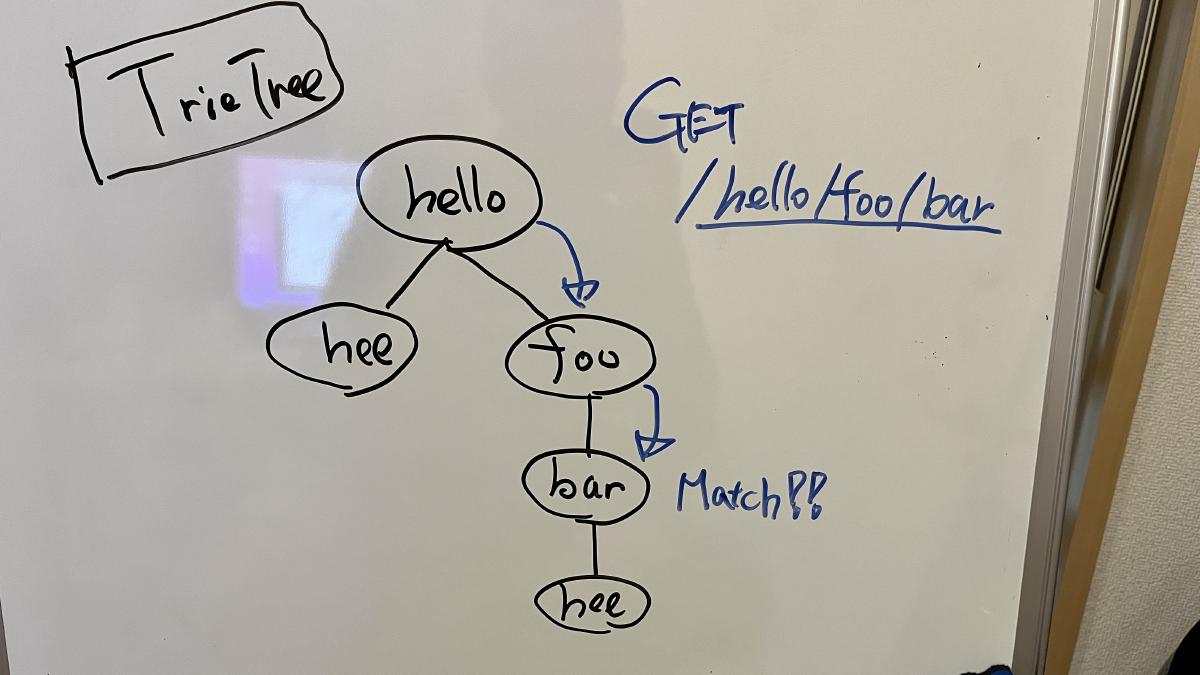
This router is not as fast as the RegExpRouter, but it is much faster than the Express router.
TrieRouter supports all patterns.
## SmartRouter
**SmartRouter** is useful when you're using multiple routers. It selects the best router by inferring from the registered routers.
Hono uses SmartRouter, RegExpRouter, and TrieRouter by default:
```ts
// Inside the core of Hono.
readonly defaultRouter: Router = new SmartRouter({
routers: [new RegExpRouter(), new TrieRouter()],
})
```
When the application starts, SmartRouter detects the fastest router based on routing and continues to use it.
## LinearRouter
RegExpRouter is fast, but the route registration phase can be slightly slow.
So, it's not suitable for an environment that initializes with every request.
**LinearRouter** is optimized for "one shot" situations.
Route registration is significantly faster than RegExpRouter because it adds the route without compiling strings, using a linear approach.
The following is one of the benchmark results, which includes the route registration phase.
```console
• GET /user/lookup/username/hey
----------------------------------------------------- -----------------------------
LinearRouter 1.82 µs/iter (1.7 µs … 2.04 µs) 1.84 µs 2.04 µs 2.04 µs
MedleyRouter 4.44 µs/iter (4.34 µs … 4.54 µs) 4.48 µs 4.54 µs 4.54 µs
FindMyWay 60.36 µs/iter (45.5 µs … 1.9 ms) 59.88 µs 78.13 µs 82.92 µs
KoaTreeRouter 3.81 µs/iter (3.73 µs … 3.87 µs) 3.84 µs 3.87 µs 3.87 µs
TrekRouter 5.84 µs/iter (5.75 µs … 6.04 µs) 5.86 µs 6.04 µs 6.04 µs
summary for GET /user/lookup/username/hey
LinearRouter
2.1x faster than KoaTreeRouter
2.45x faster than MedleyRouter
3.21x faster than TrekRouter
33.24x faster than FindMyWay
```
## PatternRouter
**PatternRouter** is the smallest router among Hono's routers.
While Hono is already compact, if you need to make it even smaller for an environment with limited resources, use PatternRouter.
An application using only PatternRouter is under 15KB in size.
```console
$ npx wrangler deploy --minify ./src/index.ts
⛅️ wrangler 3.20.0
-------------------
Total Upload: 14.68 KiB / gzip: 5.38 KiB
```
# Benchmarks
Benchmarks are only benchmarks, but they are important to us.
## Routers
We measured the speeds of a bunch of JavaScript routers.
For example, `find-my-way` is a very fast router used inside Fastify.
- @medley/router
- find-my-way
- koa-tree-router
- trek-router
- express (includes handling)
- koa-router
First, we registered the following routing to each of our routers.
These are similar to those used in the real world.
```ts twoslash
interface Route {
method: string
path: string
}
// ---cut---
export const routes: Route[] = [
{ method: 'GET', path: '/user' },
{ method: 'GET', path: '/user/comments' },
{ method: 'GET', path: '/user/avatar' },
{ method: 'GET', path: '/user/lookup/username/:username' },
{ method: 'GET', path: '/user/lookup/email/:address' },
{ method: 'GET', path: '/event/:id' },
{ method: 'GET', path: '/event/:id/comments' },
{ method: 'POST', path: '/event/:id/comment' },
{ method: 'GET', path: '/map/:location/events' },
{ method: 'GET', path: '/status' },
{ method: 'GET', path: '/very/deeply/nested/route/hello/there' },
{ method: 'GET', path: '/static/*' },
]
```
Then we sent the Request to the endpoints like below.
```ts twoslash
interface Route {
method: string
path: string
}
// ---cut---
const routes: (Route & { name: string })[] = [
{
name: 'short static',
method: 'GET',
path: '/user',
},
{
name: 'static with same radix',
method: 'GET',
path: '/user/comments',
},
{
name: 'dynamic route',
method: 'GET',
path: '/user/lookup/username/hey',
},
{
name: 'mixed static dynamic',
method: 'GET',
path: '/event/abcd1234/comments',
},
{
name: 'post',
method: 'POST',
path: '/event/abcd1234/comment',
},
{
name: 'long static',
method: 'GET',
path: '/very/deeply/nested/route/hello/there',
},
{
name: 'wildcard',
method: 'GET',
path: '/static/index.html',
},
]
```
Let's see the results.
### On Node.js
The following screenshots show the results on Node.js.
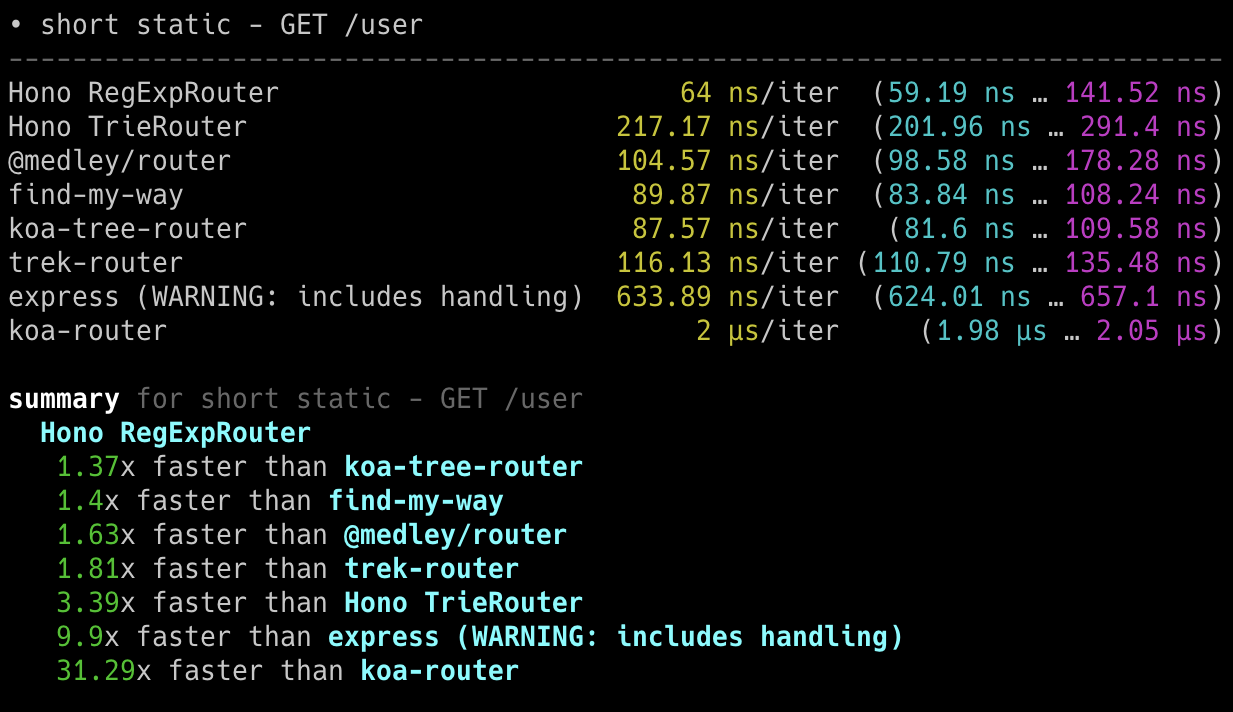
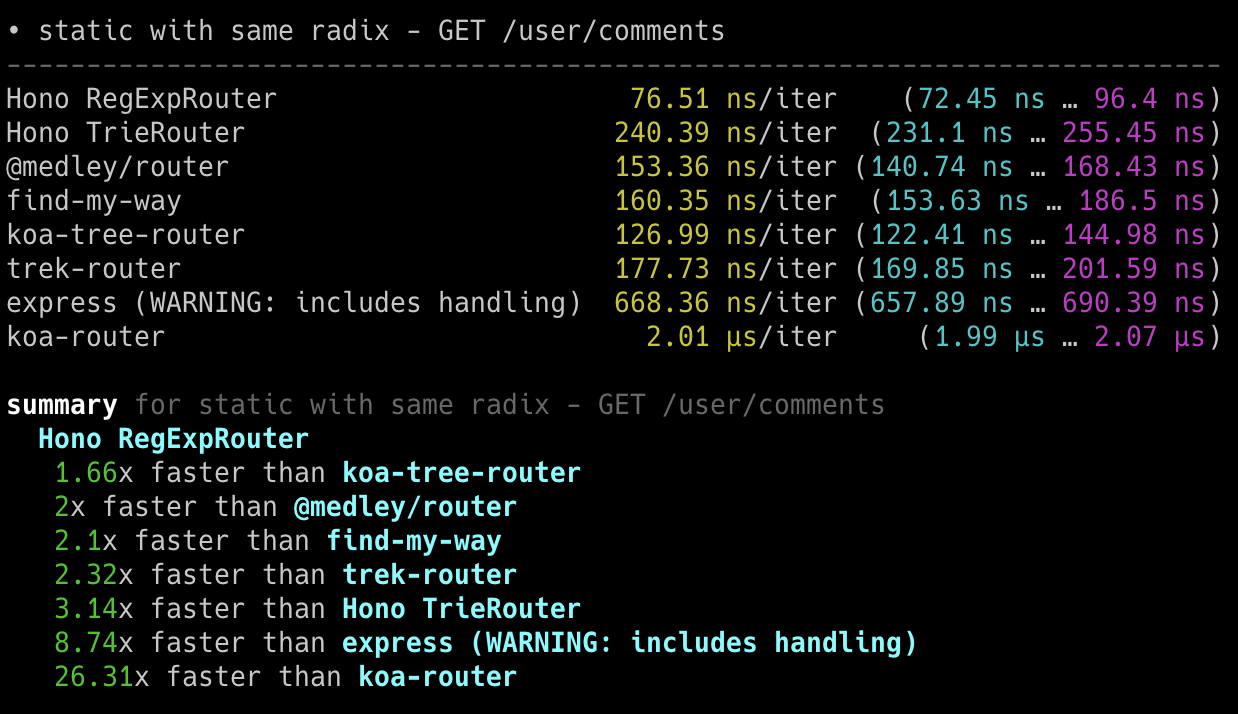
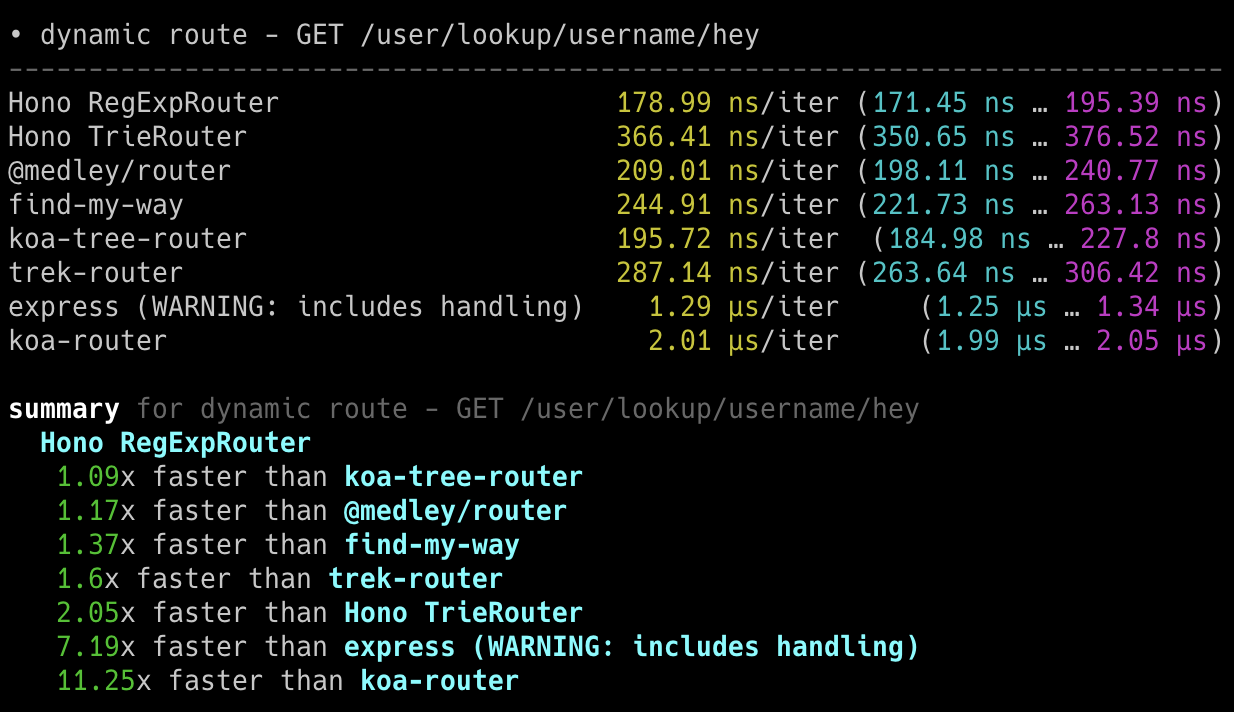
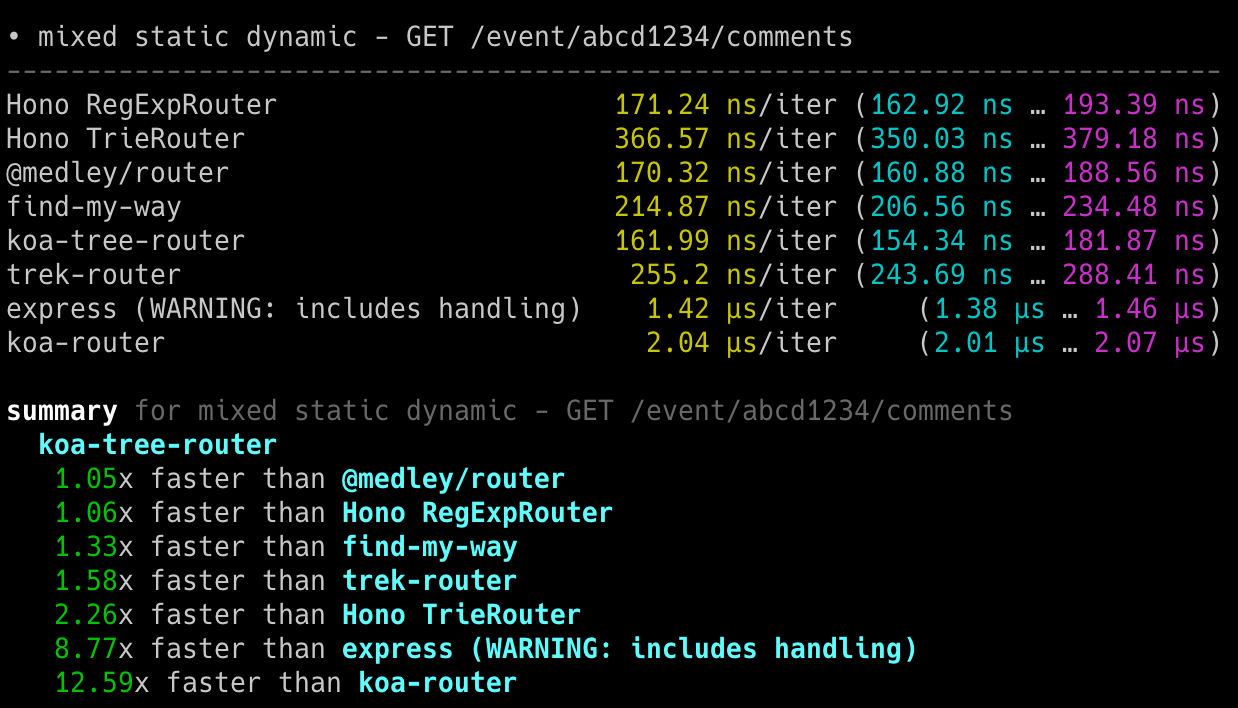
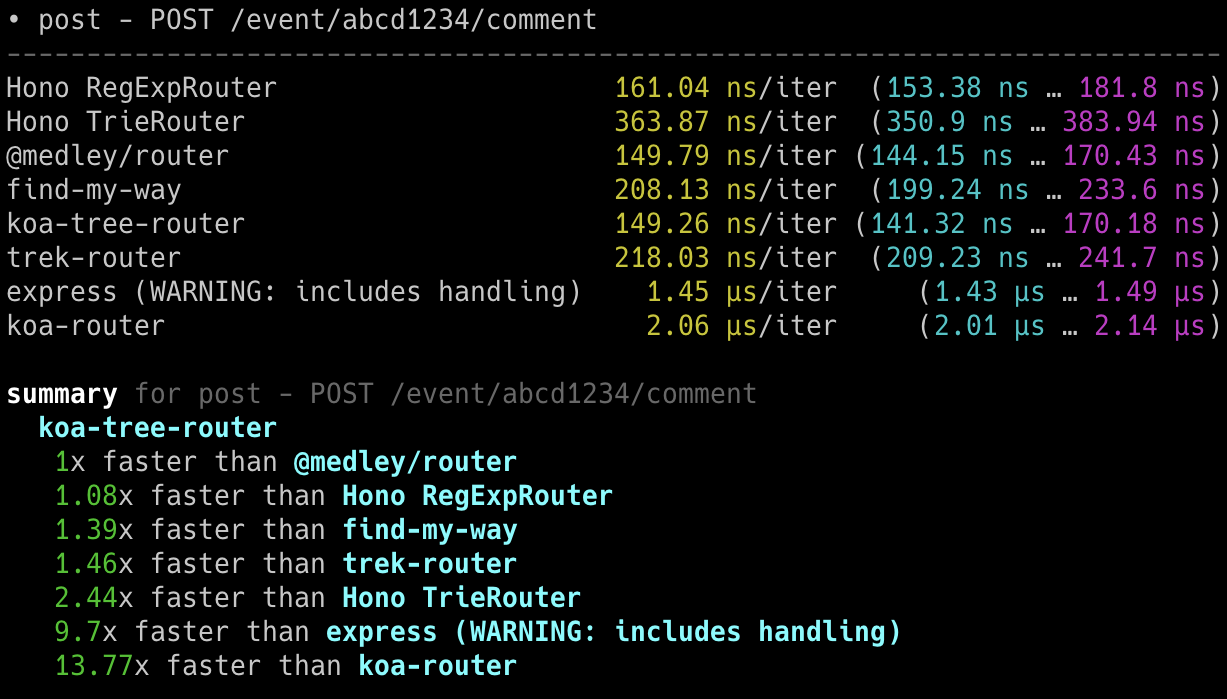
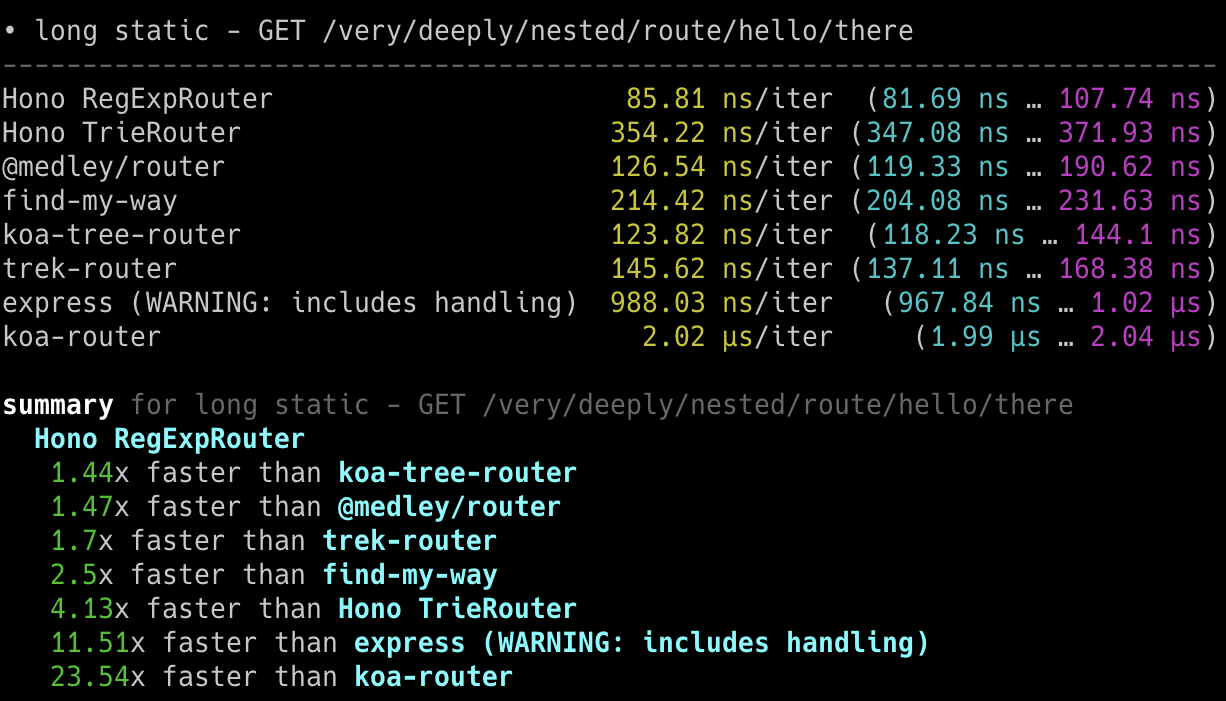
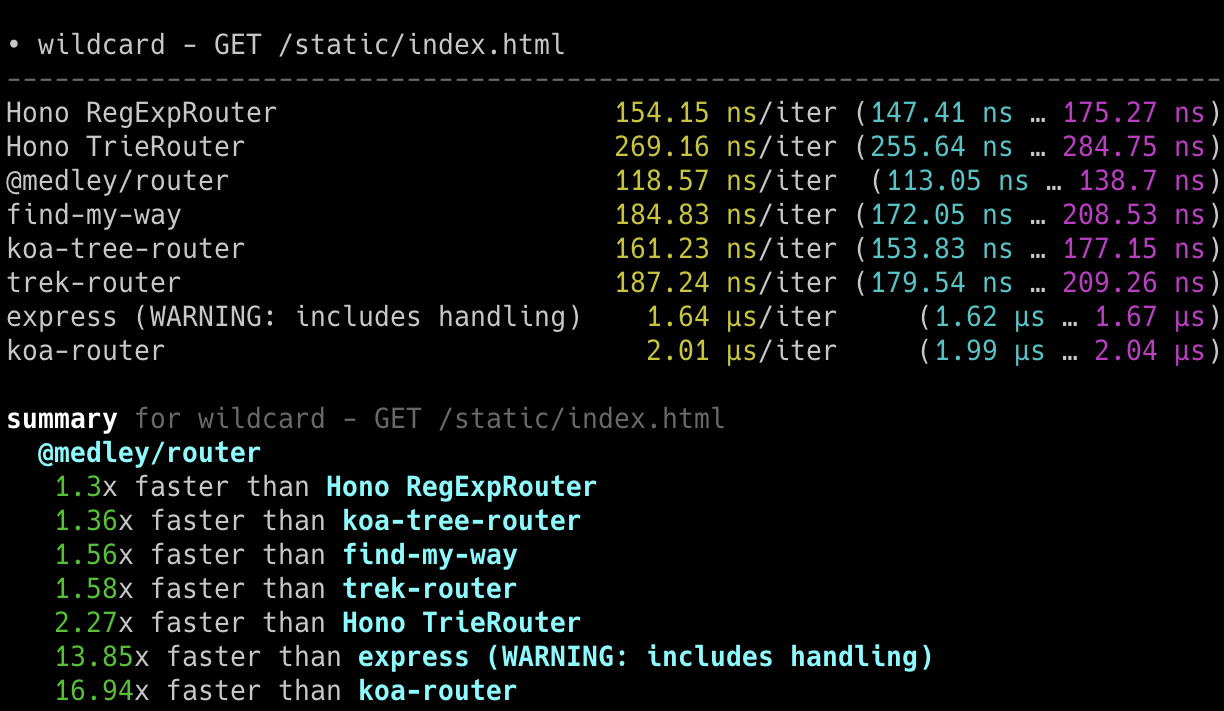
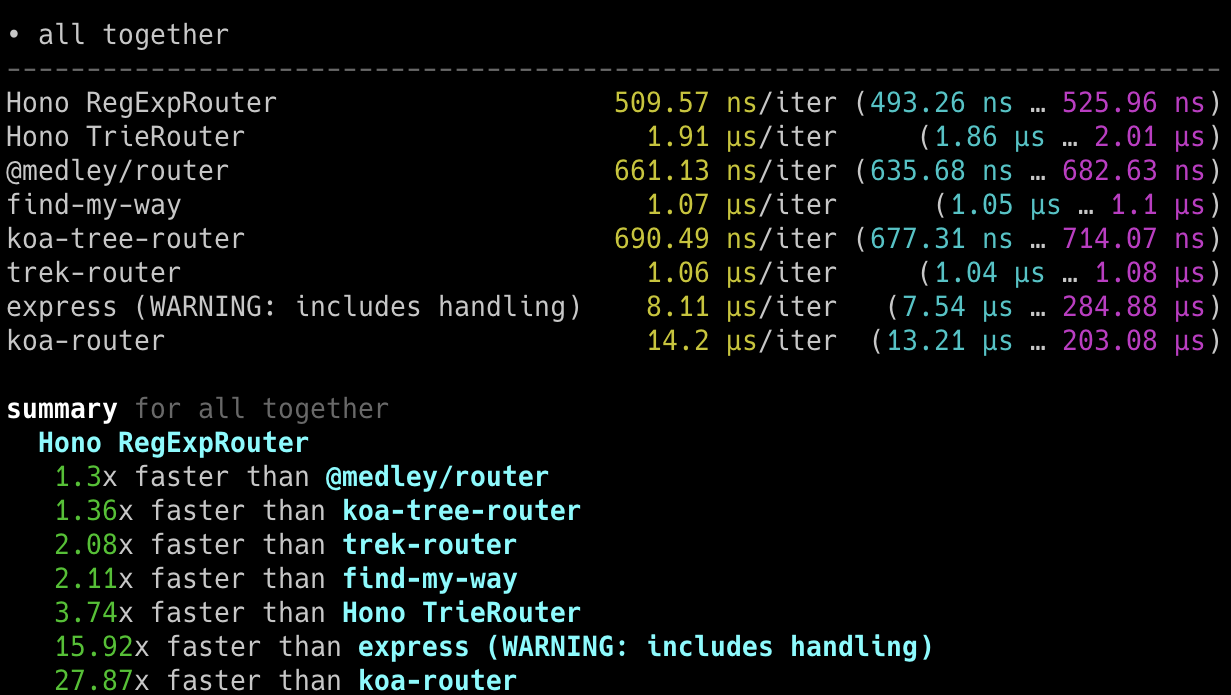
### On Bun
The following screenshots show the results on Bun.
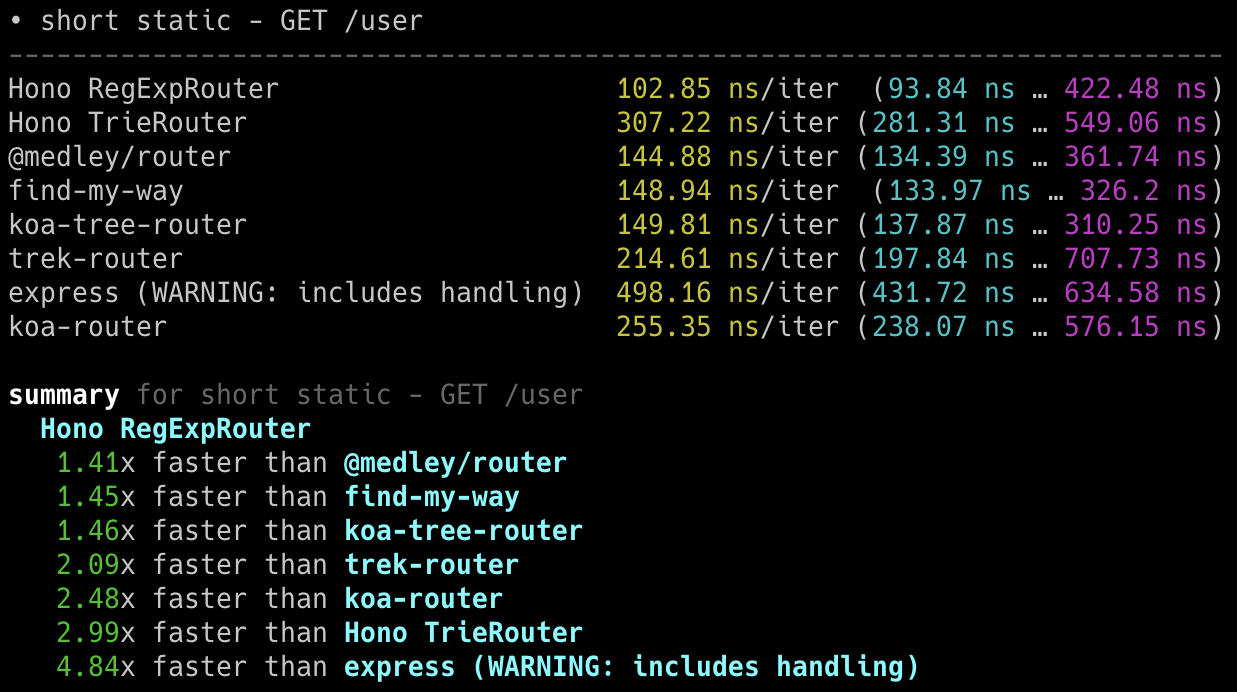
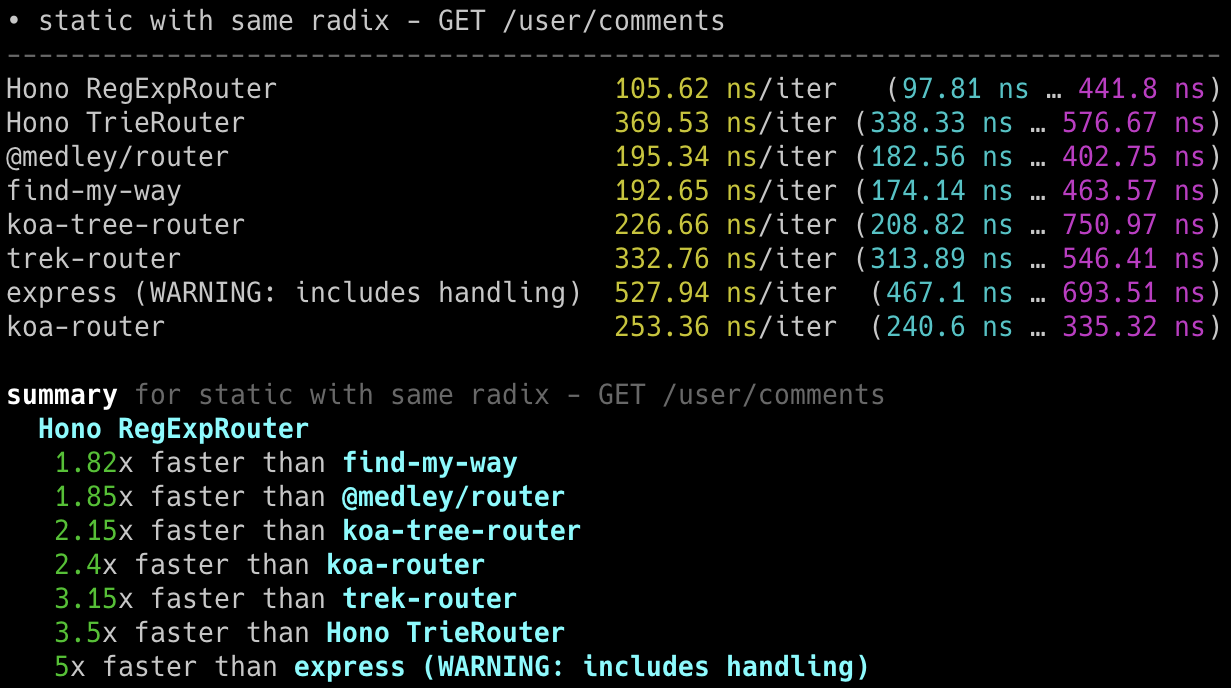
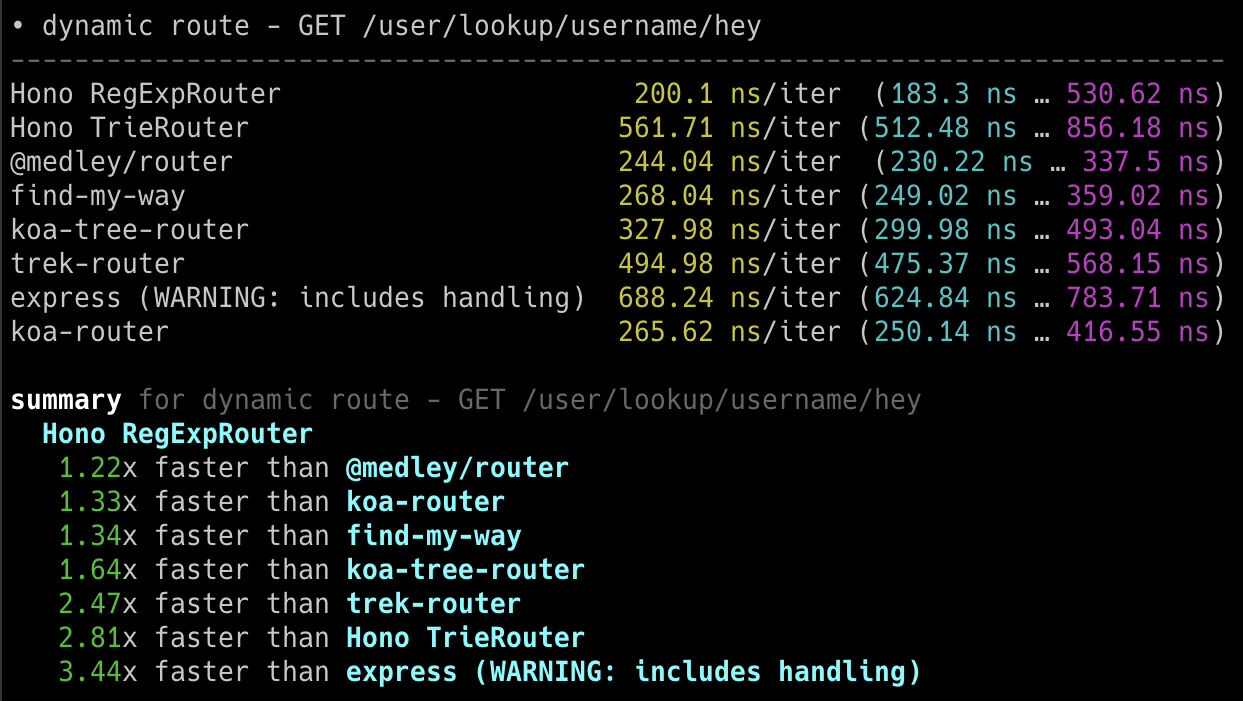
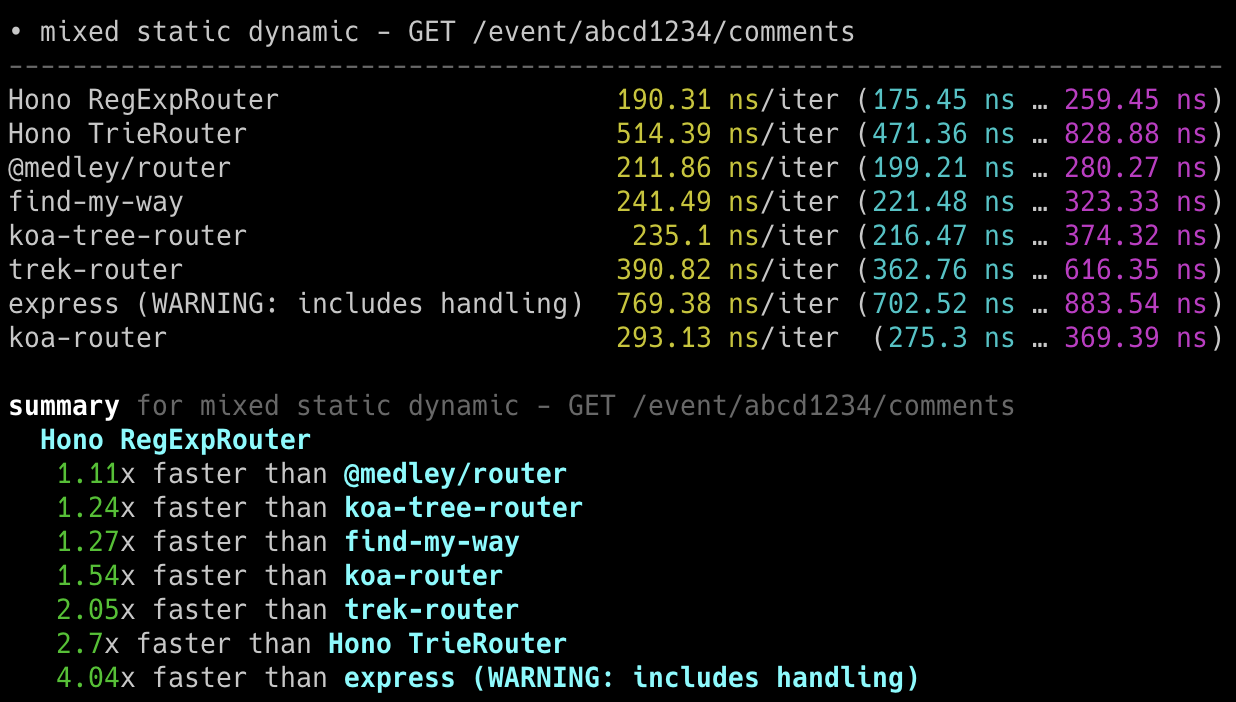
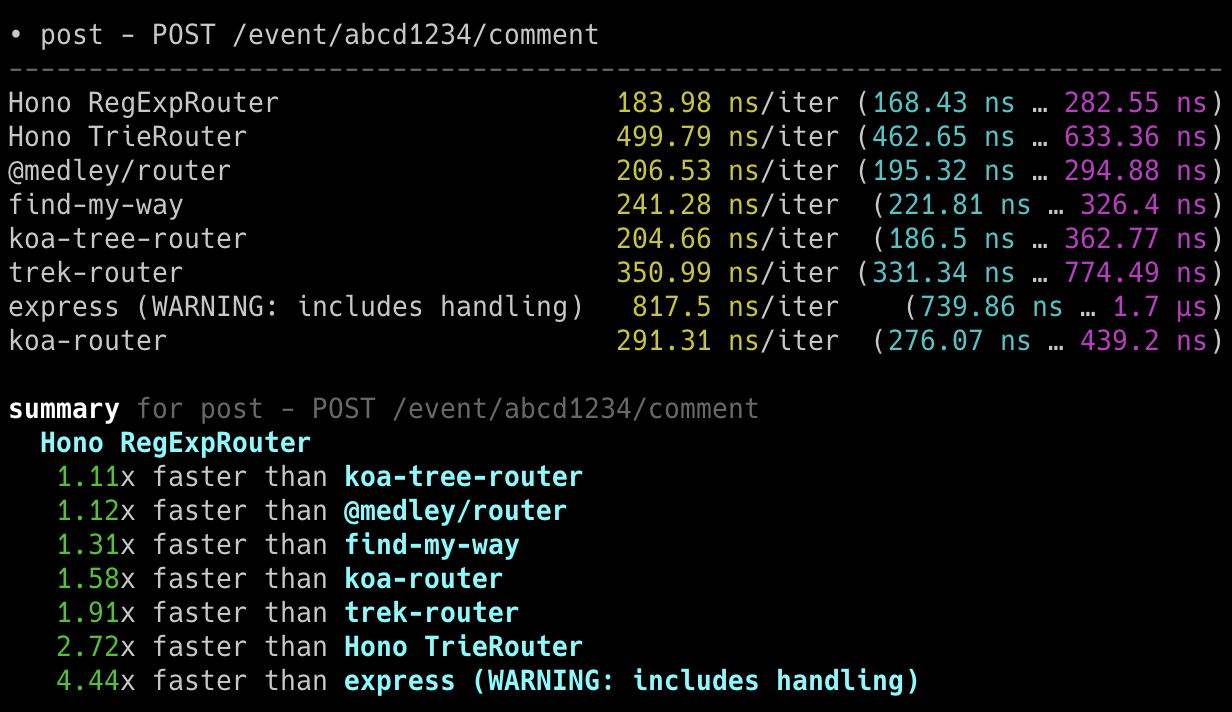
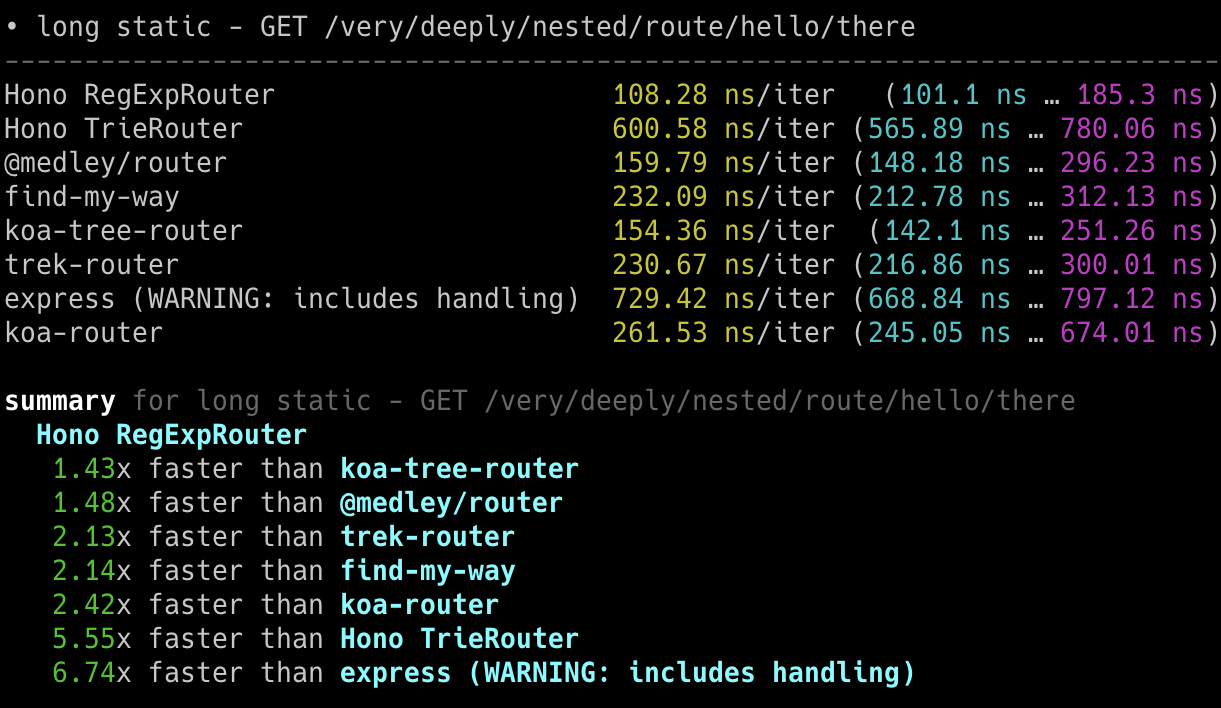
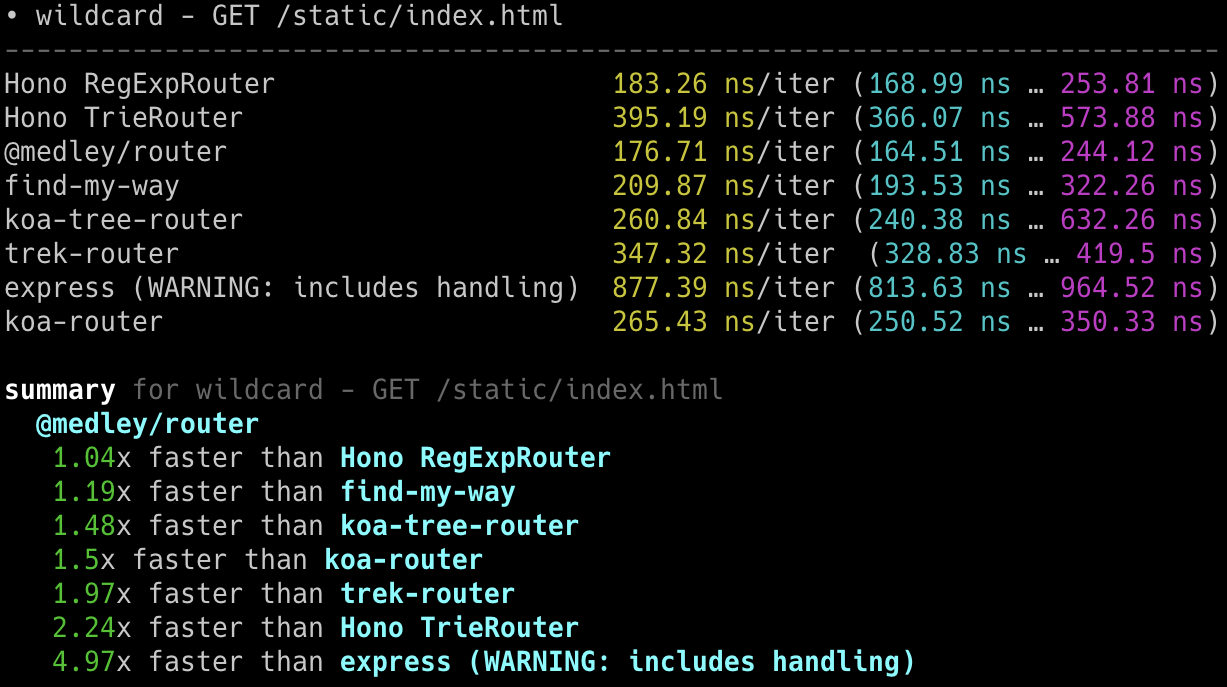
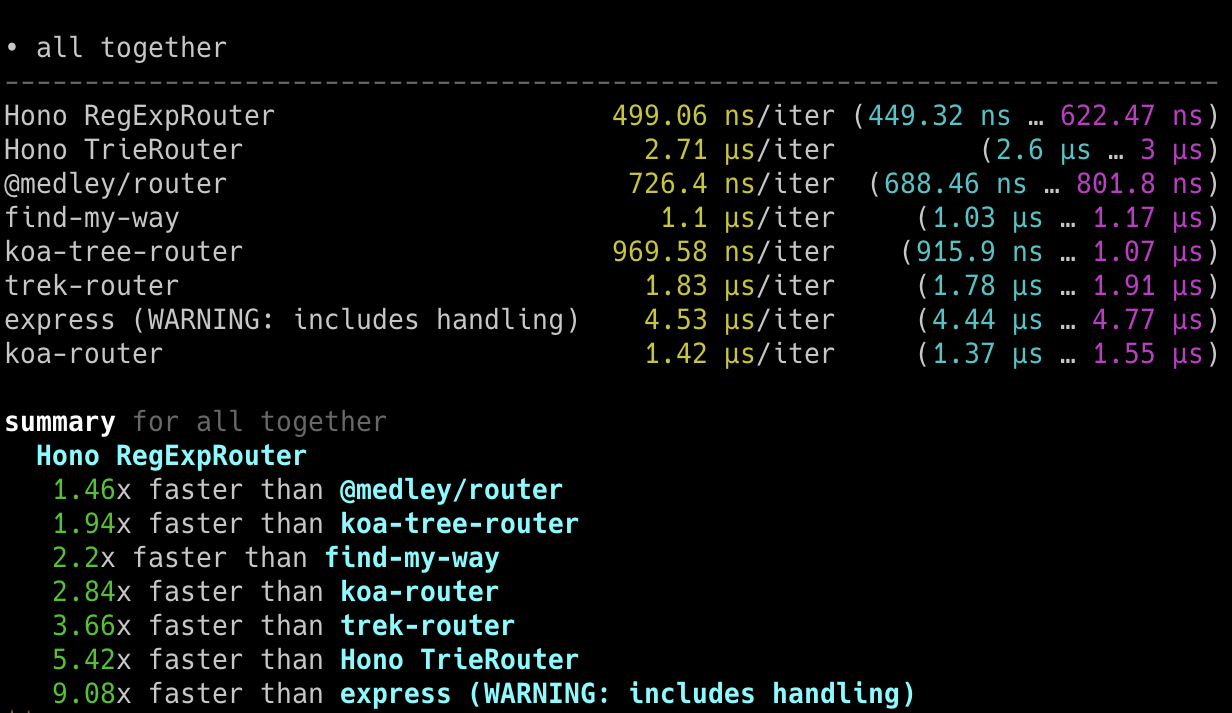
## Cloudflare Workers
**Hono is the fastest**, compared to other routers for Cloudflare Workers.
- Machine: Apple MacBook Pro, 32 GiB, M1 Pro
- Scripts: [benchmarks/handle-event](https://github.com/honojs/hono/tree/main/benchmarks/handle-event)
```
Hono x 402,820 ops/sec ±4.78% (80 runs sampled)
itty-router x 212,598 ops/sec ±3.11% (87 runs sampled)
sunder x 297,036 ops/sec ±4.76% (77 runs sampled)
worktop x 197,345 ops/sec ±2.40% (88 runs sampled)
Fastest is Hono
✨ Done in 28.06s.
```
## Deno
**Hono is the fastest**, compared to other frameworks for Deno.
- Machine: Apple MacBook Pro, 32 GiB, M1 Pro, Deno v1.22.0
- Scripts: [benchmarks/deno](https://github.com/honojs/hono/tree/main/benchmarks/deno)
- Method: `bombardier --fasthttp -d 10s -c 100 'http://localhost:8000/user/lookup/username/foo'`
| Framework | Version | Results |
| --------- | :----------: | -----------------------: |
| **Hono** | 3.0.0 | **Requests/sec: 136112** |
| Fast | 4.0.0-beta.1 | Requests/sec: 103214 |
| Megalo | 0.3.0 | Requests/sec: 64597 |
| Faster | 5.7 | Requests/sec: 54801 |
| oak | 10.5.1 | Requests/sec: 43326 |
| opine | 2.2.0 | Requests/sec: 30700 |
Another benchmark result: [denosaurs/bench](https://github.com/denosaurs/bench)
## Bun
Hono is one of the fastest frameworks for Bun.
You can see it below.
- [SaltyAom/bun-http-framework-benchmark](https://github.com/SaltyAom/bun-http-framework-benchmark)
# Hono Stacks
Hono makes easy things easy and hard things easy.
It is suitable for not just only returning JSON, but it's also great for building the full-stack application including REST API servers and the client.
## RPC
Hono's RPC feature allows you to share API specs with little change to your code.
The client generated by `hc` will read the spec and access the endpoint type-safety.
The following libraries make it possible.
- Hono - API Server
- [Zod](https://zod.dev) - Validator
- [Zod Validator Middleware](https://github.com/honojs/middleware/tree/main/packages/zod-validator)
- `hc` - HTTP Client
We can call the set of these components the **Hono Stack**.
Now let's create an API server and a client with it.
## Writing API
First, write an endpoint that receives a GET request and returns JSON.
```ts twoslash
import { Hono } from 'hono'
const app = new Hono()
app.get('/hello', (c) => {
return c.json({
message: `Hello!`,
})
})
```
## Validation with Zod
Validate with Zod to receive the value of the query parameter.
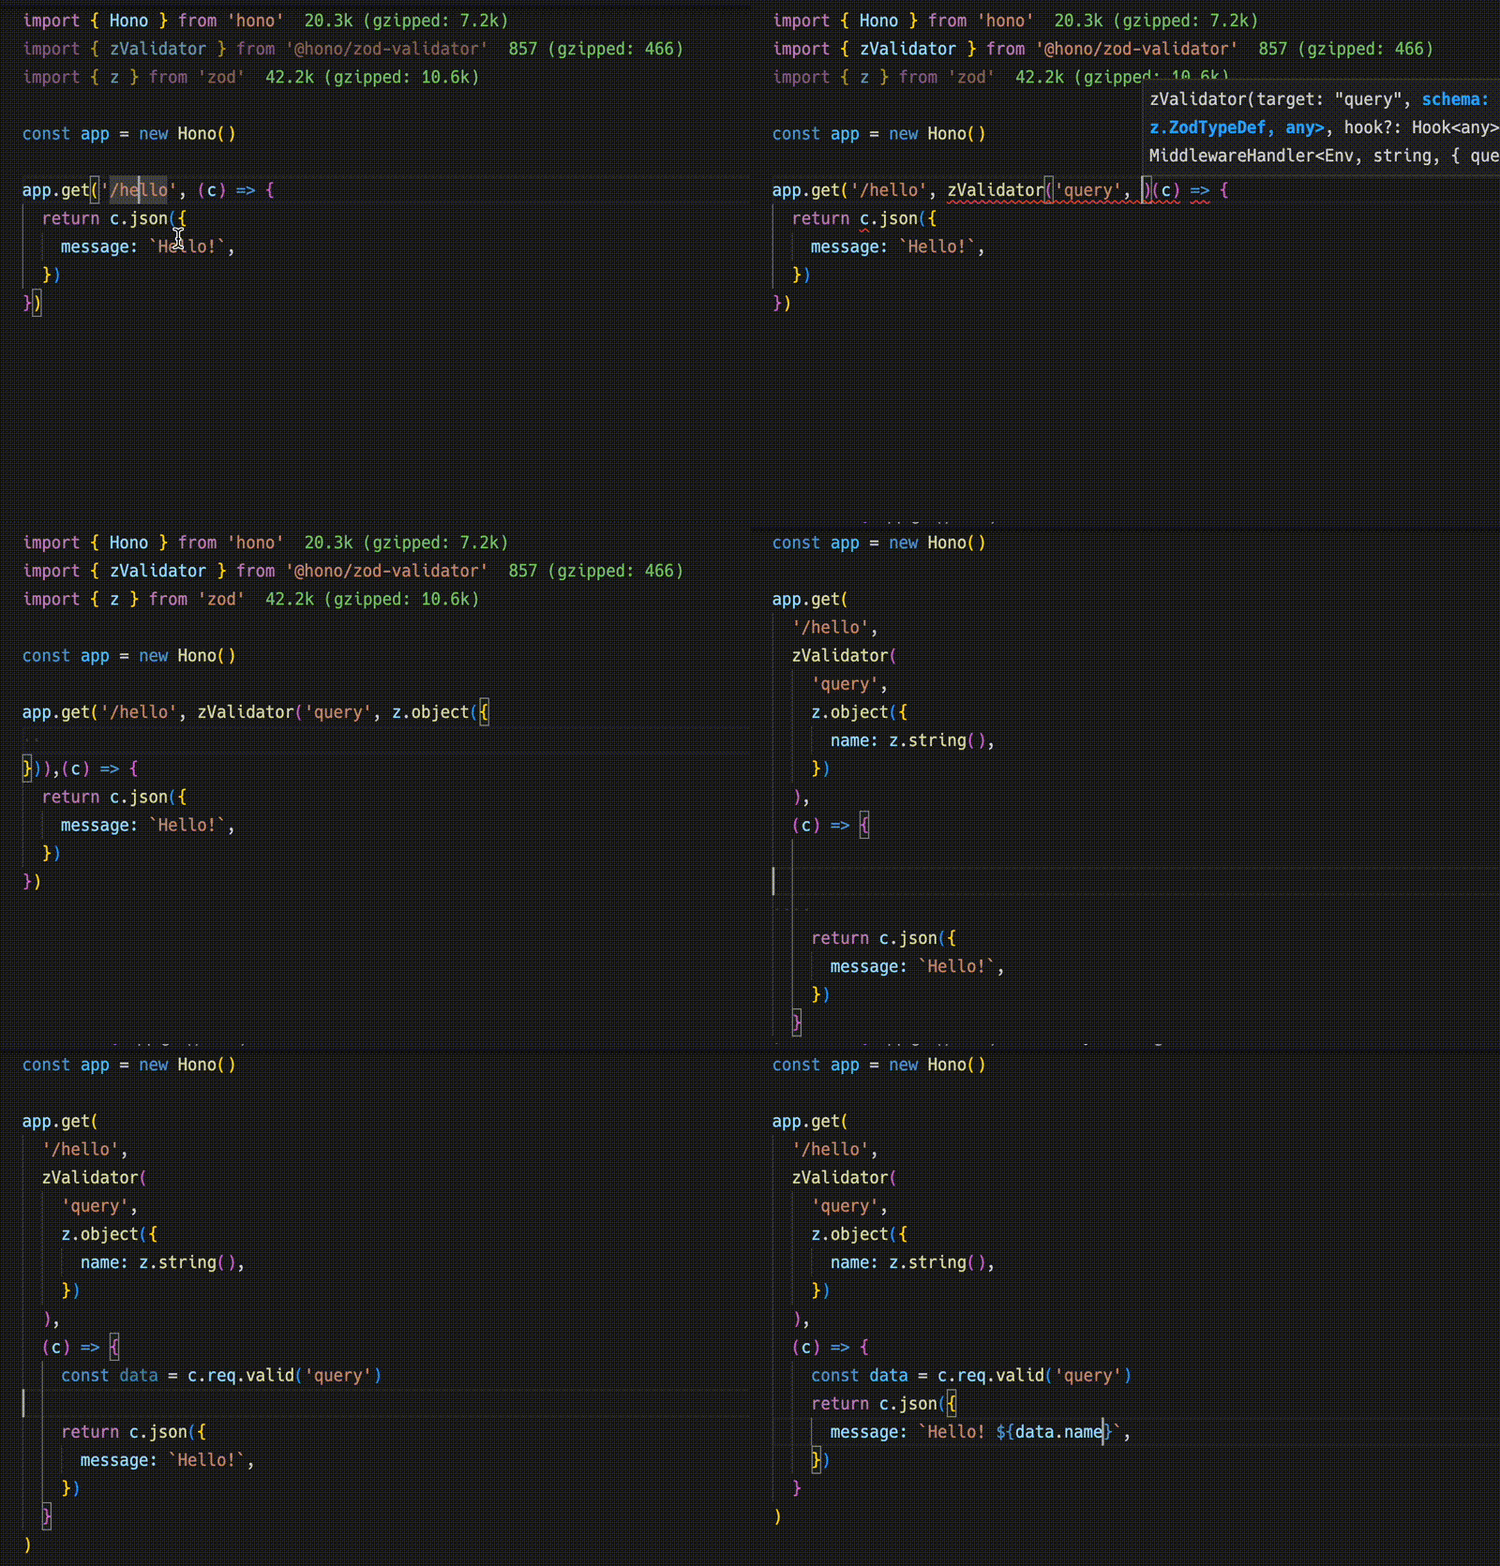
```ts
import { zValidator } from '@hono/zod-validator'
import * as z from 'zod'
app.get(
'/hello',
zValidator(
'query',
z.object({
name: z.string(),
})
),
(c) => {
const { name } = c.req.valid('query')
return c.json({
message: `Hello! ${name}`,
})
}
)
```
## Sharing the Types
To emit an endpoint specification, export its type.
::: warning
For the RPC to infer routes correctly, all included methods must be chained, and the endpoint or app type must be inferred from a declared variable. For more, see [Best Practices for RPC](https://hono.dev/docs/guides/best-practices#if-you-want-to-use-rpc-features).
:::
```ts{1,17}
const route = app.get(
'/hello',
zValidator(
'query',
z.object({
name: z.string(),
})
),
(c) => {
const { name } = c.req.valid('query')
return c.json({
message: `Hello! ${name}`,
})
}
)
export type AppType = typeof route
```
## Client
Next, The client-side implementation.
Create a client object by passing the `AppType` type to `hc` as generics.
Then, magically, completion works and the endpoint path and request type are suggested.
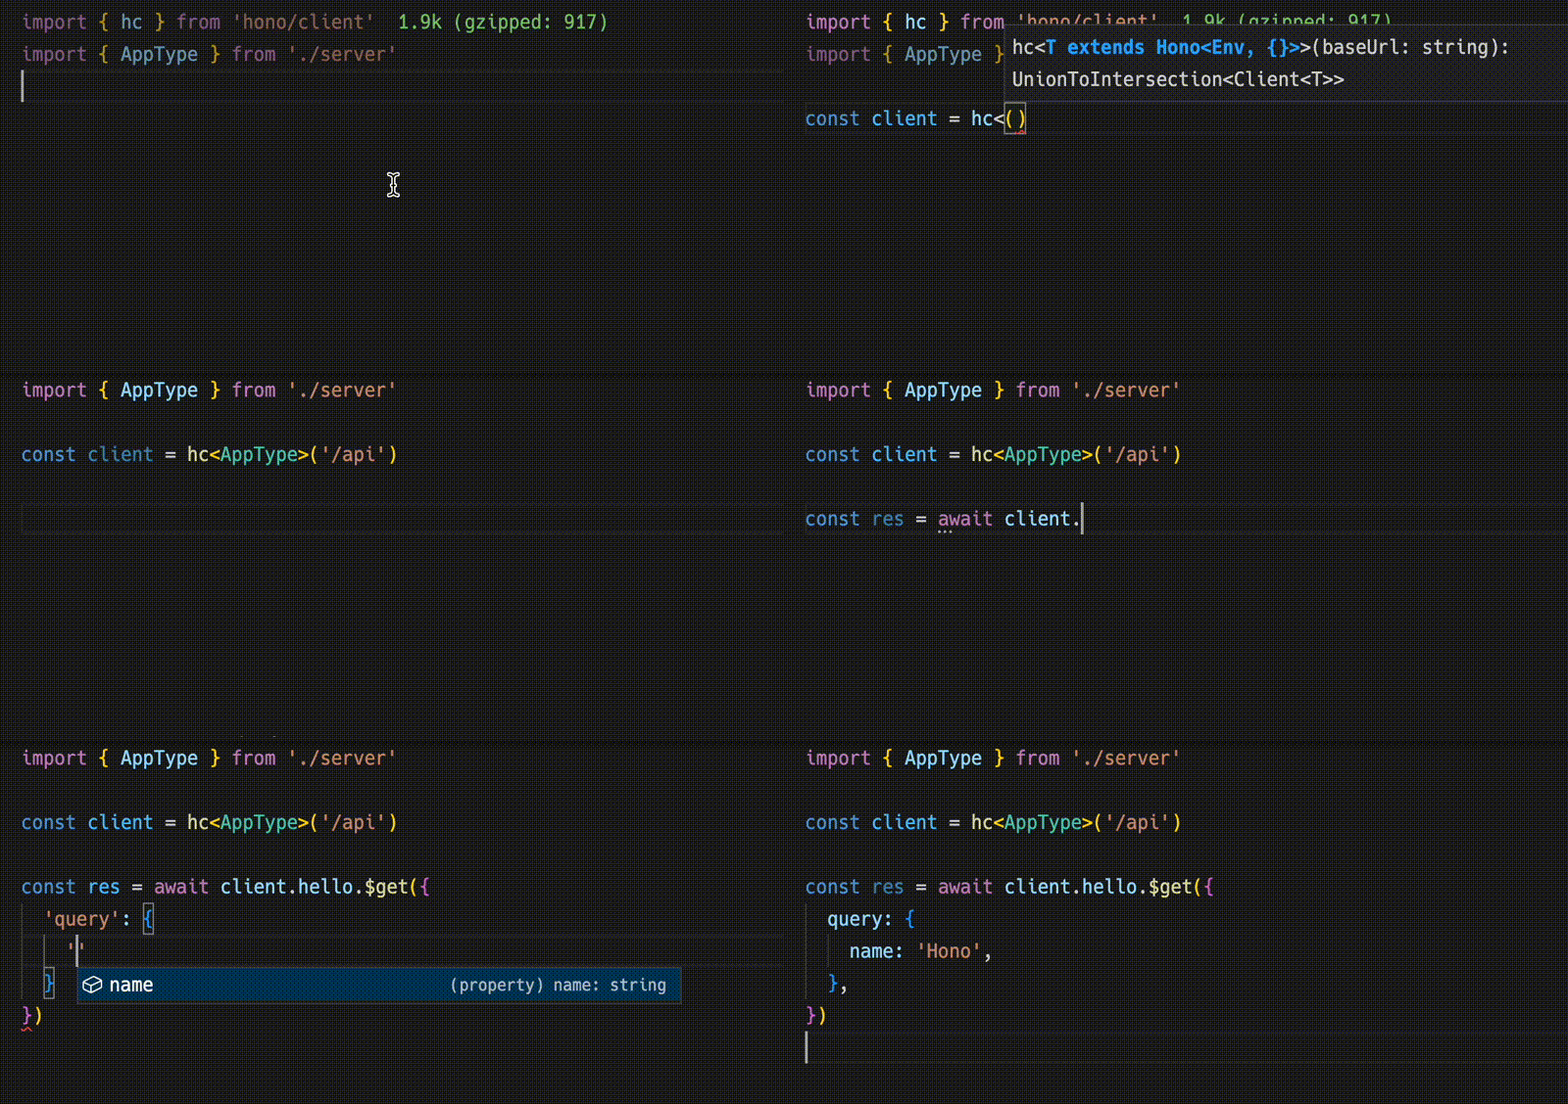
```ts
import { AppType } from './server'
import { hc } from 'hono/client'
const client = hc('/api')
const res = await client.hello.$get({
query: {
name: 'Hono',
},
})
```
The `Response` is compatible with the fetch API, but the data that can be retrieved with `json()` has a type.
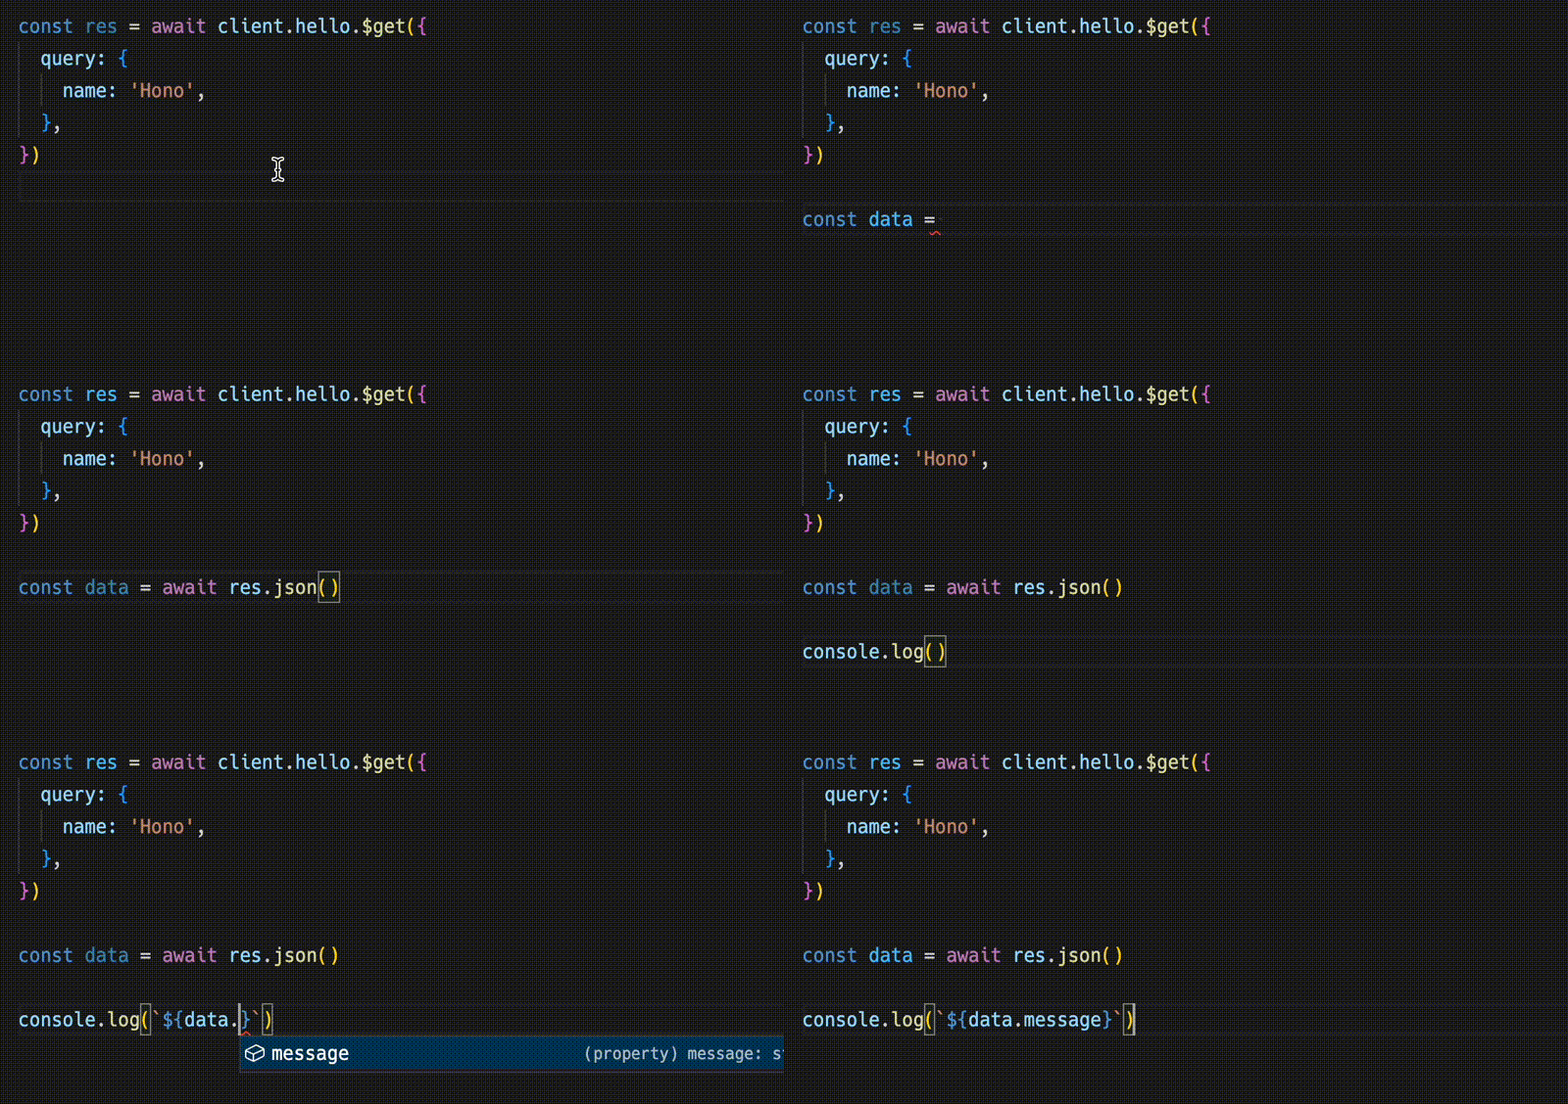
```ts
const data = await res.json()
console.log(`${data.message}`)
```
Sharing API specifications means that you can be aware of server-side changes.
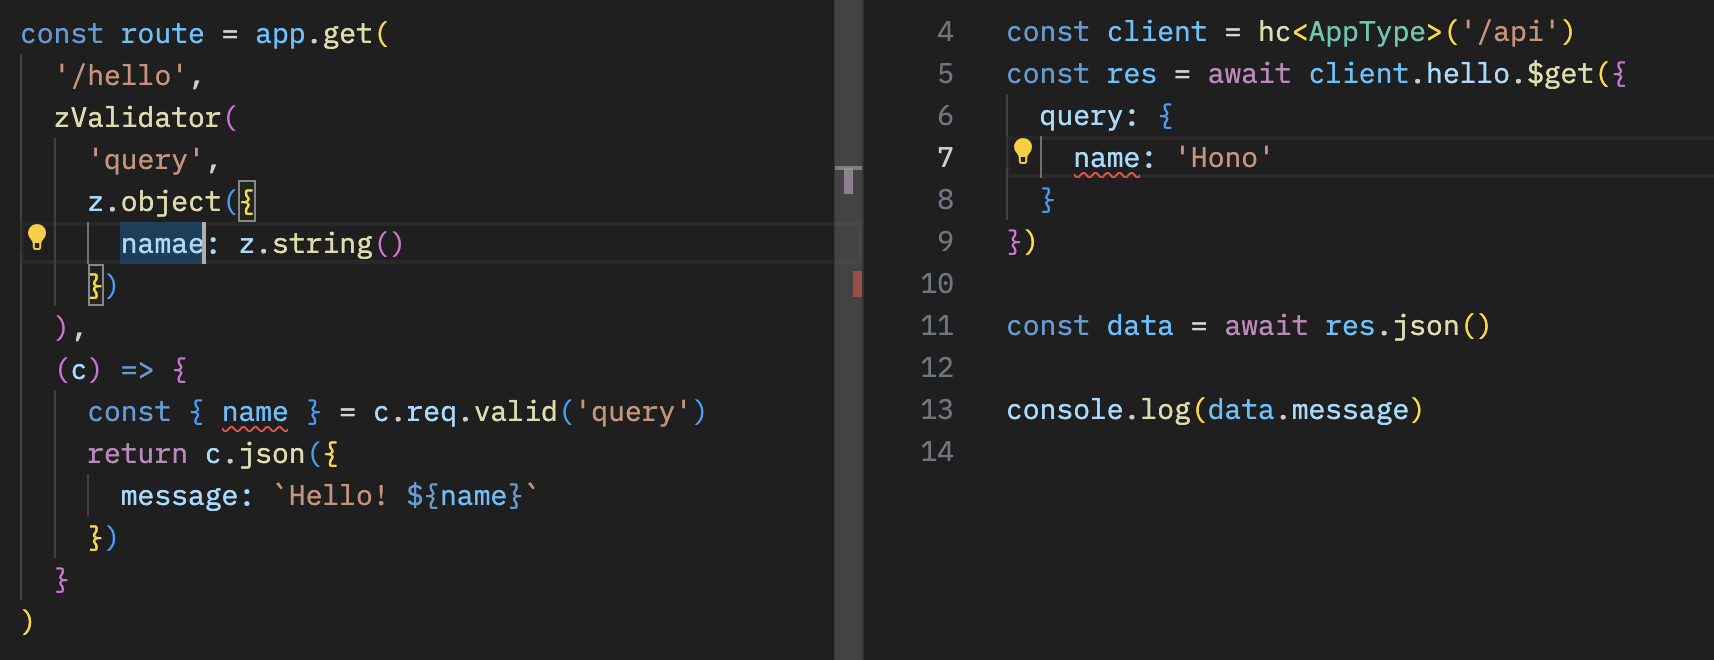
## With React
You can create applications on Cloudflare Pages using React.
The API server.
```ts
// functions/api/[[route]].ts
import { Hono } from 'hono'
import { handle } from 'hono/cloudflare-pages'
import * as z from 'zod'
import { zValidator } from '@hono/zod-validator'
const app = new Hono()
const schema = z.object({
id: z.string(),
title: z.string(),
})
type Todo = z.infer
const todos: Todo[] = []
const route = app
.post('/todo', zValidator('form', schema), (c) => {
const todo = c.req.valid('form')
todos.push(todo)
return c.json({
message: 'created!',
})
})
.get((c) => {
return c.json({
todos,
})
})
export type AppType = typeof route
export const onRequest = handle(app, '/api')
```
The client with React and React Query.
```tsx
// src/App.tsx
import {
useQuery,
useMutation,
QueryClient,
QueryClientProvider,
} from '@tanstack/react-query'
import { AppType } from '../functions/api/[[route]]'
import { hc, InferResponseType, InferRequestType } from 'hono/client'
const queryClient = new QueryClient()
const client = hc('/api')
export default function App() {
return (
)
}
const Todos = () => {
const query = useQuery({
queryKey: ['todos'],
queryFn: async () => {
const res = await client.todo.$get()
return await res.json()
},
})
const $post = client.todo.$post
const mutation = useMutation<
InferResponseType,
Error,
InferRequestType['form']
>({
mutationFn: async (todo) => {
const res = await $post({
form: todo,
})
return await res.json()
},
onSuccess: async () => {
queryClient.invalidateQueries({ queryKey: ['todos'] })
},
onError: (error) => {
console.log(error)
},
})
return (
{query.data?.todos.map((todo) => (
{todo.title}
))}
)
}
```
# Philosophy
In this section, we talk about the concept, or philosophy, of Hono.
## Motivation
At first, I just wanted to create a web application on Cloudflare Workers.
But, there was no good framework that works on Cloudflare Workers.
So, I started building Hono.
I thought it would be a good opportunity to learn how to build a router using Trie trees.
Then a friend showed up with ultra crazy fast router called "RegExpRouter".
And I also have a friend who created the Basic authentication middleware.
Using only Web Standard APIs, we could make it work on Deno and Bun. When people asked "is there Express for Bun?", we could answer, "no, but there is Hono".
(Although Express works on Bun now.)
We also have friends who make GraphQL servers, Firebase authentication, and Sentry middleware.
And, we also have a Node.js adapter.
An ecosystem has sprung up.
In other words, Hono is damn fast, makes a lot of things possible, and works anywhere.
We might imagine that Hono could become the **Standard for Web Standards**.
# HonoRequest
The `HonoRequest` is an object that can be taken from `c.req` which wraps a [Request](https://developer.mozilla.org/en-US/docs/Web/API/Request) object.
## param()
Get the values of path parameters.
```ts twoslash
import { Hono } from 'hono'
const app = new Hono()
// ---cut---
// Captured params
app.get('/entry/:id', async (c) => {
const id = c.req.param('id')
// ^?
// ...
})
// Get all params at once
app.get('/entry/:id/comment/:commentId', async (c) => {
const { id, commentId } = c.req.param()
// ^?
})
```
## query()
Get querystring parameters.
```ts twoslash
import { Hono } from 'hono'
const app = new Hono()
// ---cut---
// Query params
app.get('/search', async (c) => {
const query = c.req.query('q')
// ^?
})
// Get all params at once
app.get('/search', async (c) => {
const { q, limit, offset } = c.req.query()
// ^?
})
```
## queries()
Get multiple querystring parameter values, e.g. `/search?tags=A&tags=B`
```ts twoslash
import { Hono } from 'hono'
const app = new Hono()
// ---cut---
app.get('/search', async (c) => {
// tags will be string[]
const tags = c.req.queries('tags')
// ^?
// ...
})
```
## header()
Get the request header value.
```ts twoslash
import { Hono } from 'hono'
const app = new Hono()
// ---cut---
app.get('/', (c) => {
const userAgent = c.req.header('User-Agent')
// ^?
return c.text(`Your user agent is ${userAgent}`)
})
```
::: warning
When `c.req.header()` is called with no arguments, all keys in the returned record are **lowercase**.
If you want to get the value of a header with an uppercase name,
use `c.req.header(“X-Foo”)`.
```ts
// ❌ Will not work
const headerRecord = c.req.header()
const foo = headerRecord['X-Foo']
// ✅ Will work
const foo = c.req.header('X-Foo')
```
:::
## parseBody()
Parse Request body of type `multipart/form-data` or `application/x-www-form-urlencoded`
```ts twoslash
import { Hono } from 'hono'
const app = new Hono()
// ---cut---
app.post('/entry', async (c) => {
const body = await c.req.parseBody()
// ...
})
```
`parseBody()` supports the following behaviors.
**Single file**
```ts twoslash
import { Context } from 'hono'
declare const c: Context
// ---cut---
const body = await c.req.parseBody()
const data = body['foo']
// ^?
```
`body['foo']` is `(string | File)`.
If multiple files are uploaded, the last one will be used.
### Multiple files
```ts twoslash
import { Context } from 'hono'
declare const c: Context
// ---cut---
const body = await c.req.parseBody()
body['foo[]']
```
`body['foo[]']` is always `(string | File)[]`.
`[]` postfix is required.
### Multiple files or fields with same name
If you have an input field that allows multiple `` or multiple checkboxes with the same name ``.
```ts twoslash
import { Context } from 'hono'
declare const c: Context
// ---cut---
const body = await c.req.parseBody({ all: true })
body['foo']
```
`all` option is disabled by default.
- If `body['foo']` is multiple files, it will be parsed to `(string | File)[]`.
- If `body['foo']` is single file, it will be parsed to `(string | File)`.
### Dot notation
If you set the `dot` option `true`, the return value is structured based on the dot notation.
Imagine receiving the following data:
```ts twoslash
const data = new FormData()
data.append('obj.key1', 'value1')
data.append('obj.key2', 'value2')
```
You can get the structured value by setting the `dot` option `true`:
```ts twoslash
import { Context } from 'hono'
declare const c: Context
// ---cut---
const body = await c.req.parseBody({ dot: true })
// body is `{ obj: { key1: 'value1', key2: 'value2' } }`
```
## json()
Parses the request body of type `application/json`
```ts twoslash
import { Hono } from 'hono'
const app = new Hono()
// ---cut---
app.post('/entry', async (c) => {
const body = await c.req.json()
// ...
})
```
## text()
Parses the request body of type `text/plain`
```ts twoslash
import { Hono } from 'hono'
const app = new Hono()
// ---cut---
app.post('/entry', async (c) => {
const body = await c.req.text()
// ...
})
```
## arrayBuffer()
Parses the request body as an `ArrayBuffer`
```ts twoslash
import { Hono } from 'hono'
const app = new Hono()
// ---cut---
app.post('/entry', async (c) => {
const body = await c.req.arrayBuffer()
// ...
})
```
## blob()
Parses the request body as a `Blob`.
```ts twoslash
import { Hono } from 'hono'
const app = new Hono()
// ---cut---
app.post('/entry', async (c) => {
const body = await c.req.blob()
// ...
})
```
## formData()
Parses the request body as a `FormData`.
```ts twoslash
import { Hono } from 'hono'
const app = new Hono()
// ---cut---
app.post('/entry', async (c) => {
const body = await c.req.formData()
// ...
})
```
## valid()
Get the validated data.
```ts
app.post('/posts', async (c) => {
const { title, body } = c.req.valid('form')
// ...
})
```
Available targets are below.
- `form`
- `json`
- `query`
- `header`
- `cookie`
- `param`
See the [Validation section](/docs/guides/validation) for usage examples.
## routePath
::: warning
**Deprecated in v4.8.0**: This property is deprecated. Use `routePath()` from [Route Helper](/docs/helpers/route) instead.
:::
You can retrieve the registered path within the handler like this:
```ts twoslash
import { Hono } from 'hono'
const app = new Hono()
// ---cut---
app.get('/posts/:id', (c) => {
return c.json({ path: c.req.routePath })
})
```
If you access `/posts/123`, it will return `/posts/:id`:
```json
{ "path": "/posts/:id" }
```
## matchedRoutes
::: warning
**Deprecated in v4.8.0**: This property is deprecated. Use `matchedRoutes()` from [Route Helper](/docs/helpers/route) instead.
:::
It returns matched routes within the handler, which is useful for debugging.
```ts twoslash
import { Hono } from 'hono'
const app = new Hono()
// ---cut---
app.use(async function logger(c, next) {
await next()
c.req.matchedRoutes.forEach(({ handler, method, path }, i) => {
const name =
handler.name ||
(handler.length < 2 ? '[handler]' : '[middleware]')
console.log(
method,
' ',
path,
' '.repeat(Math.max(10 - path.length, 0)),
name,
i === c.req.routeIndex ? '<- respond from here' : ''
)
})
})
```
## path
The request pathname.
```ts twoslash
import { Hono } from 'hono'
const app = new Hono()
// ---cut---
app.get('/about/me', async (c) => {
const pathname = c.req.path // `/about/me`
// ...
})
```
## url
The request url strings.
```ts twoslash
import { Hono } from 'hono'
const app = new Hono()
// ---cut---
app.get('/about/me', async (c) => {
const url = c.req.url // `http://localhost:8787/about/me`
// ...
})
```
## method
The method name of the request.
```ts twoslash
import { Hono } from 'hono'
const app = new Hono()
// ---cut---
app.get('/about/me', async (c) => {
const method = c.req.method // `GET`
// ...
})
```
## raw
The raw [`Request`](https://developer.mozilla.org/en-US/docs/Web/API/Request) object.
```ts
// For Cloudflare Workers
app.post('/', async (c) => {
const metadata = c.req.raw.cf?.hostMetadata?
// ...
})
```
## cloneRawRequest()
Clones the raw Request object from a HonoRequest. Works even after the request body has been consumed by validators or HonoRequest methods.
```ts twoslash
import { Hono } from 'hono'
const app = new Hono()
import { cloneRawRequest } from 'hono/request'
import { validator } from 'hono/validator'
app.post(
'/forward',
validator('json', (data) => data),
async (c) => {
// Clone after validation
const clonedReq = await cloneRawRequest(c.req)
// Does not throw the error
await clonedReq.json()
// ...
}
)
```
# API
Hono's API is simple.
Just composed by extended objects from Web Standards.
So, you can understand it well quickly.
In this section, we introduce API of Hono like below.
- Hono object
- About routing
- Context object
- About middleware
# Routing
Routing of Hono is flexible and intuitive.
Let's take a look.
## Basic
```ts twoslash
import { Hono } from 'hono'
const app = new Hono()
// ---cut---
// HTTP Methods
app.get('/', (c) => c.text('GET /'))
app.post('/', (c) => c.text('POST /'))
app.put('/', (c) => c.text('PUT /'))
app.delete('/', (c) => c.text('DELETE /'))
// Wildcard
app.get('/wild/*/card', (c) => {
return c.text('GET /wild/*/card')
})
// Any HTTP methods
app.all('/hello', (c) => c.text('Any Method /hello'))
// Custom HTTP method
app.on('PURGE', '/cache', (c) => c.text('PURGE Method /cache'))
// Multiple Method
app.on(['PUT', 'DELETE'], '/post', (c) =>
c.text('PUT or DELETE /post')
)
// Multiple Paths
app.on('GET', ['/hello', '/ja/hello', '/en/hello'], (c) =>
c.text('Hello')
)
```
## Path Parameter
```ts twoslash
import { Hono } from 'hono'
const app = new Hono()
// ---cut---
app.get('/user/:name', async (c) => {
const name = c.req.param('name')
// ^?
// ...
})
```
or all parameters at once:
```ts twoslash
import { Hono } from 'hono'
const app = new Hono()
// ---cut---
app.get('/posts/:id/comment/:comment_id', async (c) => {
const { id, comment_id } = c.req.param()
// ^?
// ...
})
```
## Optional Parameter
```ts twoslash
import { Hono } from 'hono'
const app = new Hono()
// ---cut---
// Will match `/api/animal` and `/api/animal/:type`
app.get('/api/animal/:type?', (c) => c.text('Animal!'))
```
## Regexp
```ts twoslash
import { Hono } from 'hono'
const app = new Hono()
// ---cut---
app.get('/post/:date{[0-9]+}/:title{[a-z]+}', async (c) => {
const { date, title } = c.req.param()
// ^?
// ...
})
```
## Including slashes
```ts twoslash
import { Hono } from 'hono'
const app = new Hono()
// ---cut---
app.get('/posts/:filename{.+\\.png}', async (c) => {
//...
})
```
## Chained route
```ts twoslash
import { Hono } from 'hono'
const app = new Hono()
// ---cut---
app
.get('/endpoint', (c) => {
return c.text('GET /endpoint')
})
.post((c) => {
return c.text('POST /endpoint')
})
.delete((c) => {
return c.text('DELETE /endpoint')
})
```
## Grouping
You can group the routes with the Hono instance and add them to the main app with the route method.
```ts twoslash
import { Hono } from 'hono'
// ---cut---
const book = new Hono()
book.get('/', (c) => c.text('List Books')) // GET /book
book.get('/:id', (c) => {
// GET /book/:id
const id = c.req.param('id')
return c.text('Get Book: ' + id)
})
book.post('/', (c) => c.text('Create Book')) // POST /book
const app = new Hono()
app.route('/book', book)
```
## Grouping without changing base
You can also group multiple instances while keeping base.
```ts twoslash
import { Hono } from 'hono'
// ---cut---
const book = new Hono()
book.get('/book', (c) => c.text('List Books')) // GET /book
book.post('/book', (c) => c.text('Create Book')) // POST /book
const user = new Hono().basePath('/user')
user.get('/', (c) => c.text('List Users')) // GET /user
user.post('/', (c) => c.text('Create User')) // POST /user
const app = new Hono()
app.route('/', book) // Handle /book
app.route('/', user) // Handle /user
```
## Base path
You can specify the base path.
```ts twoslash
import { Hono } from 'hono'
// ---cut---
const api = new Hono().basePath('/api')
api.get('/book', (c) => c.text('List Books')) // GET /api/book
```
## Routing with hostname
It works fine if it includes a hostname.
```ts twoslash
import { Hono } from 'hono'
// ---cut---
const app = new Hono({
getPath: (req) => req.url.replace(/^https?:\/([^?]+).*$/, '$1'),
})
app.get('/www1.example.com/hello', (c) => c.text('hello www1'))
app.get('/www2.example.com/hello', (c) => c.text('hello www2'))
```
## Routing with `host` Header value
Hono can handle the `host` header value if you set the `getPath()` function in the Hono constructor.
```ts twoslash
import { Hono } from 'hono'
// ---cut---
const app = new Hono({
getPath: (req) =>
'/' +
req.headers.get('host') +
req.url.replace(/^https?:\/\/[^/]+(\/[^?]*).*/, '$1'),
})
app.get('/www1.example.com/hello', (c) => c.text('hello www1'))
// A following request will match the route:
// new Request('http://www1.example.com/hello', {
// headers: { host: 'www1.example.com' },
// })
```
By applying this, for example, you can change the routing by `User-Agent` header.
## Routing priority
Handlers or middleware will be executed in registration order.
```ts twoslash
import { Hono } from 'hono'
const app = new Hono()
// ---cut---
app.get('/book/a', (c) => c.text('a')) // a
app.get('/book/:slug', (c) => c.text('common')) // common
```
```
GET /book/a ---> `a`
GET /book/b ---> `common`
```
When a handler is executed, the process will be stopped.
```ts twoslash
import { Hono } from 'hono'
const app = new Hono()
// ---cut---
app.get('*', (c) => c.text('common')) // common
app.get('/foo', (c) => c.text('foo')) // foo
```
```
GET /foo ---> `common` // foo will not be dispatched
```
If you have the middleware that you want to execute, write the code above the handler.
```ts twoslash
import { Hono } from 'hono'
import { logger } from 'hono/logger'
const app = new Hono()
// ---cut---
app.use(logger())
app.get('/foo', (c) => c.text('foo'))
```
If you want to have a "_fallback_" handler, write the code below the other handler.
```ts twoslash
import { Hono } from 'hono'
const app = new Hono()
// ---cut---
app.get('/bar', (c) => c.text('bar')) // bar
app.get('*', (c) => c.text('fallback')) // fallback
```
```
GET /bar ---> `bar`
GET /foo ---> `fallback`
```
## Grouping ordering
Note that the mistake of grouping routings is hard to notice.
The `route()` function takes the stored routing from the second argument (such as `three` or `two`) and adds it to its own (`two` or `app`) routing.
```ts
three.get('/hi', (c) => c.text('hi'))
two.route('/three', three)
app.route('/two', two)
export default app
```
It will return 200 response.
```
GET /two/three/hi ---> `hi`
```
However, if they are in the wrong order, it will return a 404.
```ts twoslash
import { Hono } from 'hono'
const app = new Hono()
const two = new Hono()
const three = new Hono()
// ---cut---
three.get('/hi', (c) => c.text('hi'))
app.route('/two', two) // `two` does not have routes
two.route('/three', three)
export default app
```
```
GET /two/three/hi ---> 404 Not Found
```
# HTTPException
When a fatal error occurs, Hono (and many ecosystem middleware) may throw an `HTTPException`. This is a custom Hono `Error` that simplifies [returning error responses](#handling-httpexceptions).
## Throwing HTTPExceptions
You can throw your own HTTPExceptions by specifying a status code, and either a message or a custom response.
### Custom Message
For basic `text` responses, just set the error `message`.
```ts twoslash
import { HTTPException } from 'hono/http-exception'
throw new HTTPException(401, { message: 'Unauthorized' })
```
### Custom Response
For other response types, or to set response headers, use the `res` option. _Note that the status passed to the constructor is the one used to create responses._
```ts twoslash
import { HTTPException } from 'hono/http-exception'
const errorResponse = new Response('Unauthorized', {
status: 401, // this gets ignored
headers: {
Authenticate: 'error="invalid_token"',
},
})
throw new HTTPException(401, { res: errorResponse })
```
### Cause
In either case, you can use the [`cause`](https://developer.mozilla.org/en-US/docs/Web/JavaScript/Reference/Global_Objects/Error/cause) option to add arbitrary data to the HTTPException.
```ts twoslash
import { Hono, Context } from 'hono'
import { HTTPException } from 'hono/http-exception'
const app = new Hono()
declare const message: string
declare const authorize: (c: Context) => Promise
// ---cut---
app.post('/login', async (c) => {
try {
await authorize(c)
} catch (cause) {
throw new HTTPException(401, { message, cause })
}
return c.redirect('/')
})
```
## Handling HTTPExceptions
You can handle uncaught HTTPExceptions with [`app.onError`](/docs/api/hono#error-handling). They include a `getResponse` method that returns a new `Response` created from the error `status`, and either the error `message`, or the [custom response](#custom-response) set when the error was thrown.
```ts twoslash
import { Hono } from 'hono'
const app = new Hono()
// ---cut---
import { HTTPException } from 'hono/http-exception'
// ...
app.onError((err, c) => {
if (err instanceof HTTPException) {
// Return the error response generated by HTTPException
return err.getResponse()
}
// For any other unexpected errors, log and return a generic 500 response
console.error(err)
return c.text('Internal Server Error', 500)
})
```
::: warning
**`HTTPException.getResponse` is not aware of `Context`**. To include headers already set in `Context`, you must apply them to a new `Response`.
:::
# Presets
Hono has several routers, each designed for a specific purpose.
You can specify the router you want to use in the constructor of Hono.
**Presets** are provided for common use cases, so you don't have to specify the router each time.
The `Hono` class imported from all presets is the same, the only difference being the router.
Therefore, you can use them interchangeably.
## `hono`
Usage:
```ts twoslash
import { Hono } from 'hono'
```
Routers:
```ts
this.router = new SmartRouter({
routers: [new RegExpRouter(), new TrieRouter()],
})
```
## `hono/quick`
Usage:
```ts twoslash
import { Hono } from 'hono/quick'
```
Router:
```ts
this.router = new SmartRouter({
routers: [new LinearRouter(), new TrieRouter()],
})
```
## `hono/tiny`
Usage:
```ts twoslash
import { Hono } from 'hono/tiny'
```
Router:
```ts
this.router = new PatternRouter()
```
## Which preset should I use?
| Preset | Suitable platforms |
| ------------ | --------------------------------------------------------------------------------------------------------------------------------------------------------------------------------------------------------------------------------------------------------------------------------------------------------------------------------------------------------------------------------------------------------------------------------------------------------------------------------------------------------------------------------------------------------------------------- |
| `hono` | This is highly recommended for most use cases. Although the registration phase may be slower than `hono/quick`, it exhibits high performance once booted. It's ideal for long-life servers built with **Deno**, **Bun**, or **Node.js**. It is also suitable for **Fastly Compute**, as route registration occurs during the app build phase on that platform. For environments such as **Cloudflare Workers**, **Deno Deploy**, where v8 isolates are utilized, this preset is suitable as well because the isolations persist for a certain amount of time after booting. |
| `hono/quick` | This preset is designed for environments where the application is initialized for every request. |
| `hono/tiny` | This is the smallest router package and it's suitable for environments where resources are limited. |
# Context
The `Context` object is instantiated for each request and kept until the response is returned. You can put values in it, set headers and a status code you want to return, and access HonoRequest and Response objects.
## req
`req` is an instance of HonoRequest. For more details, see [HonoRequest](/docs/api/request).
```ts twoslash
import { Hono } from 'hono'
const app = new Hono()
// ---cut---
app.get('/hello', (c) => {
const userAgent = c.req.header('User-Agent')
// ...
// ---cut-start---
return c.text(`Hello, ${userAgent}`)
// ---cut-end---
})
```
## status()
You can set an HTTP status code with `c.status()`. The default is `200`. You don't have to use `c.status()` if the code is `200`.
```ts twoslash
import { Hono } from 'hono'
const app = new Hono()
// ---cut---
app.post('/posts', (c) => {
// Set HTTP status code
c.status(201)
return c.text('Your post is created!')
})
```
## header()
You can set HTTP Headers for the response.
```ts twoslash
import { Hono } from 'hono'
const app = new Hono()
// ---cut---
app.get('/', (c) => {
// Set headers
c.header('X-Message', 'My custom message')
return c.text('Hello!')
})
```
## body()
Return an HTTP response.
::: info
**Note**: When returning text or HTML, it is recommended to use `c.text()` or `c.html()`.
:::
```ts twoslash
import { Hono } from 'hono'
const app = new Hono()
// ---cut---
app.get('/welcome', (c) => {
c.header('Content-Type', 'text/plain')
// Return the response body
return c.body('Thank you for coming')
})
```
You can also write the following.
```ts twoslash
import { Hono } from 'hono'
const app = new Hono()
// ---cut---
app.get('/welcome', (c) => {
return c.body('Thank you for coming', 201, {
'X-Message': 'Hello!',
'Content-Type': 'text/plain',
})
})
```
The response is the same `Response` object as below.
```ts twoslash
new Response('Thank you for coming', {
status: 201,
headers: {
'X-Message': 'Hello!',
'Content-Type': 'text/plain',
},
})
```
## text()
Render text as `Content-Type: text/plain`.
```ts twoslash
import { Hono } from 'hono'
const app = new Hono()
// ---cut---
app.get('/say', (c) => {
return c.text('Hello!')
})
```
## json()
Render JSON as `Content-Type: application/json`.
```ts twoslash
import { Hono } from 'hono'
const app = new Hono()
// ---cut---
app.get('/api', (c) => {
return c.json({ message: 'Hello!' })
})
```
## html()
Render HTML as `Content-Type: text/html`.
```ts twoslash
import { Hono } from 'hono'
const app = new Hono()
// ---cut---
app.get('/', (c) => {
return c.html('
Hello! Hono!
')
})
```
## notFound()
Return a `Not Found` Response. You can customize it with [`app.notFound()`](/docs/api/hono#not-found).
```ts twoslash
import { Hono } from 'hono'
const app = new Hono()
// ---cut---
app.get('/notfound', (c) => {
return c.notFound()
})
```
## redirect()
Redirect, default status code is `302`.
```ts twoslash
import { Hono } from 'hono'
const app = new Hono()
// ---cut---
app.get('/redirect', (c) => {
return c.redirect('/')
})
app.get('/redirect-permanently', (c) => {
return c.redirect('/', 301)
})
```
## res
You can access the [Response] object that will be returned.
```ts twoslash
import { Hono } from 'hono'
const app = new Hono()
// ---cut---
// Response object
app.use('/', async (c, next) => {
await next()
c.res.headers.append('X-Debug', 'Debug message')
})
```
[Response]: https://developer.mozilla.org/en-US/docs/Web/API/Response
## set() / get()
Get and set arbitrary key-value pairs, with a lifetime of the current request. This allows passing specific values between middleware or from middleware to route handlers.
```ts twoslash
import { Hono } from 'hono'
const app = new Hono<{ Variables: { message: string } }>()
// ---cut---
app.use(async (c, next) => {
c.set('message', 'Hono is cool!!')
await next()
})
app.get('/', (c) => {
const message = c.get('message')
return c.text(`The message is "${message}"`)
})
```
Pass the `Variables` as Generics to the constructor of `Hono` to make it type-safe.
```ts twoslash
import { Hono } from 'hono'
// ---cut---
type Variables = {
message: string
}
const app = new Hono<{ Variables: Variables }>()
```
The value of `c.set` / `c.get` are retained only within the same request. They cannot be shared or persisted across different requests.
## var
You can also access the value of a variable with `c.var`.
```ts twoslash
import type { Context } from 'hono'
declare const c: Context
// ---cut---
const result = c.var.client.oneMethod()
```
If you want to create the middleware which provides a custom method,
write like the following:
```ts twoslash
import { Hono } from 'hono'
import { createMiddleware } from 'hono/factory'
// ---cut---
type Env = {
Variables: {
echo: (str: string) => string
}
}
const app = new Hono()
const echoMiddleware = createMiddleware(async (c, next) => {
c.set('echo', (str) => str)
await next()
})
app.get('/echo', echoMiddleware, (c) => {
return c.text(c.var.echo('Hello!'))
})
```
If you want to use the middleware in multiple handlers, you can use `app.use()`.
Then, you have to pass the `Env` as Generics to the constructor of `Hono` to make it type-safe.
```ts twoslash
import { Hono } from 'hono'
import type { MiddlewareHandler } from 'hono/types'
declare const echoMiddleware: MiddlewareHandler
type Env = {
Variables: {
echo: (str: string) => string
}
}
// ---cut---
const app = new Hono()
app.use(echoMiddleware)
app.get('/echo', (c) => {
return c.text(c.var.echo('Hello!'))
})
```
## render() / setRenderer()
You can set a layout using `c.setRenderer()` within a custom middleware.
```tsx twoslash
/** @jsx jsx */
/** @jsxImportSource hono/jsx */
import { Hono } from 'hono'
const app = new Hono()
// ---cut---
app.use(async (c, next) => {
c.setRenderer((content) => {
return c.html(
{content}
)
})
await next()
})
```
Then, you can utilize `c.render()` to create responses within this layout.
```ts twoslash
import { Hono } from 'hono'
const app = new Hono()
// ---cut---
app.get('/', (c) => {
return c.render('Hello!')
})
```
The output of which will be:
```html
Hello!
```
Additionally, this feature offers the flexibility to customize arguments.
To ensure type safety, types can be defined as:
```ts
declare module 'hono' {
interface ContextRenderer {
(
content: string | Promise,
head: { title: string }
): Response | Promise
}
}
```
Here's an example of how you can use this:
```ts
app.use('/pages/*', async (c, next) => {
c.setRenderer((content, head) => {
return c.html(
{head.title}{head.title}
, {
title: 'My hobbies',
})
})
```
## executionCtx
You can access Cloudflare Workers' specific [ExecutionContext](https://developers.cloudflare.com/workers/runtime-apis/context/).
```ts twoslash
import { Hono } from 'hono'
const app = new Hono<{
Bindings: {
KV: any
}
}>()
declare const key: string
declare const data: string
// ---cut---
// ExecutionContext object
app.get('/foo', async (c) => {
c.executionCtx.waitUntil(c.env.KV.put(key, data))
// ...
})
```
The `ExecutionContext` also has an [`exports`](https://developers.cloudflare.com/workers/runtime-apis/context/#exports) field. To get autocomplete with Wrangler's generated types, you can use module augmentation:
```ts
import 'hono'
declare module 'hono' {
interface ExecutionContext {
readonly exports: Cloudflare.Exports
}
}
```
## event
You can access Cloudflare Workers' specific `FetchEvent`. This was used in "Service Worker" syntax. But, it is not recommended now.
```ts twoslash
import { Hono } from 'hono'
declare const key: string
declare const data: string
type KVNamespace = any
// ---cut---
// Type definition to make type inference
type Bindings = {
MY_KV: KVNamespace
}
const app = new Hono<{ Bindings: Bindings }>()
// FetchEvent object (only set when using Service Worker syntax)
app.get('/foo', async (c) => {
c.event.waitUntil(c.env.MY_KV.put(key, data))
// ...
})
```
## env
In Cloudflare Workers Environment variables, secrets, KV namespaces, D1 database, R2 bucket etc. that are bound to a worker are known as bindings.
Regardless of type, bindings are always available as global variables and can be accessed via the context `c.env.BINDING_KEY`.
```ts twoslash
import { Hono } from 'hono'
type KVNamespace = any
// ---cut---
// Type definition to make type inference
type Bindings = {
MY_KV: KVNamespace
}
const app = new Hono<{ Bindings: Bindings }>()
// Environment object for Cloudflare Workers
app.get('/', async (c) => {
c.env.MY_KV.get('my-key')
// ...
})
```
## error
If the Handler throws an error, the error object is placed in `c.error`.
You can access it in your middleware.
```ts twoslash
import { Hono } from 'hono'
const app = new Hono()
// ---cut---
app.use(async (c, next) => {
await next()
if (c.error) {
// do something...
}
})
```
## ContextVariableMap
For instance, if you wish to add type definitions to variables when a specific middleware is used, you can extend `ContextVariableMap`. For example:
```ts
declare module 'hono' {
interface ContextVariableMap {
result: string
}
}
```
You can then utilize this in your middleware:
```ts twoslash
import { createMiddleware } from 'hono/factory'
// ---cut---
const mw = createMiddleware(async (c, next) => {
c.set('result', 'some values') // result is a string
await next()
})
```
In a handler, the variable is inferred as the proper type:
```ts twoslash
import { Hono } from 'hono'
const app = new Hono<{ Variables: { result: string } }>()
// ---cut---
app.get('/', (c) => {
const val = c.get('result') // val is a string
// ...
return c.json({ result: val })
})
```
# App - Hono
`Hono` is the primary object.
It will be imported first and used until the end.
```ts twoslash
import { Hono } from 'hono'
const app = new Hono()
//...
export default app // for Cloudflare Workers or Bun
```
## Methods
An instance of `Hono` has the following methods.
- app.**HTTP_METHOD**(\[path,\]handler|middleware...)
- app.**all**(\[path,\]handler|middleware...)
- app.**on**(method|method[], path|path[], handler|middleware...)
- app.**use**(\[path,\]middleware)
- app.**route**(path, \[app\])
- app.**basePath**(path)
- app.**notFound**(handler)
- app.**onError**(err, handler)
- app.**mount**(path, anotherApp)
- app.**fire**()
- app.**fetch**(request, env, event)
- app.**request**(path, options)
The first part of them is used for routing, please refer to the [routing section](/docs/api/routing).
## Not Found
`app.notFound` allows you to customize a Not Found Response.
```ts twoslash
import { Hono } from 'hono'
const app = new Hono()
// ---cut---
app.notFound((c) => {
return c.text('Custom 404 Message', 404)
})
```
:::warning
The `notFound` method is only called from the top-level app. For more information, see this [issue](https://github.com/honojs/hono/issues/3465#issuecomment-2381210165).
:::
## Error Handling
`app.onError` allows you to handle uncaught errors and return a custom Response.
```ts twoslash
import { Hono } from 'hono'
const app = new Hono()
// ---cut---
app.onError((err, c) => {
console.error(`${err}`)
return c.text('Custom Error Message', 500)
})
```
::: info
If both a parent app and its routes have `onError` handlers, the route-level handlers get priority.
:::
## fire()
::: warning
**`app.fire()` is deprecated**. Use `fire()` from `hono/service-worker` instead. See the [Service Worker documentation](/docs/getting-started/service-worker) for details.
:::
`app.fire()` automatically adds a global `fetch` event listener.
This can be useful for environments that adhere to the [Service Worker API](https://developer.mozilla.org/en-US/docs/Web/API/Service_Worker_API), such as [non-ES module Cloudflare Workers](https://developers.cloudflare.com/workers/reference/migrate-to-module-workers/).
`app.fire()` executes the following for you:
```ts
addEventListener('fetch', (event: FetchEventLike): void => {
event.respondWith(this.dispatch(...))
})
```
## fetch()
`app.fetch` will be the entry point of your application.
For Cloudflare Workers, you can use the following:
```ts twoslash
import { Hono } from 'hono'
const app = new Hono()
type Env = any
type ExecutionContext = any
// ---cut---
export default {
fetch(request: Request, env: Env, ctx: ExecutionContext) {
return app.fetch(request, env, ctx)
},
}
```
or just do:
```ts twoslash
import { Hono } from 'hono'
const app = new Hono()
// ---cut---
export default app
```
Bun:
```ts
export default app // [!code --]
export default { // [!code ++]
port: 3000, // [!code ++]
fetch: app.fetch, // [!code ++]
} // [!code ++]
```
## request()
`request` is a useful method for testing.
You can pass a URL or pathname to send a GET request.
`app` will return a `Response` object.
```ts twoslash
import { Hono } from 'hono'
const app = new Hono()
declare const test: (name: string, fn: () => void) => void
declare const expect: (value: any) => any
// ---cut---
test('GET /hello is ok', async () => {
const res = await app.request('/hello')
expect(res.status).toBe(200)
})
```
You can also pass a `Request` object:
```ts twoslash
import { Hono } from 'hono'
const app = new Hono()
declare const test: (name: string, fn: () => void) => void
declare const expect: (value: any) => any
// ---cut---
test('POST /message is ok', async () => {
const req = new Request('Hello!', {
method: 'POST',
})
const res = await app.request(req)
expect(res.status).toBe(201)
})
```
## mount()
The `mount()` allows you to mount applications built with other frameworks into your Hono application.
```ts
import { Router as IttyRouter } from 'itty-router'
import { Hono } from 'hono'
// Create itty-router application
const ittyRouter = IttyRouter()
// Handle `GET /itty-router/hello`
ittyRouter.get('/hello', () => new Response('Hello from itty-router'))
// Hono application
const app = new Hono()
// Mount!
app.mount('/itty-router', ittyRouter.handle)
```
## strict mode
Strict mode defaults to `true` and distinguishes the following routes.
- `/hello`
- `/hello/`
`app.get('/hello')` will not match `GET /hello/`.
By setting strict mode to `false`, both paths will be treated equally.
```ts twoslash
import { Hono } from 'hono'
// ---cut---
const app = new Hono({ strict: false })
```
## router option
The `router` option specifies which router to use. The default router is `SmartRouter`. If you want to use `RegExpRouter`, pass it to a new `Hono` instance:
```ts twoslash
import { Hono } from 'hono'
// ---cut---
import { RegExpRouter } from 'hono/router/reg-exp-router'
const app = new Hono({ router: new RegExpRouter() })
```
## Generics
You can pass Generics to specify the types of Cloudflare Workers Bindings and variables used in `c.set`/`c.get`.
```ts twoslash
import { Hono } from 'hono'
type User = any
declare const user: User
// ---cut---
type Bindings = {
TOKEN: string
}
type Variables = {
user: User
}
const app = new Hono<{
Bindings: Bindings
Variables: Variables
}>()
app.use('/auth/*', async (c, next) => {
const token = c.env.TOKEN // token is `string`
// ...
c.set('user', user) // user should be `User`
await next()
})
```
# Third-party Middleware
Third-party middleware refers to middleware not bundled within the Hono package.
Most of this middleware leverages external libraries.
### Authentication
- [Auth.js(Next Auth)](https://github.com/honojs/middleware/tree/main/packages/auth-js)
- [Casbin](https://github.com/honojs/middleware/tree/main/packages/casbin)
- [Clerk Auth](https://github.com/honojs/middleware/tree/main/packages/clerk-auth)
- [Cloudflare Access](https://github.com/honojs/middleware/tree/main/packages/cloudflare-access)
- [OAuth Providers](https://github.com/honojs/middleware/tree/main/packages/oauth-providers)
- [OIDC Auth](https://github.com/honojs/middleware/tree/main/packages/oidc-auth)
- [Firebase Auth](https://github.com/honojs/middleware/tree/main/packages/firebase-auth)
- [Verify RSA JWT (JWKS)](https://github.com/wataruoguchi/verify-rsa-jwt-cloudflare-worker)
- [Stytch Auth](https://github.com/honojs/middleware/tree/main/packages/stytch-auth)
### Validators
- [Ajv Validator](https://github.com/honojs/middleware/tree/main/packages/ajv-validator)
- [ArkType Validator](https://github.com/honojs/middleware/tree/main/packages/arktype-validator)
- [Class Validator](https://github.com/honojs/middleware/tree/main/packages/class-validator)
- [Conform Validator](https://github.com/honojs/middleware/tree/main/packages/conform-validator)
- [Effect Schema Validator](https://github.com/honojs/middleware/tree/main/packages/effect-validator)
- [Standard Schema Validator](https://github.com/honojs/middleware/tree/main/packages/standard-validator)
- [TypeBox Validator](https://github.com/honojs/middleware/tree/main/packages/typebox-validator)
- [Typia Validator](https://github.com/honojs/middleware/tree/main/packages/typia-validator)
- [unknownutil Validator](https://github.com/ryoppippi/hono-unknownutil-validator)
- [Valibot Validator](https://github.com/honojs/middleware/tree/main/packages/valibot-validator)
- [Zod Validator](https://github.com/honojs/middleware/tree/main/packages/zod-validator)
### OpenAPI
- [Zod OpenAPI](https://github.com/honojs/middleware/tree/main/packages/zod-openapi)
- [Scalar](https://github.com/scalar/scalar/tree/main/integrations/hono)
- [Swagger UI](https://github.com/honojs/middleware/tree/main/packages/swagger-ui)
- [Swagger Editor](https://github.com/honojs/middleware/tree/main/packages/swagger-editor)
- [Hono OpenAPI](https://github.com/rhinobase/hono-openapi)
- [hono-zod-openapi](https://github.com/paolostyle/hono-zod-openapi)
### Development
- [ESLint Config](https://github.com/honojs/middleware/tree/main/packages/eslint-config)
- [SSG Plugin Essential](https://github.com/honojs/middleware/tree/main/packages/ssg-plugins-essential)
### Monitoring / Tracing
- [Apitally (API monitoring & analytics)](https://docs.apitally.io/frameworks/hono)
- [Highlight.io](https://www.highlight.io/docs/getting-started/backend-sdk/js/hono)
- [LogTape (Logging)](https://logtape.org/manual/integrations#hono)
- [OpenTelemetry](https://github.com/honojs/middleware/tree/main/packages/otel)
- [Prometheus Metrics](https://github.com/honojs/middleware/tree/main/packages/prometheus)
- [Sentry](https://github.com/honojs/middleware/tree/main/packages/sentry)
- [Pino logger](https://github.com/maou-shonen/hono-pino)
### Server / Adapter
- [GraphQL Server](https://github.com/honojs/middleware/tree/main/packages/graphql-server)
- [Node WebSocket Helper](https://github.com/honojs/middleware/tree/main/packages/node-ws)
- [tRPC Server](https://github.com/honojs/middleware/tree/main/packages/trpc-server)
### Transpiler
- [Bun Transpiler](https://github.com/honojs/middleware/tree/main/packages/bun-transpiler)
- [esbuild Transpiler](https://github.com/honojs/middleware/tree/main/packages/esbuild-transpiler)
### UI / Renderer
- [Qwik City](https://github.com/honojs/middleware/tree/main/packages/qwik-city)
- [React Compatibility](https://github.com/honojs/middleware/tree/main/packages/react-compat)
- [React Renderer](https://github.com/honojs/middleware/tree/main/packages/react-renderer)
### Queue / Job Processing
- [GlideMQ (Message Queue REST API + SSE)](https://github.com/avifenesh/glidemq-hono)
### Internationalization
- [Intlayer i18n](https://intlayer.org/doc/environment/hono)
### Utilities
- [Bun Compress](https://github.com/honojs/middleware/tree/main/packages/bun-compress)
- [Cap Checkpoint](https://capjs.js.org/guide/middleware/hono.html)
- [Event Emitter](https://github.com/honojs/middleware/tree/main/packages/event-emitter)
- [Geo](https://github.com/ktkongtong/hono-geo-middleware/tree/main/packages/middleware)
- [Hono Rate Limiter](https://github.com/rhinobase/hono-rate-limiter)
- [Hono Problem Details (RFC 9457)](https://github.com/paveg/hono-problem-details)
- [Hono Simple DI](https://github.com/maou-shonen/hono-simple-DI)
- [Idempotency (Stripe-style idempotency keys)](https://github.com/paveg/hono-idempotency)
- [idempot-js](https://js.idempot.dev) - spec-compliant middleware, supporting multiple storage backends (redis, postgres, mysql, sqlite)
- [jsonv-ts (Validator, OpenAPI, MCP)](https://github.com/dswbx/jsonv-ts)
- [MCP](https://github.com/honojs/middleware/tree/main/packages/mcp)
- [RONIN (Database)](https://github.com/ronin-co/hono-client)
- [Session](https://github.com/honojs/middleware/tree/main/packages/session)
- [tsyringe](https://github.com/honojs/middleware/tree/main/packages/tsyringe)
- [User Agent based Blocker](https://github.com/honojs/middleware/tree/main/packages/ua-blocker)
# Language Middleware
The Language Detector middleware automatically determines a user's preferred language (locale) from various sources and makes it available via `c.get('language')`. Detection strategies include query parameters, cookies, headers, and URL path segments. Perfect for internationalization (i18n) and locale-specific content.
## Import
```ts
import { Hono } from 'hono'
import { languageDetector } from 'hono/language'
```
## Basic Usage
Detect language from query string, cookie, and header (default order), with fallback to English:
```ts
const app = new Hono()
app.use(
languageDetector({
supportedLanguages: ['en', 'ar', 'ja'], // Must include fallback
fallbackLanguage: 'en', // Required
})
)
app.get('/', (c) => {
const lang = c.get('language')
return c.text(`Hello! Your language is ${lang}`)
})
```
### Client Examples
```sh
# Via path
curl http://localhost:8787/ar/home
# Via query parameter
curl http://localhost:8787/?lang=ar
# Via cookie
curl -H 'Cookie: language=ja' http://localhost:8787/
# Via header
curl -H 'Accept-Language: ar,en;q=0.9' http://localhost:8787/
```
## Default Configuration
```ts
export const DEFAULT_OPTIONS: DetectorOptions = {
order: ['querystring', 'cookie', 'header'],
lookupQueryString: 'lang',
lookupCookie: 'language',
lookupFromHeaderKey: 'accept-language',
lookupFromPathIndex: 0,
caches: ['cookie'],
ignoreCase: true,
fallbackLanguage: 'en',
supportedLanguages: ['en'],
cookieOptions: {
sameSite: 'Strict',
secure: true,
maxAge: 365 * 24 * 60 * 60,
httpOnly: true,
},
debug: false,
}
```
## Key Behaviors
### Detection Workflow
1. **Order**: Checks sources in this sequence by default:
- Query parameter (?lang=ar)
- Cookie (language=ar)
- Accept-Language header
2. **Caching**: Stores detected language in a cookie (1 year by default)
3. **Fallback**: Uses `fallbackLanguage` if no valid detection (must be in `supportedLanguages`)
## Advanced Configuration
### Custom Detection Order
Prioritize URL path detection (e.g., /en/about):
```ts
app.use(
languageDetector({
order: ['path', 'cookie', 'querystring', 'header'],
lookupFromPathIndex: 0, // /en/profile → index 0 = 'en'
supportedLanguages: ['en', 'ar'],
fallbackLanguage: 'en',
})
)
```
### Progressive Locale Matching
When a detected locale code like `ja-JP` is not in `supportedLanguages`, the middleware progressively truncates subtags to find a match. For example, `zh-Hant-CN` will try `zh-Hant`, then `zh`. An exact match is always preferred.
```ts
app.use(
languageDetector({
supportedLanguages: ['en', 'ja', 'zh-Hant'],
fallbackLanguage: 'en',
})
)
// Accept-Language: ja-JP → matches 'ja'
// Accept-Language: zh-Hant-CN → matches 'zh-Hant'
```
### Language Code Transformation
Normalize complex codes (e.g., en-US → en):
```ts
app.use(
languageDetector({
convertDetectedLanguage: (lang) => lang.split('-')[0],
supportedLanguages: ['en', 'ja'],
fallbackLanguage: 'en',
})
)
```
### Cookie Configuration
```ts
app.use(
languageDetector({
lookupCookie: 'app_lang',
caches: ['cookie'],
cookieOptions: {
path: '/', // Cookie path
sameSite: 'Lax', // Cookie same-site policy
secure: true, // Only send over HTTPS
maxAge: 86400 * 365, // 1 year expiration
httpOnly: true, // Not accessible via JavaScript
domain: '.example.com', // Optional: specific domain
},
})
)
```
To disable cookie caching:
```ts
languageDetector({
caches: false,
})
```
### Debugging
Log detection steps:
```ts
languageDetector({
debug: true, // Shows: "Detected from querystring: ar"
})
```
## Options Reference
### Basic Options
| Option | Type | Default | Required | Description |
| :------------------- | :--------------- | :------------------------------------ | :------- | :--------------------- |
| `supportedLanguages` | `string[]` | `['en']` | Yes | Allowed language codes |
| `fallbackLanguage` | `string` | `'en'` | Yes | Default language |
| `order` | `DetectorType[]` | `['querystring', 'cookie', 'header']` | No | Detection sequence |
| `debug` | `boolean` | `false` | No | Enable logging |
### Detection Options
| Option | Type | Default | Description |
| :-------------------- | :------- | :------------------ | :------------------- |
| `lookupQueryString` | `string` | `'lang'` | Query parameter name |
| `lookupCookie` | `string` | `'language'` | Cookie name |
| `lookupFromHeaderKey` | `string` | `'accept-language'` | Header name |
| `lookupFromPathIndex` | `number` | `0` | Path segment index |
### Cookie Options
| Option | Type | Default | Description |
| :----------------------- | :---------------------------- | :----------- | :------------------- |
| `caches` | `CacheType[] \| false` | `['cookie']` | Cache settings |
| `cookieOptions.path` | `string` | `'/'` | Cookie path |
| `cookieOptions.sameSite` | `'Strict' \| 'Lax' \| 'None'` | `'Strict'` | SameSite policy |
| `cookieOptions.secure` | `boolean` | `true` | HTTPS only |
| `cookieOptions.maxAge` | `number` | `31536000` | Expiration (seconds) |
| `cookieOptions.httpOnly` | `boolean` | `true` | JS accessibility |
| `cookieOptions.domain` | `string` | `undefined` | Cookie domain |
### Advanced Options
| Option | Type | Default | Description |
| :------------------------ | :------------------------- | :---------- | :------------------------ |
| `ignoreCase` | `boolean` | `true` | Case-insensitive matching |
| `convertDetectedLanguage` | `(lang: string) => string` | `undefined` | Language code transformer |
## Validation & Error Handling
- `fallbackLanguage` must be in `supportedLanguages` (throws error during setup)
- `lookupFromPathIndex` must be ≥ 0
- Invalid configurations throw errors during middleware initialization
- Failed detections silently use `fallbackLanguage`
## Common Recipes
### Path-Based Routing
```ts
app.get('/:lang/home', (c) => {
const lang = c.get('language') // 'en', 'ar', etc.
return c.json({ message: getLocalizedContent(lang) })
})
```
### Multiple Supported Languages
```ts
languageDetector({
supportedLanguages: ['en', 'en-GB', 'ar', 'ar-EG'],
convertDetectedLanguage: (lang) => lang.replace('_', '-'), // Normalize
})
```
# Body Limit Middleware
The Body Limit Middleware can limit the file size of the request body.
This middleware first uses the value of the `Content-Length` header in the request, if present.
If it is not set, it reads the body in the stream and executes an error handler if it is larger than the specified file size.
## Import
```ts
import { Hono } from 'hono'
import { bodyLimit } from 'hono/body-limit'
```
## Usage
```ts
const app = new Hono()
app.post(
'/upload',
bodyLimit({
maxSize: 50 * 1024, // 50kb
onError: (c) => {
return c.text('overflow :(', 413)
},
}),
async (c) => {
const body = await c.req.parseBody()
if (body['file'] instanceof File) {
console.log(`Got file sized: ${body['file'].size}`)
}
return c.text('pass :)')
}
)
```
## Options
### maxSize: `number`
The maximum file size of the file you want to limit. The default is `100 * 1024` - `100kb`.
### onError: `OnError`
The error handler to be invoked if the specified file size is exceeded.
## Usage with Bun for large requests
If the Body Limit Middleware is used explicitly to allow a request body larger than the default, it might be necessary to make changes to your `Bun.serve` configuration accordingly. [At the time of writing](https://github.com/oven-sh/bun/blob/f2cfa15e4ef9d730fc6842ad8b79fb7ab4c71cb9/packages/bun-types/bun.d.ts#L2191), `Bun.serve`'s default request body limit is 128MiB. If you set Hono's Body Limit Middleware to a value bigger than that, your requests will still fail and, additionally, the `onError` handler specified in the middleware will not be called. This is because `Bun.serve()` will set the status code to `413` and terminate the connection before passing the request to Hono.
If you want to accept requests larger than 128MiB with Hono and Bun, you need to set the limit for Bun as well:
```ts
export default {
port: process.env['PORT'] || 3000,
fetch: app.fetch,
maxRequestBodySize: 1024 * 1024 * 200, // your value here
}
```
or, depending on your setup:
```ts
Bun.serve({
fetch(req, server) {
return app.fetch(req, { ip: server.requestIP(req) })
},
maxRequestBodySize: 1024 * 1024 * 200, // your value here
})
```
# Cache Middleware
The Cache middleware uses the Web Standards' [Cache API](https://developer.mozilla.org/en-US/docs/Web/API/Cache).
The Cache middleware currently supports Cloudflare Workers projects using custom domains and Deno projects using [Deno 1.26+](https://github.com/denoland/deno/releases/tag/v1.26.0). Also available with Deno Deploy.
Cloudflare Workers respects the `Cache-Control` header and return cached responses. For details, refer to [Cache on Cloudflare Docs](https://developers.cloudflare.com/workers/runtime-apis/cache/). Deno does not respect headers, so if you need to update the cache, you will need to implement your own mechanism.
See [Usage](#usage) below for instructions on each platform.
## Import
```ts
import { Hono } from 'hono'
import { cache } from 'hono/cache'
```
## Usage
::: code-group
```ts [Cloudflare Workers]
app.get(
'*',
cache({
cacheName: 'my-app',
cacheControl: 'max-age=3600',
})
)
```
```ts [Deno]
// Must use `wait: true` for the Deno runtime
app.get(
'*',
cache({
cacheName: 'my-app',
cacheControl: 'max-age=3600',
wait: true,
})
)
```
:::
## Options
### cacheName: `string` | `(c: Context) => string` | `Promise`
The name of the cache. Can be used to store multiple caches with different identifiers.
### wait: `boolean`
A boolean indicating if Hono should wait for the Promise of the `cache.put` function to resolve before continuing with the request. _Required to be true for the Deno environment_. The default is `false`.
### cacheControl: `string`
A string of directives for the `Cache-Control` header. See the [MDN docs](https://developer.mozilla.org/en-US/docs/Web/HTTP/Headers/Cache-Control) for more information. When this option is not provided, no `Cache-Control` header is added to requests.
### vary: `string` | `string[]`
Sets the `Vary` header in the response. If the original response header already contains a `Vary` header, the values are merged, removing any duplicates. Setting this to `*` will result in an error. For more details on the Vary header and its implications for caching strategies, refer to the [MDN docs](https://developer.mozilla.org/en-US/docs/Web/HTTP/Headers/Vary).
### keyGenerator: `(c: Context) => string | Promise`
Generates keys for every request in the `cacheName` store. This can be used to cache data based on request parameters or context parameters. The default is `c.req.url`.
### cacheableStatusCodes: `number[]`
An array of status codes that should be cached. The default is `[200]`. Use this option to cache responses with specific status codes.
```ts
app.get(
'*',
cache({
cacheName: 'my-app',
cacheControl: 'max-age=3600',
cacheableStatusCodes: [200, 404, 412],
})
)
```
# CORS Middleware
There are many use cases of Cloudflare Workers as Web APIs and calling them from external front-end application.
For them we have to implement CORS, let's do this with middleware as well.
## Import
```ts
import { Hono } from 'hono'
import { cors } from 'hono/cors'
```
## Usage
```ts
const app = new Hono()
// CORS should be called before the route
app.use('/api/*', cors())
app.use(
'/api2/*',
cors({
origin: 'http://example.com',
allowHeaders: ['X-Custom-Header', 'Upgrade-Insecure-Requests'],
allowMethods: ['POST', 'GET', 'OPTIONS'],
exposeHeaders: ['Content-Length', 'X-Kuma-Revision'],
maxAge: 600,
credentials: true,
})
)
app.all('/api/abc', (c) => {
return c.json({ success: true })
})
app.all('/api2/abc', (c) => {
return c.json({ success: true })
})
```
Multiple origins:
```ts
app.use(
'/api3/*',
cors({
origin: ['https://example.com', 'https://example.org'],
})
)
// Or you can use "function"
app.use(
'/api4/*',
cors({
// `c` is a `Context` object
origin: (origin, c) => {
return origin.endsWith('.example.com')
? origin
: 'http://example.com'
},
})
)
```
Dynamic allowed methods based on origin:
```ts
app.use(
'/api5/*',
cors({
origin: (origin) =>
origin === 'https://example.com' ? origin : '*',
// `c` is a `Context` object
allowMethods: (origin, c) =>
origin === 'https://example.com'
? ['GET', 'HEAD', 'POST', 'PATCH', 'DELETE']
: ['GET', 'HEAD'],
})
)
```
## Options
### origin: `string` | `string[]` | `(origin:string, c:Context) => string`
The value of "_Access-Control-Allow-Origin_" CORS header. You can also pass the callback function like `origin: (origin) => (origin.endsWith('.example.com') ? origin : 'http://example.com')`. The default is `*`.
### allowMethods: `string[]` | `(origin:string, c:Context) => string[]`
The value of "_Access-Control-Allow-Methods_" CORS header. You can also pass a callback function to dynamically determine allowed methods based on the origin. The default is `['GET', 'HEAD', 'PUT', 'POST', 'DELETE', 'PATCH']`.
### allowHeaders: `string[]`
The value of "_Access-Control-Allow-Headers_" CORS header. The default is `[]`.
### maxAge: `number`
The value of "_Access-Control-Max-Age_" CORS header.
### credentials: `boolean`
The value of "_Access-Control-Allow-Credentials_" CORS header.
### exposeHeaders: `string[]`
The value of "_Access-Control-Expose-Headers_" CORS header. The default is `[]`.
## Environment-dependent CORS configuration
If you want to adjust CORS configuration according to the execution environment, such as development or production, injecting values from environment variables is convenient as it eliminates the need for the application to be aware of its own execution environment. See the example below for clarification.
```ts
app.use('*', async (c, next) => {
const corsMiddlewareHandler = cors({
origin: c.env.CORS_ORIGIN,
})
return corsMiddlewareHandler(c, next)
})
```
## Using with Vite
When using Hono with Vite, you should disable Vite's built-in CORS feature by setting `server.cors` to `false` in your `vite.config.ts`. This prevents conflicts with Hono's CORS middleware.
```ts
// vite.config.ts
import { cloudflare } from '@cloudflare/vite-plugin'
import { defineConfig } from 'vite'
export default defineConfig({
server: {
cors: false, // disable Vite's built-in CORS setting
},
plugins: [cloudflare()],
})
```
# Timeout Middleware
The Timeout Middleware enables you to easily manage request timeouts in your application. It allows you to set a maximum duration for requests and optionally define custom error responses if the specified timeout is exceeded.
## Import
```ts
import { Hono } from 'hono'
import { timeout } from 'hono/timeout'
```
## Usage
Here's how to use the Timeout Middleware with both default and custom settings:
Default Settings:
```ts
const app = new Hono()
// Applying a 5-second timeout
app.use('/api', timeout(5000))
// Handling a route
app.get('/api/data', async (c) => {
// Your route handler logic
return c.json({ data: 'Your data here' })
})
```
Custom settings:
```ts
import { HTTPException } from 'hono/http-exception'
// Custom exception factory function
const customTimeoutException = (context) =>
new HTTPException(408, {
message: `Request timeout after waiting ${context.req.headers.get(
'Duration'
)} seconds. Please try again later.`,
})
// for Static Exception Message
// const customTimeoutException = new HTTPException(408, {
// message: 'Operation timed out. Please try again later.'
// });
// Applying a 1-minute timeout with a custom exception
app.use('/api/long-process', timeout(60000, customTimeoutException))
app.get('/api/long-process', async (c) => {
// Simulate a long process
await new Promise((resolve) => setTimeout(resolve, 61000))
return c.json({ data: 'This usually takes longer' })
})
```
## Notes
- The duration for the timeout can be specified in milliseconds. The middleware will automatically reject the promise and potentially throw an error if the specified duration is exceeded.
- The timeout middleware cannot be used with stream Thus, use `stream.close` and `setTimeout` together.
```ts
app.get('/sse', async (c) => {
let id = 0
let running = true
let timer: number | undefined
return streamSSE(c, async (stream) => {
timer = setTimeout(() => {
console.log('Stream timeout reached, closing stream')
stream.close()
}, 3000) as unknown as number
stream.onAbort(async () => {
console.log('Client closed connection')
running = false
clearTimeout(timer)
})
while (running) {
const message = `It is ${new Date().toISOString()}`
await stream.writeSSE({
data: message,
event: 'time-update',
id: String(id++),
})
await stream.sleep(1000)
}
})
})
```
## Middleware Conflicts
Be cautious about the order of middleware, especially when using error-handling or other timing-related middleware, as it might affect the behavior of this timeout middleware.
# Compress Middleware
This middleware compresses the response body, according to `Accept-Encoding` request header.
::: info
**Note**: On Cloudflare Workers and Deno Deploy, the response body will be compressed automatically, so there is no need to use this middleware.
:::
## Import
```ts
import { Hono } from 'hono'
import { compress } from 'hono/compress'
```
## Usage
```ts
const app = new Hono()
app.use(compress())
```
## Options
### encoding: `'gzip'` | `'deflate'`
The compression scheme to allow for response compression. Either `gzip` or `deflate`. If not defined, both are allowed and will be used based on the `Accept-Encoding` header. `gzip` is prioritized if this option is not provided and the client provides both in the `Accept-Encoding` header.
### threshold: `number`
The minimum size in bytes to compress. Defaults to 1024 bytes.
# Request ID Middleware
Request ID Middleware generates a unique ID for each request, which you can use in your handlers.
::: info
**Node.js**: This middleware uses `crypto.randomUUID()` to generate IDs. The global `crypto` was introduced in Node.js version 20 or later. Therefore, errors may occur in versions earlier than that. In that case, please specify `generator`. However, if you are using [the Node.js adapter](https://github.com/honojs/node-server), it automatically sets `crypto` globally, so this is not necessary.
:::
## Import
```ts
import { Hono } from 'hono'
import { requestId } from 'hono/request-id'
```
## Usage
You can access the Request ID through the `requestId` variable in the handlers and middleware to which the Request ID Middleware is applied.
```ts
const app = new Hono()
app.use('*', requestId())
app.get('/', (c) => {
return c.text(`Your request id is ${c.get('requestId')}`)
})
```
If you want to explicitly specify the type, import `RequestIdVariables` and pass it in the generics of `new Hono()`.
```ts
import type { RequestIdVariables } from 'hono/request-id'
const app = new Hono<{
Variables: RequestIdVariables
}>()
```
### Set Request ID
You set a custom request ID in the header (default: `X-Request-Id`), the middleware will use that value instead of generating a new one:
```ts
const app = new Hono()
app.use('*', requestId())
app.get('/', (c) => {
return c.text(`${c.get('requestId')}`)
})
const res = await app.request('/', {
headers: {
'X-Request-Id': 'your-custom-id',
},
})
console.log(await res.text()) // your-custom-id
```
If you want to disable this feature, set [`headerName` option](#headername-string) to an empty string.
## Options
### limitLength: `number`
The maximum length of the request ID. The default is `255`.
### headerName: `string`
The header name used for the request ID. The default is `X-Request-Id`.
### generator: `(c: Context) => string`
The request ID generation function. By default, it uses `crypto.randomUUID()`.
## Platform specific Request IDs
Some platform (such as AWS Lambda) already generate their own Request IDs per request.
Without any additional configuration, this middleware is unaware of these specific Request IDs
and generates a new Request ID. This can lead to confusion when looking at your application logs.
To unify these IDs, use the `generator` function to capture the platform specific Request ID and to use it in this middleware.
### Platform specific links
- AWS Lambda
- [AWS documentation: Context object](https://docs.aws.amazon.com/lambda/latest/dg/nodejs-context.html)
- [Hono: Access AWS Lambda Object](/docs/getting-started/aws-lambda#access-aws-lambda-object)
- Cloudflare
- [Cloudflare Ray ID
](https://developers.cloudflare.com/fundamentals/reference/cloudflare-ray-id/)
- Deno
- [Request ID on the Deno Blog](https://deno.com/blog/zero-config-debugging-deno-opentelemetry#:~:text=s%20automatically%20have-,unique%20request%20IDs,-associated%20with%20them)
- Fastly
- [Fastly documentation: req.xid](https://www.fastly.com/documentation/reference/vcl/variables/client-request/req-xid/)
# Combine Middleware
Combine Middleware combines multiple middleware functions into a single middleware. It provides three functions:
- `some` - Runs only one of the given middleware.
- `every` - Runs all given middleware.
- `except` - Runs all given middleware only if a condition is not met.
## Import
```ts
import { Hono } from 'hono'
import { some, every, except } from 'hono/combine'
```
## Usage
Here's an example of complex access control rules using Combine Middleware.
```ts
import { Hono } from 'hono'
import { bearerAuth } from 'hono/bearer-auth'
import { getConnInfo } from 'hono/cloudflare-workers'
import { every, some } from 'hono/combine'
import { ipRestriction } from 'hono/ip-restriction'
import { rateLimit } from '@/my-rate-limit'
const app = new Hono()
app.use(
'*',
some(
every(
ipRestriction(getConnInfo, { allowList: ['192.168.0.2'] }),
bearerAuth({ token })
),
// If both conditions are met, rateLimit will not execute.
rateLimit()
)
)
app.get('/', (c) => c.text('Hello Hono!'))
```
### some
Runs the first middleware that returns true. Middleware is applied in order, and if any middleware exits successfully, subsequent middleware will not run.
```ts
import { some } from 'hono/combine'
import { bearerAuth } from 'hono/bearer-auth'
import { myRateLimit } from '@/rate-limit'
// If client has a valid token, skip rate limiting.
// Otherwise, apply rate limiting.
app.use(
'/api/*',
some(bearerAuth({ token }), myRateLimit({ limit: 100 }))
)
```
### every
Runs all middleware and stops if any of them fail. Middleware is applied in order, and if any middleware throws an error, subsequent middleware will not run.
```ts
import { some, every } from 'hono/combine'
import { bearerAuth } from 'hono/bearer-auth'
import { myCheckLocalNetwork } from '@/check-local-network'
import { myRateLimit } from '@/rate-limit'
// If client is in local network, skip authentication and rate limiting.
// Otherwise, apply authentication and rate limiting.
app.use(
'/api/*',
some(
myCheckLocalNetwork(),
every(bearerAuth({ token }), myRateLimit({ limit: 100 }))
)
)
```
### except
Runs all middleware except when the condition is met. You can pass a string or function as the condition. If multiple targets need to be matched, pass them as an array.
```ts
import { except } from 'hono/combine'
import { bearerAuth } from 'hono/bearer-auth'
// If client is accessing public API, skip authentication.
// Otherwise, require a valid token.
app.use('/api/*', except('/api/public/*', bearerAuth({ token })))
```
# JSX Renderer Middleware
JSX Renderer Middleware allows you to set up the layout when rendering JSX with the `c.render()` function, without the need for using `c.setRenderer()`. Additionally, it enables access to instances of Context within components through the use of `useRequestContext()`.
## Import
```ts
import { Hono } from 'hono'
import { jsxRenderer, useRequestContext } from 'hono/jsx-renderer'
```
## Usage
```jsx
const app = new Hono()
app.get(
'/page/*',
jsxRenderer(({ children }) => {
return (
Menu
)
})
```
## Options
### docType: `boolean` | `string`
If you do not want to add a DOCTYPE at the beginning of the HTML, set the `docType` option to `false`.
```tsx
app.use(
'*',
jsxRenderer(
({ children }) => {
return (
{children}
)
},
{ docType: false }
)
)
```
And you can specify the DOCTYPE.
```tsx
app.use(
'*',
jsxRenderer(
({ children }) => {
return (
{children}
)
},
{
docType:
'',
}
)
)
```
### stream: `boolean` | `Record`
If you set it to `true` or provide a Record value, it will be rendered as a streaming response.
```tsx
const AsyncComponent = async () => {
await new Promise((r) => setTimeout(r, 1000)) // sleep 1s
return
{children}
)
},
{ stream: true }
)
)
app.get('/', (c) => {
return c.render(
loading...}>
)
})
```
If `true` is set, the following headers are added:
```ts
{
'Transfer-Encoding': 'chunked',
'Content-Type': 'text/html; charset=UTF-8',
'Content-Encoding': 'Identity'
}
```
You can customize the header values by specifying the Record values.
### Function-based Options
You can pass a function that receives a `Context` object instead of a static options object. This allows you to dynamically set options based on the request context, such as environment variables or request parameters.
```tsx
app.use(
'*',
jsxRenderer(
({ children }) => {
return (
{children}
)
},
(c) => ({
stream: c.req.header('X-Enable-Streaming') === 'true',
})
)
)
```
As a concrete example, you can use this to disable streaming when generating static sites (SSG) with ``, by using the [`isSSGContext`](/docs/helpers/ssg#isssgcontext) helper:
```tsx
app.use(
'*',
jsxRenderer(
({ children }) => {
return (
)
},
(c) => ({
stream: !isSSGContext(c),
})
)
)
```
## Nested Layouts
The `Layout` component enables nesting the layouts.
```tsx
app.use(
jsxRenderer(({ children }) => {
return (
{children}
)
})
)
const blog = new Hono()
blog.use(
jsxRenderer(({ children, Layout }) => {
return (
{children}
)
})
)
app.route('/blog', blog)
```
## `useRequestContext()`
`useRequestContext()` returns an instance of Context.
```tsx
import { useRequestContext, jsxRenderer } from 'hono/jsx-renderer'
const app = new Hono()
app.use(jsxRenderer())
const RequestUrlBadge: FC = () => {
const c = useRequestContext()
return {c.req.url}
}
app.get('/page/info', (c) => {
return c.render(
You are accessing:
)
})
```
::: warning
You can't use `useRequestContext()` with the Deno's `precompile` JSX option. Use the `react-jsx`:
```json
"compilerOptions": {
"jsx": "precompile", // [!code --]
"jsx": "react-jsx", // [!code ++]
"jsxImportSource": "hono/jsx"
}
}
```
:::
## Extending `ContextRenderer`
By defining `ContextRenderer` as shown below, you can pass additional content to the renderer. This is handy, for instance, when you want to change the contents of the head tag depending on the page.
```tsx
declare module 'hono' {
interface ContextRenderer {
(
content: string | Promise,
props: { title: string }
): Response
}
}
const app = new Hono()
app.get(
'/page/*',
jsxRenderer(({ children, title }) => {
return (
{title}Menu
,
{
title: 'My favorites',
}
)
})
```
# CSRF Protection
This middleware protects against CSRF attacks by checking both the `Origin` header and the `Sec-Fetch-Site` header. The request is allowed if either validation passes.
The middleware only validates requests that:
- Use unsafe HTTP methods (not GET, HEAD, or OPTIONS)
- Have content types that can be sent by HTML forms (`application/x-www-form-urlencoded`, `multipart/form-data`, or `text/plain`)
Old browsers that do not send `Origin` headers, or environments that use reverse proxies to remove these headers, may not work well. In such environments, use other CSRF token methods.
## Import
```ts
import { Hono } from 'hono'
import { csrf } from 'hono/csrf'
```
## Usage
```ts
const app = new Hono()
// Default: both origin and sec-fetch-site validation
app.use(csrf())
// Allow specific origins
app.use(csrf({ origin: 'https://myapp.example.com' }))
// Allow multiple origins
app.use(
csrf({
origin: [
'https://myapp.example.com',
'https://development.myapp.example.com',
],
})
)
// Allow specific sec-fetch-site values
app.use(csrf({ secFetchSite: 'same-origin' }))
app.use(csrf({ secFetchSite: ['same-origin', 'none'] }))
// Dynamic origin validation
// It is strongly recommended that the protocol be verified to ensure a match to `$`.
// You should *never* do a forward match.
app.use(
'*',
csrf({
origin: (origin) =>
/https:\/\/(\w+\.)?myapp\.example\.com$/.test(origin),
})
)
// Dynamic sec-fetch-site validation
app.use(
csrf({
secFetchSite: (secFetchSite, c) => {
// Always allow same-origin
if (secFetchSite === 'same-origin') return true
// Allow cross-site for webhook endpoints
if (
secFetchSite === 'cross-site' &&
c.req.path.startsWith('/webhook/')
) {
return true
}
return false
},
})
)
```
## Options
### origin: `string` | `string[]` | `Function`
Specify allowed origins for CSRF protection.
- **`string`**: Single allowed origin (e.g., `'https://example.com'`)
- **`string[]`**: Array of allowed origins
- **`Function`**: Custom handler `(origin: string, context: Context) => boolean` for flexible origin validation and bypass logic
**Default**: Only same origin as the request URL
The function handler receives the request's `Origin` header value and the request context, allowing for dynamic validation based on request properties like path, headers, or other context data.
### secFetchSite: `string` | `string[]` | `Function`
Specify allowed Sec-Fetch-Site header values for CSRF protection using [Fetch Metadata](https://web.dev/articles/fetch-metadata).
- **`string`**: Single allowed value (e.g., `'same-origin'`)
- **`string[]`**: Array of allowed values (e.g., `['same-origin', 'none']`)
- **`Function`**: Custom handler `(secFetchSite: string, context: Context) => boolean` for flexible validation
**Default**: Only allows `'same-origin'`
Standard Sec-Fetch-Site values:
- `same-origin`: Request from same origin
- `same-site`: Request from same site (different subdomain)
- `cross-site`: Request from different site
- `none`: Request not from a web page (e.g., browser address bar, bookmark)
The function handler receives the request's `Sec-Fetch-Site` header value and the request context, enabling dynamic validation based on request properties.
# Logger Middleware
It's a simple logger.
## Import
```ts
import { Hono } from 'hono'
import { logger } from 'hono/logger'
```
## Usage
```ts
const app = new Hono()
app.use(logger())
app.get('/', (c) => c.text('Hello Hono!'))
```
## Logging Details
The Logger Middleware logs the following details for each request:
- **Incoming Request**: Logs the HTTP method, request path, and incoming request.
- **Outgoing Response**: Logs the HTTP method, request path, response status code, and request/response times.
- **Status Code Coloring**: Response status codes are color-coded for better visibility and quick identification of status categories. Different status code categories are represented by different colors.
- **Elapsed Time**: The time taken for the request/response cycle is logged in a human-readable format, either in milliseconds (ms) or seconds (s).
By using the Logger Middleware, you can easily monitor the flow of requests and responses in your Hono application and quickly identify any issues or performance bottlenecks.
You can also extend the middleware further by providing your own `PrintFunc` function for tailored logging behavior.
::: tip
To disable _status code coloring_, you can set a `NO_COLOR` environment variable. This is a common way to disable ANSI color escape codes in logging libraries, and is described at . Note that Cloudflare Workers do not have a `process.env` object, so will default to plaintext log output.
:::
## PrintFunc
The Logger Middleware accepts an optional `PrintFunc` function as a parameter. This function allows you to customize the logger and add additional logs.
## Options
### fn: `PrintFunc(str: string, ...rest: string[])`
- `str`: Passed by the logger.
- `...rest`: Additional string props to be printed to console.
### Example
Setting up a custom `PrintFunc` function to the Logger Middleware:
```ts
export const customLogger = (message: string, ...rest: string[]) => {
console.log(message, ...rest)
}
app.use(logger(customLogger))
```
Setting up the custom logger in a route:
```ts
app.post('/blog', (c) => {
// Routing logic
customLogger('Blog saved:', `Path: ${blog.url},`, `ID: ${blog.id}`)
// Output
// <-- POST /blog
// Blog saved: Path: /blog/example, ID: 1
// --> POST /blog 201 93ms
// Return Context
})
```
# Server-Timing Middleware
The [Server-Timing](https://developer.mozilla.org/en-US/docs/Web/HTTP/Headers/Server-Timing) Middleware provides
performance metrics in the response headers.
::: info
Note: On Cloudflare Workers, the timer metrics may not be accurate,
since [timers only show the time of last I/O](https://developers.cloudflare.com/workers/learning/security-model/#step-1-disallow-timers-and-multi-threading).
:::
## Import
```ts [npm]
import { Hono } from 'hono'
import {
timing,
setMetric,
startTime,
endTime,
wrapTime,
} from 'hono/timing'
import type { TimingVariables } from 'hono/timing'
```
## Usage
```js
// Specify the variable types to infer the `c.get('metric')`:
type Variables = TimingVariables
const app = new Hono<{ Variables: Variables }>()
// add the middleware to your router
app.use(timing());
app.get('/', async (c) => {
// add custom metrics
setMetric(c, 'region', 'europe-west3')
// add custom metrics with timing, must be in milliseconds
setMetric(c, 'custom', 23.8, 'My custom Metric')
// start a new timer
startTime(c, 'db');
const data = await db.findMany(...);
// end the timer
endTime(c, 'db');
// ...or you can also just wrap a Promise using this function:
const data = await wrapTime(c, 'db', db.findMany(...));
return c.json({ response: data });
});
```
### Conditionally enabled
```ts
const app = new Hono()
app.use(
'*',
timing({
// c: Context of the request
enabled: (c) => c.req.method === 'POST',
})
)
```
## Result
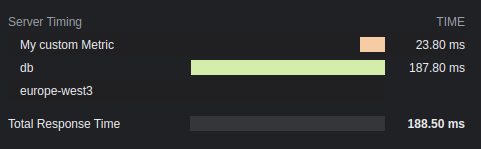
## Options
### total: `boolean`
Show the total response time. The default is `true`.
### enabled: `boolean` | `(c: Context) => boolean`
Whether timings should be added to the headers or not. The default is `true`.
### totalDescription: `boolean`
Description for the total response time. The default is `Total Response Time`.
### autoEnd: `boolean`
If `startTime()` should end automatically at the end of the request.
If disabled, not manually ended timers will not be shown.
### crossOrigin: `boolean` | `string` | `(c: Context) => boolean | string`
The origin this timings header should be readable.
- If false, only from current origin.
- If true, from all origin.
- If string, from this domain(s). Multiple domains must be separated with a comma.
The default is `false`. See more [docs](https://developer.mozilla.org/en-US/docs/Web/HTTP/Headers/Timing-Allow-Origin).
# JWT Auth Middleware
The JWT Auth Middleware provides authentication by verifying the token with JWT.
The middleware will check for an `Authorization` header if the `cookie` option is not set. You can customize the header name using the `headerName` option.
:::info
The Authorization header sent from the client must have a specified scheme.
Example: `Bearer my.token.value` or `Basic my.token.value`
:::
## Import
```ts
import { Hono } from 'hono'
import { jwt } from 'hono/jwt'
import type { JwtVariables } from 'hono/jwt'
```
## Usage
```ts
// Specify the variable types to infer the `c.get('jwtPayload')`:
type Variables = JwtVariables
const app = new Hono<{ Variables: Variables }>()
app.use(
'/auth/*',
jwt({
secret: 'it-is-very-secret',
alg: 'HS256',
})
)
app.get('/auth/page', (c) => {
return c.text('You are authorized')
})
```
Get payload:
```ts
const app = new Hono()
app.use(
'/auth/*',
jwt({
secret: 'it-is-very-secret',
alg: 'HS256',
issuer: 'my-trusted-issuer',
})
)
app.get('/auth/page', (c) => {
const payload = c.get('jwtPayload')
return c.json(payload) // eg: { "sub": "1234567890", "name": "John Doe", "iat": 1516239022, "iss": "my-trusted-issuer" }
})
```
::: tip
`jwt()` is just a middleware function. If you want to use an environment variable (eg: `c.env.JWT_SECRET`), you can use it as follows:
```js
app.use('/auth/*', (c, next) => {
const jwtMiddleware = jwt({
secret: c.env.JWT_SECRET,
alg: 'HS256',
})
return jwtMiddleware(c, next)
})
```
:::
## Options
### secret: `string`
A value of your secret key.
### alg: `string`
An algorithm type that is used for verifying.
Available types are `HS256` | `HS384` | `HS512` | `RS256` | `RS384` | `RS512` | `PS256` | `PS384` | `PS512` | `ES256` | `ES384` | `ES512` | `EdDSA`.
### cookie: `string`
If this value is set, then the value is retrieved from the cookie header using that value as a key, which is then validated as a token.
### headerName: `string`
The name of the header to look for the JWT token. The default is `Authorization`.
```ts
app.use(
'/auth/*',
jwt({
secret: 'it-is-very-secret',
alg: 'HS256',
headerName: 'x-custom-auth-header',
})
)
```
### verifyOptions: `VerifyOptions`
Options controlling verification of the token.
#### verifyOptions.iss: `string | RexExp`
The expected issuer used for token verification. The `iss` claim will **not** be checked if this isn't set.
#### verifyOptions.nbf: `boolean`
The `nbf` (not before) claim will be verified if present and this is set to `true`. The default is `true`.
#### verifyOptions.iat: `boolean`
The `iat` (issued at) claim will be verified if present and this is set to `true`. The default is `true`.
#### verifyOptions.exp: `boolean`
The `exp` (expiration time) claim will be verified if present and this is set to `true`. The default is `true`.
# Pretty JSON Middleware
Pretty JSON middleware enables "_JSON pretty print_" for JSON response body.
Adding `?pretty` to url query param, the JSON strings are prettified.
```js
// GET /
{"project":{"name":"Hono","repository":"https://github.com/honojs/hono"}}
```
will be:
```js
// GET /?pretty
{
"project": {
"name": "Hono",
"repository": "https://github.com/honojs/hono"
}
}
```
## Import
```ts
import { Hono } from 'hono'
import { prettyJSON } from 'hono/pretty-json'
```
## Usage
```ts
const app = new Hono()
app.use(prettyJSON()) // With options: prettyJSON({ space: 4 })
app.get('/', (c) => {
return c.json({ message: 'Hono!' })
})
```
## Options
### space: `number`
Number of spaces for indentation. The default is `2`.
### query: `string`
The name of the query string for applying. The default is `pretty`.
### force: `boolean`
When set to `true`, JSON responses are always prettified regardless of the query parameter. The default is `false`.
# Basic Auth Middleware
This middleware can apply Basic authentication to a specified path.
Implementing Basic authentication with Cloudflare Workers or other platforms is more complicated than it seems, but with this middleware, it's a breeze.
For more information about how the Basic auth scheme works under the hood, see the [MDN docs](https://developer.mozilla.org/en-US/docs/Web/HTTP/Authentication#basic_authentication_scheme).
## Import
```ts
import { Hono } from 'hono'
import { basicAuth } from 'hono/basic-auth'
```
## Usage
```ts
const app = new Hono()
app.use(
'/auth/*',
basicAuth({
username: 'hono',
password: 'acoolproject',
})
)
app.get('/auth/page', (c) => {
return c.text('You are authorized')
})
```
To restrict to a specific route + method:
```ts
const app = new Hono()
app.get('/auth/page', (c) => {
return c.text('Viewing page')
})
app.delete(
'/auth/page',
basicAuth({ username: 'hono', password: 'acoolproject' }),
(c) => {
return c.text('Page deleted')
}
)
```
If you want to verify the user by yourself, specify the `verifyUser` option; returning `true` means it is accepted.
```ts
const app = new Hono()
app.use(
basicAuth({
verifyUser: (username, password, c) => {
return (
username === 'dynamic-user' && password === 'hono-password'
)
},
})
)
```
## Options
### username: `string`
The username of the user who is authenticating.
### password: `string`
The password value for the provided username to authenticate against.
### realm: `string`
The domain name of the realm, as part of the returned WWW-Authenticate challenge header. The default is `"Secure Area"`.
See more: https://developer.mozilla.org/en-US/docs/Web/HTTP/Headers/WWW-Authenticate#directives
### hashFunction: `Function`
A function to handle hashing for safe comparison of passwords.
### verifyUser: `(username: string, password: string, c: Context) => boolean | Promise`
The function to verify the user.
### invalidUserMessage: `string | object | MessageFunction`
`MessageFunction` is `(c: Context) => string | object | Promise`. The custom message if the user is invalid.
### onAuthSuccess: `(c: Context, username: string) => void | Promise`
A callback function invoked after successful authentication. This allows you to set context variables or perform side effects without re-parsing the Authorization header.
```ts
app.use(
'/auth/*',
basicAuth({
username: 'hono',
password: 'acoolproject',
onAuthSuccess: (c, username) => {
c.set('username', username)
},
})
)
app.get('/auth/page', (c) => {
const username = c.get('username')
return c.text(`Hello, ${username}!`)
})
```
## More Options
### ...users: `{ username: string, password: string }[]`
## Recipes
### Defining Multiple Users
This middleware also allows you to pass arbitrary parameters containing objects defining more `username` and `password` pairs.
```ts
app.use(
'/auth/*',
basicAuth(
{
username: 'hono',
password: 'acoolproject',
// Define other params in the first object
realm: 'www.example.com',
},
{
username: 'hono-admin',
password: 'super-secure',
// Cannot redefine other params here
},
{
username: 'hono-user-1',
password: 'a-secret',
// Or here
}
)
)
```
Or less hardcoded:
```ts
import { users } from '../config/users'
app.use(
'/auth/*',
basicAuth(
{
realm: 'www.example.com',
...users[0],
},
...users.slice(1)
)
)
```
# Bearer Auth Middleware
The Bearer Auth Middleware provides authentication by verifying an API token in the Request header.
The HTTP clients accessing the endpoint will add the `Authorization` header with `Bearer {token}` as the header value.
Using `curl` from the terminal, it would look like this:
```sh
curl -H 'Authorization: Bearer honoiscool' http://localhost:8787/auth/page
```
## Import
```ts
import { Hono } from 'hono'
import { bearerAuth } from 'hono/bearer-auth'
```
## Usage
> [!NOTE]
> Your `token` must match the regex `/[A-Za-z0-9._~+/-]+=*/`, otherwise a 400 error will be returned. Notably, this regex accommodates both URL-safe Base64- and standard Base64-encoded JWTs. This middleware does not require the bearer token to be a JWT, just that it matches the above regex.
```ts
const app = new Hono()
const token = 'honoiscool'
app.use('/api/*', bearerAuth({ token }))
app.get('/api/page', (c) => {
return c.json({ message: 'You are authorized' })
})
```
To restrict to a specific route + method:
```ts
const app = new Hono()
const token = 'honoiscool'
app.get('/api/page', (c) => {
return c.json({ message: 'Read posts' })
})
app.post('/api/page', bearerAuth({ token }), (c) => {
return c.json({ message: 'Created post!' }, 201)
})
```
To implement multiple tokens (E.g., any valid token can read but create/update/delete are restricted to a privileged token):
```ts
const app = new Hono()
const readToken = 'read'
const privilegedToken = 'read+write'
const privilegedMethods = ['POST', 'PUT', 'PATCH', 'DELETE']
app.on('GET', '/api/page/*', async (c, next) => {
// List of valid tokens
const bearer = bearerAuth({ token: [readToken, privilegedToken] })
return bearer(c, next)
})
app.on(privilegedMethods, '/api/page/*', async (c, next) => {
// Single valid privileged token
const bearer = bearerAuth({ token: privilegedToken })
return bearer(c, next)
})
// Define handlers for GET, POST, etc.
```
If you want to verify the value of the token yourself, specify the `verifyToken` option; returning `true` means it is accepted.
```ts
const app = new Hono()
app.use(
'/auth-verify-token/*',
bearerAuth({
verifyToken: async (token, c) => {
return token === 'dynamic-token'
},
})
)
```
## Options
### token: `string` | `string[]`
The string to validate the incoming bearer token against.
### realm: `string`
The domain name of the realm, as part of the returned WWW-Authenticate challenge header. The default is `""`.
See more: https://developer.mozilla.org/en-US/docs/Web/HTTP/Headers/WWW-Authenticate#directives
### prefix: `string`
The prefix (or known as `schema`) for the Authorization header value. The default is `"Bearer"`.
### headerName: `string`
The header name. The default value is `Authorization`.
### hashFunction: `Function`
A function to handle hashing for safe comparison of authentication tokens.
### verifyToken: `(token: string, c: Context) => boolean | Promise`
The function to verify the token.
### noAuthenticationHeader: `object`
Customizes the error response when the request does not have an authentication header.
- `wwwAuthenticateHeader`: `string | object | MessageFunction` - Customizes the WWW-Authenticate header value.
- `message`: `string | object | MessageFunction` - The custom message for the response body.
`MessageFunction` is `(c: Context) => string | object | Promise`.
### invalidAuthenticationHeader: `object`
Customizes the error response when the authentication header format is invalid.
- `wwwAuthenticateHeader`: `string | object | MessageFunction` - Customizes the WWW-Authenticate header value.
- `message`: `string | object | MessageFunction` - The custom message for the response body.
### invalidToken: `object`
Customizes the error response when the token is invalid.
- `wwwAuthenticateHeader`: `string | object | MessageFunction` - Customizes the WWW-Authenticate header value.
- `message`: `string | object | MessageFunction` - The custom message for the response body.
# Trailing Slash Middleware
This middleware handles Trailing Slash in the URL on a GET request.
`appendTrailingSlash` redirects the URL to which it added the Trailing Slash if the content was not found. Also, `trimTrailingSlash` will remove the Trailing Slash.
## Import
```ts
import { Hono } from 'hono'
import {
appendTrailingSlash,
trimTrailingSlash,
} from 'hono/trailing-slash'
```
## Usage
Example of redirecting a GET request of `/about/me` to `/about/me/`.
```ts
import { Hono } from 'hono'
import { appendTrailingSlash } from 'hono/trailing-slash'
const app = new Hono({ strict: true })
app.use(appendTrailingSlash())
app.get('/about/me/', (c) => c.text('With Trailing Slash'))
```
Example of redirecting a GET request of `/about/me/` to `/about/me`.
```ts
import { Hono } from 'hono'
import { trimTrailingSlash } from 'hono/trailing-slash'
const app = new Hono({ strict: true })
app.use(trimTrailingSlash())
app.get('/about/me', (c) => c.text('Without Trailing Slash'))
```
## Options
### alwaysRedirect: `boolean`
By default, trailing slash middleware only redirects when the response status is `404`. When `alwaysRedirect` is set to `true`, the middleware redirects before executing handlers. This is useful for wildcard routes (`*`) where the default behavior doesn't work.
```ts
const app = new Hono()
app.use(trimTrailingSlash({ alwaysRedirect: true }))
app.get('/my-path/*', (c) => c.text('Wildcard route'))
```
This option is available for both `trimTrailingSlash` and `appendTrailingSlash`.
### skip: `(path: string) => boolean`
A function that determines whether the redirect should be skipped based on the request path. If the function returns `true`, the redirect will be skipped. This is useful when you want to exclude certain paths, such as those with file extensions, from being redirected.
```ts
app.use(
appendTrailingSlash({
skip: (path) => /\.\w+$/.test(path),
})
)
```
This option is available for both `trimTrailingSlash` and `appendTrailingSlash`.
## Note
It will be enabled when the request method is `GET` and the response status is `404`.
# IP Restriction Middleware
IP Restriction Middleware is middleware that limits access to resources based on the IP address of the user.
## Import
```ts
import { Hono } from 'hono'
import { ipRestriction } from 'hono/ip-restriction'
```
## Usage
For your application running on Bun, if you want to allow access only from local, you can write it as follows. Specify the rules you want to deny in the `denyList` and the rules you want to allow in the `allowList`.
```ts
import { Hono } from 'hono'
import { getConnInfo } from 'hono/bun'
import { ipRestriction } from 'hono/ip-restriction'
const app = new Hono()
app.use(
'*',
ipRestriction(getConnInfo, {
denyList: [],
allowList: ['127.0.0.1', '::1'],
})
)
app.get('/', (c) => c.text('Hello Hono!'))
```
Pass the `getConninfo` from the [ConnInfo helper](/docs/helpers/conninfo) appropriate for your environment as the first argument of `ipRestriction`. For example, for Deno, it would look like this:
```ts
import { getConnInfo } from 'hono/deno'
import { ipRestriction } from 'hono/ip-restriction'
//...
app.use(
'*',
ipRestriction(getConnInfo, {
// ...
})
)
```
## Rules
Follow the instructions below for writing rules.
### IPv4
- `192.168.2.0` - Static IP Address
- `192.168.2.0/24` - CIDR Notation
- `*` - ALL Addresses
### IPv6
- `::1` - Static IP Address
- `::1/10` - CIDR Notation
- `*` - ALL Addresses
## Error handling
To customize the error, return a `Response` in the third argument.
```ts
app.use(
'*',
ipRestriction(
getConnInfo,
{
denyList: ['192.168.2.0/24'],
},
async (remote, c) => {
return c.text(`Blocking access from ${remote.addr}`, 403)
}
)
)
```
# Context Storage Middleware
The Context Storage Middleware stores the Hono `Context` in the `AsyncLocalStorage`, to make it globally accessible.
::: info
**Note** This middleware uses `AsyncLocalStorage`. The runtime should support it.
**Cloudflare Workers**: To enable `AsyncLocalStorage`, add the [`nodejs_compat` or `nodejs_als` flag](https://developers.cloudflare.com/workers/configuration/compatibility-dates/#nodejs-compatibility-flag) to your `wrangler.toml` file.
:::
## Import
```ts
import { Hono } from 'hono'
import {
contextStorage,
getContext,
tryGetContext,
} from 'hono/context-storage'
```
## Usage
The `getContext()` will return the current Context object if the `contextStorage()` is applied as a middleware.
```ts
type Env = {
Variables: {
message: string
}
}
const app = new Hono()
app.use(contextStorage())
app.use(async (c, next) => {
c.set('message', 'Hello!')
await next()
})
// You can access the variable outside the handler.
const getMessage = () => {
return getContext().var.message
}
app.get('/', (c) => {
return c.text(getMessage())
})
```
On Cloudflare Workers, you can access the bindings outside the handler.
```ts
type Env = {
Bindings: {
KV: KVNamespace
}
}
const app = new Hono()
app.use(contextStorage())
const setKV = (value: string) => {
return getContext().env.KV.put('key', value)
}
```
## tryGetContext
`tryGetContext()` works like `getContext()`, but returns `undefined` instead of throwing an error when the context is not available:
```ts
const context = tryGetContext()
if (context) {
// Context is available
console.log(context.var.message)
}
```
# JWK Auth Middleware
The JWK Auth Middleware authenticates requests by verifying tokens using JWK (JSON Web Key). It checks for an `Authorization` header and other configured sources, such as cookies, if specified. It validates tokens using the provided `keys`, retrieves keys from `jwks_uri` if specified, and supports token extraction from cookies if the `cookie` option is set.
## What this middleware validates
For each token, `jwk()`:
- Parses and validates the JWT header format.
- Requires a `kid` header and finds a matching key by `kid`.
- Rejects symmetric algorithms (`HS256`, `HS384`, `HS512`).
- Requires the header `alg` to be included in the configured `alg` allowlist.
- If a matched JWK has an `alg` field, requires it to match the JWT header `alg`.
- Verifies the token signature with the matched key.
- By default, validates time-based claims: `nbf`, `exp`, and `iat`.
Optional claim validation can be configured with the `verification` option:
- `iss`: validates issuer when provided.
- `aud`: validates audience when provided.
If you need additional token checks beyond the above (for example, custom application-level authorization rules), add them in your own middleware after `jwk()`.
:::info
The Authorization header sent from the client must have a specified scheme.
Example: `Bearer my.token.value` or `Basic my.token.value`
:::
## Import
```ts
import { Hono } from 'hono'
import { jwk } from 'hono/jwk'
import { verifyWithJwks } from 'hono/jwt'
```
## Usage
```ts
const app = new Hono()
app.use(
'/auth/*',
jwk({
jwks_uri: `https://${backendServer}/.well-known/jwks.json`,
alg: ['RS256'],
})
)
app.get('/auth/page', (c) => {
return c.text('You are authorized')
})
```
Get payload:
```ts
const app = new Hono()
app.use(
'/auth/*',
jwk({
jwks_uri: `https://${backendServer}/.well-known/jwks.json`,
alg: ['RS256'],
})
)
app.get('/auth/page', (c) => {
const payload = c.get('jwtPayload')
return c.json(payload) // eg: { "sub": "1234567890", "name": "John Doe", "iat": 1516239022 }
})
```
Anonymous access:
```ts
const app = new Hono()
app.use(
'/auth/*',
jwk({
jwks_uri: (c) =>
`https://${c.env.authServer}/.well-known/jwks.json`,
alg: ['RS256'],
allow_anon: true,
})
)
app.get('/auth/page', (c) => {
const payload = c.get('jwtPayload')
return c.json(payload ?? { message: 'hello anon' })
})
```
## Using `verifyWithJwks` outside of middleware
The `verifyWithJwks` utility function can be used to verify JWT tokens outside of Hono's middleware context, such as in SvelteKit SSR pages or other server-side environments:
```ts
const id_payload = await verifyWithJwks(
id_token,
{
jwks_uri: 'https://your-auth-server/.well-known/jwks.json',
allowedAlgorithms: ['RS256'],
},
{
cf: { cacheEverything: true, cacheTtl: 3600 },
}
)
```
## Configuring JWKS fetch request options
To configure how JWKS is retrieved from `jwks_uri`, pass fetch request options as the second argument of `jwk()`.
This argument is `RequestInit` and is used only for the JWKS fetch request.
```ts
const app = new Hono()
app.use(
'/auth/*',
jwk(
{
jwks_uri: `https://${backendServer}/.well-known/jwks.json`,
alg: ['RS256'],
},
{
headers: {
Authorization: 'Bearer TOKEN',
},
}
)
)
```
## Options
### alg: `AsymmetricAlgorithm[]`
An array of allowed asymmetric algorithms used for token verification.
Available types are `RS256` | `RS384` | `RS512` | `PS256` | `PS384` | `PS512` | `ES256` | `ES384` | `ES512` | `EdDSA`.
### keys: `HonoJsonWebKey[] | (c: Context) => Promise`
The values of your public keys, or a function that returns them. The function receives the Context object.
### jwks_uri: `string` | `(c: Context) => Promise`
If this value is set, attempt to fetch JWKs from this URI, expecting a JSON response with `keys`, which are added to the provided `keys` option. You can also pass a callback function to dynamically determine the JWKS URI using the Context.
### allow_anon: `boolean`
If this value is set to `true`, requests without a valid token will be allowed to pass through the middleware. Use `c.get('jwtPayload')` to check if the request is authenticated. The default is `false`.
### cookie: `string`
If this value is set, then the value is retrieved from the cookie header using that value as a key, which is then validated as a token.
### headerName: `string`
The name of the header to look for the JWT token. The default is `Authorization`.
### verification: `VerifyOptions`
Configure claim validation behavior in addition to signature verification:
- `iss`: expected issuer.
- `aud`: expected audience.
- `exp`, `nbf`, `iat`: enabled by default, can be disabled if needed.
# Secure Headers Middleware
Secure Headers Middleware simplifies the setup of security headers. Inspired in part by the capabilities of Helmet, it allows you to control the activation and deactivation of specific security headers.
## Import
```ts
import { Hono } from 'hono'
import { secureHeaders } from 'hono/secure-headers'
```
## Usage
You can use the optimal settings by default.
```ts
const app = new Hono()
app.use(secureHeaders())
```
You can suppress unnecessary headers by setting them to false.
```ts
const app = new Hono()
app.use(
'*',
secureHeaders({
xFrameOptions: false,
xXssProtection: false,
})
)
```
You can override default header values using a string.
```ts
const app = new Hono()
app.use(
'*',
secureHeaders({
strictTransportSecurity:
'max-age=63072000; includeSubDomains; preload',
xFrameOptions: 'DENY',
xXssProtection: '1',
})
)
```
## Supported Options
Each option corresponds to the following Header Key-Value pairs.
| Option | Header | Value | Default |
| ------------------------------- | ---------------------------------------------------------------------------------------------------------------------------------------------- | -------------------------------------------------------------------------- | ---------- |
| - | X-Powered-By | (Delete Header) | True |
| contentSecurityPolicy | [Content-Security-Policy](https://developer.mozilla.org/en-US/docs/Web/HTTP/CSP) | Usage: [Setting Content-Security-Policy](#setting-content-security-policy) | No Setting |
| contentSecurityPolicyReportOnly | [Content-Security-Policy-Report-Only](https://developer.mozilla.org/en-US/docs/Web/HTTP/Headers/Content-Security-Policy-Report-Only) | Usage: [Setting Content-Security-Policy](#setting-content-security-policy) | No Setting |
| trustedTypes | [Trusted Types](https://developer.mozilla.org/en-US/docs/Web/HTTP/Headers/Content-Security-Policy/trusted-types) | Usage: [Setting Content-Security-Policy](#setting-content-security-policy) | No Setting |
| requireTrustedTypesFor | [Require Trusted Types For](https://developer.mozilla.org/en-US/docs/Web/HTTP/Headers/Content-Security-Policy/require-trusted-types-for) | Usage: [Setting Content-Security-Policy](#setting-content-security-policy) | No Setting |
| crossOriginEmbedderPolicy | [Cross-Origin-Embedder-Policy](https://developer.mozilla.org/en-US/docs/Web/HTTP/Headers/Cross-Origin-Embedder-Policy) | require-corp | **False** |
| crossOriginResourcePolicy | [Cross-Origin-Resource-Policy](https://developer.mozilla.org/en-US/docs/Web/HTTP/Headers/Cross-Origin-Resource-Policy) | same-origin | True |
| crossOriginOpenerPolicy | [Cross-Origin-Opener-Policy](https://developer.mozilla.org/en-US/docs/Web/HTTP/Headers/Cross-Origin-Opener-Policy) | same-origin | True |
| originAgentCluster | [Origin-Agent-Cluster](https://developer.mozilla.org/en-US/docs/Web/HTTP/Headers/Origin-Agent-Cluster) | ?1 | True |
| referrerPolicy | [Referrer-Policy](https://developer.mozilla.org/en-US/docs/Web/HTTP/Headers/Referrer-Policy) | no-referrer | True |
| reportingEndpoints | [Reporting-Endpoints](https://www.w3.org/TR/reporting-1/#header) | Usage: [Setting Content-Security-Policy](#setting-content-security-policy) | No Setting |
| reportTo | [Report-To](https://developer.mozilla.org/en-US/docs/Web/HTTP/Headers/Content-Security-Policy/report-to) | Usage: [Setting Content-Security-Policy](#setting-content-security-policy) | No Setting |
| strictTransportSecurity | [Strict-Transport-Security](https://developer.mozilla.org/en-US/docs/Web/HTTP/Headers/Strict-Transport-Security) | max-age=15552000; includeSubDomains | True |
| xContentTypeOptions | [X-Content-Type-Options](https://developer.mozilla.org/en-US/docs/Web/HTTP/Headers/X-Content-Type-Options) | nosniff | True |
| xDnsPrefetchControl | [X-DNS-Prefetch-Control](https://developer.mozilla.org/en-US/docs/Web/HTTP/Headers/X-DNS-Prefetch-Control) | off | True |
| xDownloadOptions | [X-Download-Options](https://learn.microsoft.com/en-us/archive/blogs/ie/ie8-security-part-v-comprehensive-protection#mime-handling-force-save) | noopen | True |
| xFrameOptions | [X-Frame-Options](https://developer.mozilla.org/en-US/docs/Web/HTTP/Headers/X-Frame-Options) | SAMEORIGIN | True |
| xPermittedCrossDomainPolicies | [X-Permitted-Cross-Domain-Policies](https://developer.mozilla.org/en-US/docs/Web/HTTP/Headers/X-Permitted-Cross-Domain-Policies) | none | True |
| xXssProtection | [X-XSS-Protection](https://developer.mozilla.org/en-US/docs/Web/HTTP/Headers/X-XSS-Protection) | 0 | True |
| permissionPolicy | [Permissions-Policy](https://developer.mozilla.org/en-US/docs/Web/HTTP/Headers/Permissions-Policy) | Usage: [Setting Permission-Policy](#setting-permission-policy) | No Setting |
## Middleware Conflict
Please be cautious about the order of specification when dealing with middleware that manipulates the same header.
In this case, Secure-headers operates and the `x-powered-by` is removed:
```ts
const app = new Hono()
app.use(secureHeaders())
app.use(poweredBy())
```
In this case, Powered-By operates and the `x-powered-by` is added:
```ts
const app = new Hono()
app.use(poweredBy())
app.use(secureHeaders())
```
## Setting Content-Security-Policy
```ts
const app = new Hono()
app.use(
'/test',
secureHeaders({
reportingEndpoints: [
{
name: 'endpoint-1',
url: 'https://example.com/reports',
},
],
// -- or alternatively
// reportTo: [
// {
// group: 'endpoint-1',
// max_age: 10886400,
// endpoints: [{ url: 'https://example.com/reports' }],
// },
// ],
contentSecurityPolicy: {
defaultSrc: ["'self'"],
baseUri: ["'self'"],
childSrc: ["'self'"],
connectSrc: ["'self'"],
fontSrc: ["'self'", 'https:', 'data:'],
formAction: ["'self'"],
frameAncestors: ["'self'"],
frameSrc: ["'self'"],
imgSrc: ["'self'", 'data:'],
manifestSrc: ["'self'"],
mediaSrc: ["'self'"],
objectSrc: ["'none'"],
reportTo: 'endpoint-1',
reportUri: '/csp-report',
sandbox: ['allow-same-origin', 'allow-scripts'],
scriptSrc: ["'self'"],
scriptSrcAttr: ["'none'"],
scriptSrcElem: ["'self'"],
styleSrc: ["'self'", 'https:', "'unsafe-inline'"],
styleSrcAttr: ['none'],
styleSrcElem: ["'self'", 'https:', "'unsafe-inline'"],
upgradeInsecureRequests: [],
workerSrc: ["'self'"],
},
})
)
```
### `nonce` attribute
You can add a [`nonce` attribute](https://developer.mozilla.org/en-US/docs/Web/HTML/Global_attributes/nonce) to a `script` or `style` element by adding the `NONCE` imported from `hono/secure-headers` to a `scriptSrc` or `styleSrc`:
```tsx
import { secureHeaders, NONCE } from 'hono/secure-headers'
import type { SecureHeadersVariables } from 'hono/secure-headers'
// Specify the variable types to infer the `c.get('secureHeadersNonce')`:
type Variables = SecureHeadersVariables
const app = new Hono<{ Variables: Variables }>()
// Set the pre-defined nonce value to `scriptSrc`:
app.get(
'*',
secureHeaders({
contentSecurityPolicy: {
scriptSrc: [NONCE, 'https://allowed1.example.com'],
},
})
)
// Get the value from `c.get('secureHeadersNonce')`:
app.get('/', (c) => {
return c.html(
{/** contents */}
)
})
```
If you want to generate the nonce value yourself, you can also specify a function as the following:
```tsx
const app = new Hono<{
Variables: { myNonce: string }
}>()
const myNonceGenerator: ContentSecurityPolicyOptionHandler = (c) => {
// This function is called on every request.
const nonce = Math.random().toString(36).slice(2)
c.set('myNonce', nonce)
return `'nonce-${nonce}'`
}
app.get(
'*',
secureHeaders({
contentSecurityPolicy: {
scriptSrc: [myNonceGenerator, 'https://allowed1.example.com'],
},
})
)
app.get('/', (c) => {
return c.html(
{/** contents */}
)
})
```
## Setting Permission-Policy
The Permission-Policy header allows you to control which features and APIs can be used in the browser. Here's an example of how to set it:
```ts
const app = new Hono()
app.use(
'*',
secureHeaders({
permissionsPolicy: {
fullscreen: ['self'], // fullscreen=(self)
bluetooth: ['none'], // bluetooth=(none)
payment: ['self', 'https://example.com'], // payment=(self "https://example.com")
syncXhr: [], // sync-xhr=()
camera: false, // camera=none
microphone: true, // microphone=*
geolocation: ['*'], // geolocation=*
usb: ['self', 'https://a.example.com', 'https://b.example.com'], // usb=(self "https://a.example.com" "https://b.example.com")
accelerometer: ['https://*.example.com'], // accelerometer=("https://*.example.com")
gyroscope: ['src'], // gyroscope=(src)
magnetometer: [
'https://a.example.com',
'https://b.example.com',
], // magnetometer=("https://a.example.com" "https://b.example.com")
},
})
)
```
# Method Override Middleware
This middleware executes the handler of the specified method, which is different from the actual method of the request, depending on the value of the form, header, or query, and returns its response.
## Import
```ts
import { Hono } from 'hono'
import { methodOverride } from 'hono/method-override'
```
## Usage
```ts
const app = new Hono()
// If no options are specified, the value of `_method` in the form,
// e.g. DELETE, is used as the method.
app.use('/posts', methodOverride({ app }))
app.delete('/posts', (c) => {
// ....
})
```
## For example
Since HTML forms cannot send a DELETE method, you can put the value `DELETE` in the property named `_method` and send it. And the handler for `app.delete()` will be executed.
The HTML form:
```html
```
The application:
```ts
import { methodOverride } from 'hono/method-override'
const app = new Hono()
app.use('/posts', methodOverride({ app }))
app.delete('/posts', () => {
// ...
})
```
You can change the default values or use the header value and query value:
```ts
app.use('/posts', methodOverride({ app, form: '_custom_name' }))
app.use(
'/posts',
methodOverride({ app, header: 'X-METHOD-OVERRIDE' })
)
app.use('/posts', methodOverride({ app, query: '_method' }))
```
## Options
### app: `Hono`
The instance of `Hono` is used in your application.
### form: `string`
Form key with a value containing the method name.
The default is `_method`.
### header: `boolean`
Header name with a value containing the method name.
### query: `boolean`
Query parameter key with a value containing the method name.
# ETag Middleware
Using this middleware, you can add ETag headers easily.
## Import
```ts
import { Hono } from 'hono'
import { etag } from 'hono/etag'
```
## Usage
```ts
const app = new Hono()
app.use('/etag/*', etag())
app.get('/etag/abc', (c) => {
return c.text('Hono is cool')
})
```
## The retained headers
The 304 Response must include the headers that would have been sent in an equivalent 200 OK response. The default headers are Cache-Control, Content-Location, Date, ETag, Expires, and Vary.
If you want to add the header that is sent, you can use `retainedHeaders` option and `RETAINED_304_HEADERS` strings array variable that includes the default headers:
```ts
import { etag, RETAINED_304_HEADERS } from 'hono/etag'
// ...
app.use(
'/etag/*',
etag({
retainedHeaders: ['x-message', ...RETAINED_304_HEADERS],
})
)
```
## Options
### weak: `boolean`
Define using or not using a [weak validation](https://developer.mozilla.org/en-US/docs/Web/HTTP/Conditional_requests#weak_validation). If `true` is set, then `w/` is added to the prefix of the value. The default is `false`.
### retainedHeaders: `string[]`
The headers that you want to retain in the 304 Response.
### generateDigest: `(body: Uint8Array) => ArrayBuffer | Promise`
A custom digest generation function. By default, it uses `SHA-1`. This function is called with the response body as a `Uint8Array` and should return a hash as an `ArrayBuffer` or a Promise of one.
# Helpers
Helpers are available to assist in developing your application. Unlike middleware, they don't act as handlers, but rather provide useful functions.
For instance, here's how to use the [Cookie helper](/docs/helpers/cookie):
```ts
import { getCookie, setCookie } from 'hono/cookie'
const app = new Hono()
app.get('/cookie', (c) => {
const yummyCookie = getCookie(c, 'yummy_cookie')
// ...
setCookie(c, 'delicious_cookie', 'macha')
//
})
```
## Available Helpers
- [Accepts](/docs/helpers/accepts)
- [Adapter](/docs/helpers/adapter)
- [Cookie](/docs/helpers/cookie)
- [css](/docs/helpers/css)
- [Dev](/docs/helpers/dev)
- [Factory](/docs/helpers/factory)
- [html](/docs/helpers/html)
- [JWT](/docs/helpers/jwt)
- [SSG](/docs/helpers/ssg)
- [Streaming](/docs/helpers/streaming)
- [Testing](/docs/helpers/testing)
- [WebSocket](/docs/helpers/websocket)
# JSX
You can write HTML with JSX syntax with `hono/jsx`.
Although `hono/jsx` works on the client, you will probably use it most often when rendering content on the server side. Here are some things related to JSX that are common to both server and client.
## Settings
To use JSX, modify the `tsconfig.json`:
`tsconfig.json`:
```json
{
"compilerOptions": {
"jsx": "react-jsx",
"jsxImportSource": "hono/jsx"
}
}
```
Alternatively, use the pragma directives:
```ts
/** @jsx jsx */
/** @jsxImportSource hono/jsx */
```
For Deno, you have to modify the `deno.json` instead of the `tsconfig.json`:
```json
{
"compilerOptions": {
"jsx": "precompile",
"jsxImportSource": "@hono/hono/jsx"
}
}
```
## Usage
:::info
If you are coming straight from the [Quick Start](/docs/#quick-start), the main file has a `.ts` extension - you need to change it to `.tsx` - otherwise you will not be able to run the application at all. You should additionally modify the `package.json` (or `deno.json` if you are using Deno) to reflect that change (e.g. instead of having `bun run --hot src/index.ts` in dev script, you should have `bun run --hot src/index.tsx`).
:::
`index.tsx`:
```tsx
import { Hono } from 'hono'
import type { FC } from 'hono/jsx'
const app = new Hono()
const Layout: FC = (props) => {
return (
{props.children}
)
}
const Top: FC<{ messages: string[] }> = (props: {
messages: string[]
}) => {
return (
Hello Hono!
{props.messages.map((message) => {
return
{message}!!
})}
)
}
app.get('/', (c) => {
const messages = ['Good Morning', 'Good Evening', 'Good Night']
return c.html()
})
export default app
```
## Metadata hoisting
You can write document metadata tags such as ``, `<link>`, and `<meta>` directly inside your components. These tags will be automatically hoisted to the `<head>` section of the document. This is especially useful when the `<head>` element is rendered far from the component that determines the appropriate metadata.
```tsx
import { Hono } from 'hono'
const app = new Hono()
app.use('*', async (c, next) => {
c.setRenderer((content) => {
return c.html(
<html>
<head></head>
<body>{content}</body>
</html>
)
})
await next()
})
app.get('/about', (c) => {
return c.render(
<>
<title>About Page
about page content
)
})
export default app
```
:::info
When hoisting occurs, existing elements are not removed. Elements appearing later are added to the end. For example, if you have `Default` in your `` and a component renders `Page Title`, both titles will appear in the head.
:::
## Fragment
Use Fragment to group multiple elements without adding extra nodes:
```tsx
import { Fragment } from 'hono/jsx'
const List = () => (
first child
second child
third child
)
```
Or you can write it with `<>` if it sets up properly.
```tsx
const List = () => (
<>
first child
second child
third child
)
```
## `PropsWithChildren`
You can use `PropsWithChildren` to correctly infer a child element in a function component.
```tsx
import { PropsWithChildren } from 'hono/jsx'
type Post = {
id: number
title: string
}
function Component({ title, children }: PropsWithChildren) {
return (
{title}
{children}
)
}
```
## Inserting Raw HTML
To directly insert HTML, use `dangerouslySetInnerHTML`:
```tsx
app.get('/foo', (c) => {
const inner = { __html: 'JSX · SSR' }
const Div =
})
```
## Memoization
Optimize your components by memoizing computed strings using `memo`:
```tsx
import { memo } from 'hono/jsx'
const Header = memo(() => Welcome to Hono)
const Footer = memo(() => )
const Layout = (
Hono is cool!
)
```
## Context
By using `useContext`, you can share data globally across any level of the Component tree without passing values through props.
```tsx
import type { FC } from 'hono/jsx'
import { createContext, useContext } from 'hono/jsx'
const themes = {
light: {
color: '#000000',
background: '#eeeeee',
},
dark: {
color: '#ffffff',
background: '#222222',
},
}
const ThemeContext = createContext(themes.light)
const Button: FC = () => {
const theme = useContext(ThemeContext)
return
}
const Toolbar: FC = () => {
return (
)
}
// ...
app.get('/', (c) => {
return c.html(
)
})
```
## Async Component
`hono/jsx` supports an Async Component, so you can use `async`/`await` in your component.
If you render it with `c.html()`, it will await automatically.
```tsx
const AsyncComponent = async () => {
await new Promise((r) => setTimeout(r, 1000)) // sleep 1s
return
Done!
}
app.get('/', (c) => {
return c.html(
)
})
```
## Suspense
The React-like `Suspense` feature is available.
If you wrap the async component with `Suspense`, the content in the fallback will be rendered first, and once the Promise is resolved, the awaited content will be displayed.
You can use it with `renderToReadableStream()`.
```tsx
import { renderToReadableStream, Suspense } from 'hono/jsx/streaming'
//...
app.get('/', (c) => {
const stream = renderToReadableStream(
loading...}>
)
return c.body(stream, {
headers: {
'Content-Type': 'text/html; charset=UTF-8',
'Transfer-Encoding': 'chunked',
},
})
})
```
## ErrorBoundary
You can catch errors in child components using `ErrorBoundary`.
In the example below, it will show the content specified in `fallback` if an error occurs.
```tsx
function SyncComponent() {
throw new Error('Error')
return
Hello
}
app.get('/sync', async (c) => {
return c.html(
Out of Service}>
)
})
```
`ErrorBoundary` can also be used with async components and `Suspense`.
```tsx
async function AsyncComponent() {
await new Promise((resolve) => setTimeout(resolve, 2000))
throw new Error('Error')
return
Hello
}
app.get('/with-suspense', async (c) => {
return c.html(
Out of Service}>
Loading...}>
)
})
```
## StreamingContext
You can use `StreamingContext` to provide configuration for streaming components like `Suspense` and `ErrorBoundary`. This is useful for adding nonce values to script tags generated by these components for Content Security Policy (CSP).
```tsx
import { Suspense, StreamingContext } from 'hono/jsx/streaming'
// ...
app.get('/', (c) => {
const stream = renderToReadableStream(
Loading...}>
)
return c.body(stream, {
headers: {
'Content-Type': 'text/html; charset=UTF-8',
'Transfer-Encoding': 'chunked',
'Content-Security-Policy':
"script-src 'nonce-random-nonce-value'",
},
})
})
```
The `scriptNonce` value will be automatically added to any `